Although Linux Mint runs out-of-the-box mostly as a charm, there are always things that need to be done or can be done to optimize your system and improve your user experience and pleasure even more. In this article, as part of my Linux Mint tutorial series, I will give you my personal favorite and in my opinion, 21 best things to do immediately after installing Linux Mint.
Content
- Change to nearby update servers
- Update your operating system
- Install the newest microcode
- Check and install drivers
- Install multimedia codecs
- Set up Timeshift for backup and recovery of your system files
- Determine a backup strategy for your personal files
- Improve the use of internal memory
- Set up a firewall
- Improve battery life
- Set up Redshift
- Install basic software
- Remove unwanted applications
- Set up additional users and parental control
- Install additional fonts
- Install Stacer to optimize and monitor your system
- Install and set up Flatseal
- Install and set up Ulauncher
- Install and set up a clipboard manager
- Optimize screen real estate with fractional scaling
- Speed up application launch times with Preload
Article information
- Linux Mint 21.3 Cinnamon
Introduction
As part of my Linux Mint tutorial series for beginners, I think it is important to help you set up a well-considered starting point after you finish the basic installation of Linux Mint. In this article, I will share with you the, in my opinion, 21 best things you can do and should consider after you finish the installation of Linux Mint. The first version of this article, I published somewhere in 2018, so 5 years ago, in which I had a list of only 15 things to do. It is nice to see that my initial list still holds strong, but that in the years I valued some extra improvements and additions, which I included in this updated article.
These additions, changes, updates, and improvements, will help you set up a great initial implementation for your operating system to enjoy in your Linux journey. Think about things like changing to nearby update servers for improved performance, setting up backup and recovery solutions for your system files and your personal files, improving the battery life of your laptop, and improving how the system is using your internal memory. So let’s start.
1) Change to nearby update servers
In the standard installation of Linux Mint the Main and Base mirrors, which are the starting point for retrieving your software updates, are probably not the closest to your location and not the fastest option for your specific situation. To change to a more nearby update server to improve update performance you can do the following:
1) Launch the Update Manager by clicking on the Update Manager icon on the panel or by searching for Update Manager in the Applications menu.
2) Select the menu option Edit.
3) Select Software Sources and provide the admin password.
The Software Sources screen will appear:
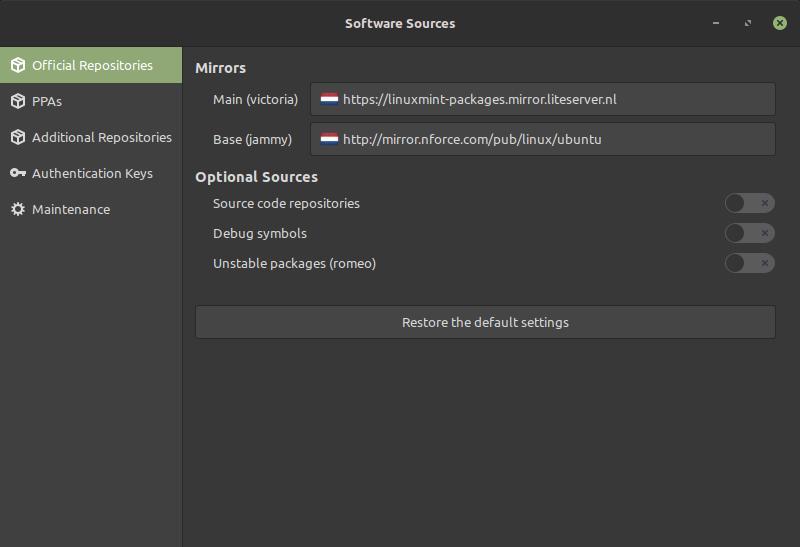
4) Click on the current server location of Main (victoria).
Now the Select a mirror screen will be opened and all available servers will be checked for their specific speed.
5) In the Select a mirror screen click on the Speed column to order from high to low.
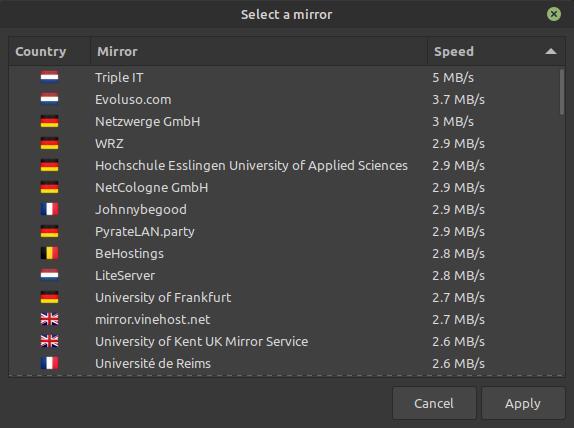
6) Select if possible a mirror in your country or the one that is nearby. If another one is even faster, just choose the fastest one. Click on Apply.
7) Repeat steps 4, 5, and 6 for the server location of Base (jammy).
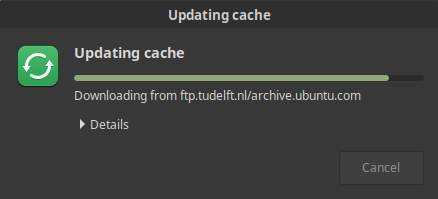
8) When the Software Sources screen shows the messages to update your APT cache, click on OK.
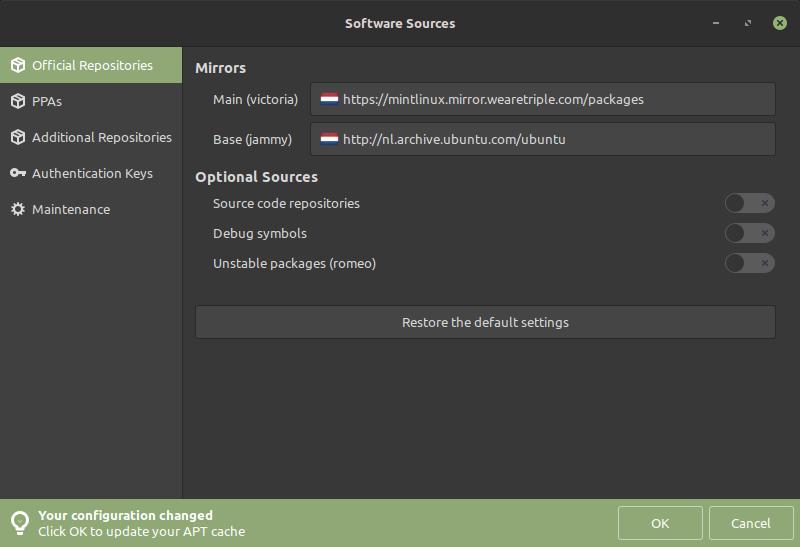
Now the cache will be updated.
9) After the cache update is finished close the Software Sources screen.
2) Update your operating system
After we change to a nearby server for optimal download results we should update our package index files and upgrade to install the newest versions of all packages to start with the most up-to-date foundation. Then we know for sure we install the most recent available software. Keep in mind that an update should always be performed before an upgrade.
1) Open a terminal session with the keyboard combination Ctrl + Alt + T.
An update is required to synchronize the package index files.
2) Type or copy and paste the below command and hit enter.
sudo apt-get updateAn upgrade is required to install the latest versions of all packages currently installed on your system
3) Type or copy and paste the below command and hit enter.
sudo apt-get upgradeNow you will get the message “Do you want to continue? [Y/n]”.
4) Type “Y” and give enter.
Note: The capital Y in [Y/n] indicates that you also can just hit enter directly because Y is the default.
3) Install the newest microcode
Maybe you remember the commotion some years ago surrounding the problems found in a lot of processors, also called the Meltdown and Specter vulnerabilities. Processors can contain design errors, and motherboards can deliver incorrect microcode to the processor. UEFI updates and BIOS updates for your motherboard may include a new microcode for processors. It is a good idea to check regularly whether the supplier of your motherboard has released new updates so that you can implement them in your motherboard. But maybe no recent updates are available for your motherboard. Then it is wise to install the latest microcode within Linux, which is then loaded at every start. It won’t improve the performance of your processor, but it will fix bugs, if applicable, and it might enable new features, depending on the type of processor.
To install the latest microcode via Linux Mint you do the following:
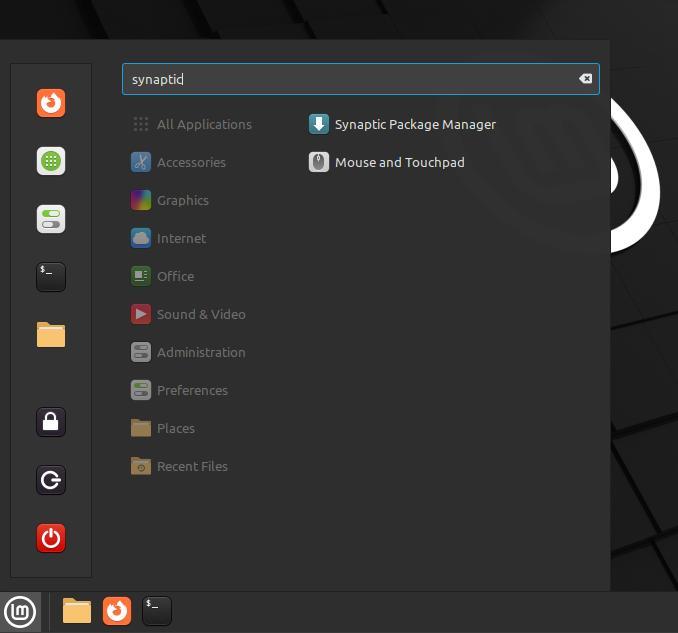
1) Go to Menu and search for Synaptic to start the Synaptic Package Manager.
2) Click on Search.
3) Search for “Microcode”.

It may be, as in the above situation, that the microcode is already loaded (amd64-microcode + intel-microcode). In that case, you do not need to do anything anymore and you close Synaptic Package Manager.
Note: If the BIOS or UEFI update of your motherboard is newer than the Linux microcode, do not install the latter. You probably have to go into your BIOS or UEFI when you start your computer to check the date and check this against Installed version and Latest version in the Synaptic Package Manager like in the above screenshot.
4) If the microcode for your processor (Intel or AMD) is not yet installed, click on the checkbox and mark it for installation.
5) Click on Apply now.
6) Click Apply again in the Summary screen.
7) Close Synaptic Package Manager.
8) Now start your Driver Manager by searching for Driver Manager in your Applications Start Menu search bar.

9) Select your microcode option and click Apply Changes.
10) Reboot your computer to effectuate the changes.
Now you can check if the microcode is indeed active by the following steps:
11) Start a Terminal session with Ctrl + Alt + T.
12) Type or copy and paste the below command and hit enter.
dmesg | grep microcode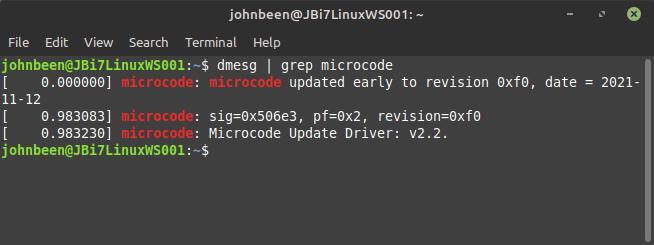
Here we can see that the microcode is active.
4) Check and install drivers
The modern Linux distributions have out-of-the-box terrific support for most of the available hardware components, like graphics cards, printers, and Wi-Fi adapters. But it is always possible that the setup procedure doesn’t come up directly with the correct or most optimized drivers. So you should check and, if necessary, adapt your drivers for devices and hardware components like your Wi-Fi adapter, graphics card, and Printer. You can read my articles “How to install graphics drivers in Linux Mint“, “How to install WiFi drivers in Linux Mint” and “How to setup your printer in Linux Mint” for more detailed information on the actual setup.
“How to install graphics drivers in Linux Mint“
5) Install multimedia codecs
Some content requires additional multimedia codecs to be installed. A codec is a piece of software that enables the encoding or decoding of a digital data stream or signal. Codecs for playing multimedia formats are not activated in Linux Mint by default. When you were connected to the internet while installing Linux Mint there was an option to install these codecs. If you did so you can forget this part of this article. If you didn’t select it during the installation process you can get support for the extra codecs by installing them now.
1) Search for “Software Manager” in your Applications Start Menu and open it.
2) Search for “Codecs” and select Multimedia Codecs.
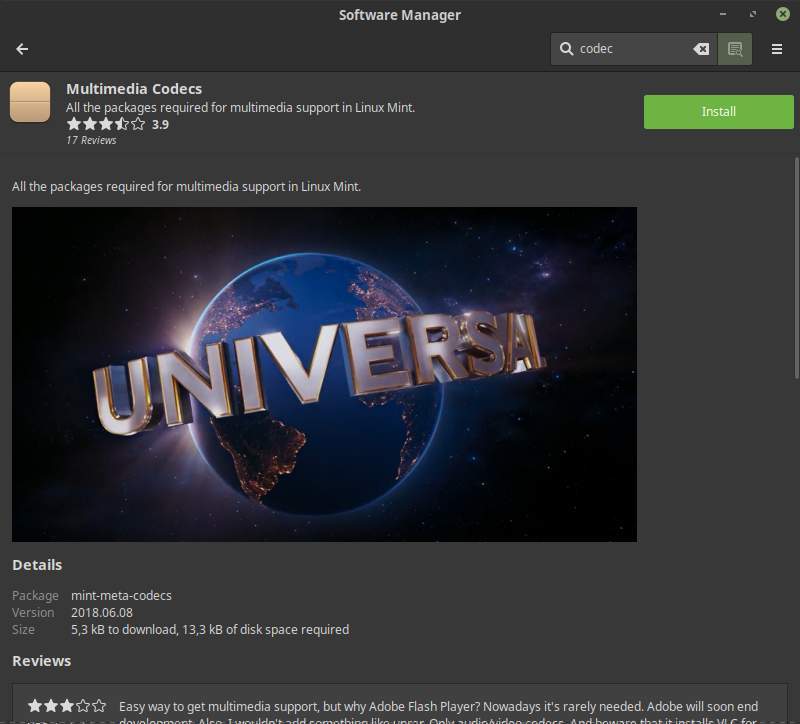
3) Click Install.
6) Set up Timeshift for backup and recovery of your system files
There are two types of people in the world, those who have already had a hard drive crash and those who will get one soon. Maybe a little bit exaggerated, but the question is not if your storage device will break down, but when it will happen. Every storage device like a hard drive or SSD device has a limited lifespan and the moment it stops working is always at an unexpected and undesirable moment. But the risks are not only about crashes, as they also involve flooding, fire, and lightning strikes, but also just wrong human actions and decisions. So we need to be aware of those situations and act on them by setting up a good backup implementation. From version 19, Linux Mint offers the application Timeshift as the standard tool to back up and restore your system files. Read my article “How to use Timeshift to backup and restore Linux Mint” for further details.
7) Determine a backup strategy for your personal files
As already explained in the previous item, the question is not if your storage device will break down, but when it will happen. There I focused mainly on backup and recovery of your system files, but your personal files are probably far more important. So a solid backup strategy is extremely important. In my article “How to design your perfect backup strategy for Linux” you can read about the globally known 3-2-1 backup concept. This strategy is even embraced by governments worldwide, so it will also be sufficient for us as simple souls. The 3-2-1 strategy simply means that you save at least 3 versions of your files, of which 2 are stored locally (on site) but on different media and 1 version in a location out of the reach of your computer and local versions (offsite).
After you read the above article, it is time to set up and use backup software for your personal files. In my articles “How to easily create backups in Linux with Pika Backup“, “luckyBackup is a powerful backup solution for linux” and “Cronopete backup software for Linux is a good alternative to Apple Time Machine” you can read about some great alternatives and how to set them up.
“How to easily create backups in Linux with Pika Backup“
“luckyBackup is a powerful backup solution for linux”
“Cronopete backup software for Linux is a good alternative to Apple Time Machine”
8) Improve the use of internal memory
Linux Mint is configured in such a way that if your memory usage reaches a certain percentage of the internal memory in your machine, it is starting to use what we call the swap. The swap is a technique to use a special swap partition or swap file as additional working memory. But using swap is much slower than your internal memory so it should be used only when really required. The default value of the swap is 60 which means that the swap comes into operation when 40% of the RAM is in use. This standard turning point of 60 is in my opinion a bit early, especially if you have only 2 or 4 GB of internal memory. My advice is to bring this value down to 10, which means that the swap comes into operation when 90% of the RAM is in use. This can be adjusted by defining the swappiness in the sysctl.conf.
1) Open a terminal session with the keyboard combination Ctrl + Alt + T.
2) Type or copy and paste the below command and hit enter.
sudo xed /etc/sysctl.confAn editor will be opened with elevated privileges. Here we can edit the sysctl.conf file.
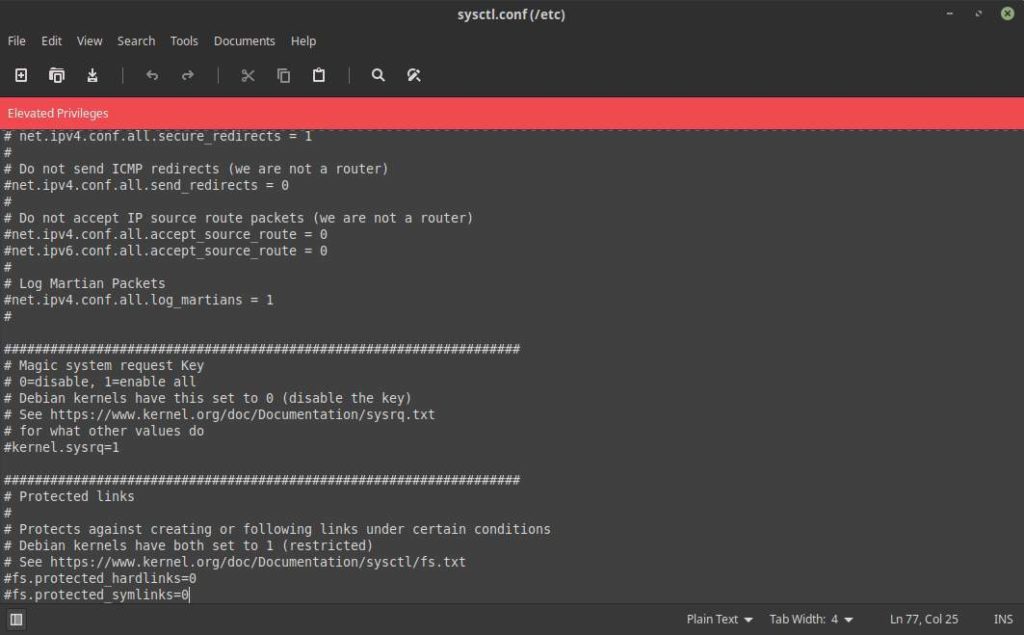
3) Go to the last line in the file and hit enter to start a new line.
4) Type the following:
vm.swappiness=105) Save the file and close the file.
6) Reboot your computer.
When the computer is up and running again you can check the new configuration by doing the following:
7) Open a terminal session with the keyboard combination Ctrl + Alt + T.
8) Type or copy and paste the below and hit enter.
cat /proc/sys/vm/swappiness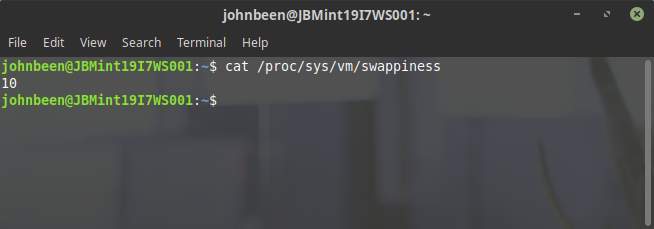
Here you can see that the swappiness value is indeed 10 now, which means that your system will use up to 90% of your internal memory before switching over to a swap file. This should keep your system more responsive when using heavier workloads.
9) Setup a firewall
Setting up the firewall in Linux Mint is childishly simple.
1) Search for “Firewall” in your Applications Start Menu.
2) Start Firewall Configuration.
The following screen will appear.
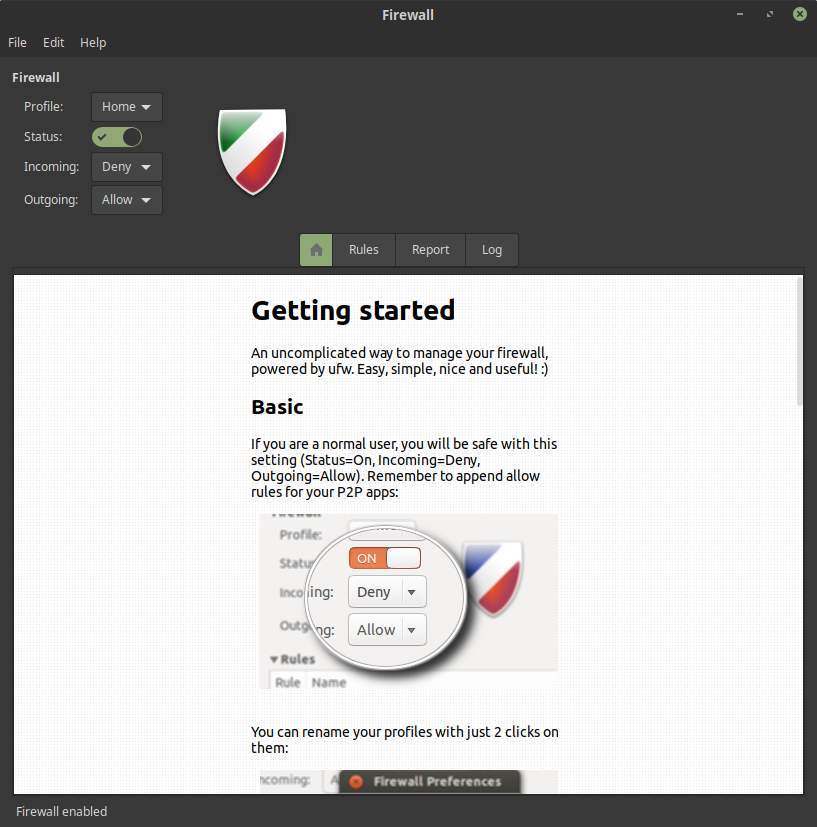
3) Make sure that you have the following settings:
Status = On
Incoming = Deny
Outgoing = Allow
10) Improve battery life
Out-of-the-box Linux Mint is not optimized for working on a laptop. On a desktop, you don’t need to improve battery life, but on your laptop, you should pay some attention to power consumption. Until now it was never possible to squeeze as many hours out of your laptop with Linux when compared to macOS and Windows, but things are getting better and better. You can use the program TLP, which offers a good configuration out of the box for improved power management and improved battery life on your laptop.
1) Start a terminal session via the keyboard combination Ctrl + Alt + T.
2) Add the TLP Package Repository to your package sources with the following commands:
sudo add-apt-repository ppa:linrunner/tlpsudo apt-get update3) Install the packages tlp, tlp-rdw, tp-smapi-dkms and acpi-call-dkms via the following command:
sudo apt-get install tlp tlp-rdwThinkPads require an additional command:
sudo apt-get install tp-smapi-dkms acpi-call-dkmsIf you want more details of everything TLP has to offer, please have a look at my article “How to improve battery life on Linux laptops with TLP“.
11) Setup Redshift to prevent negative effects of blue light emission
For a while now, we read and heard more and more about the dangers of looking too long at displays, like computer screens, mobile phones, and tablets. Displays of computers and mobile devices emit significant amounts of blue light. Under certain circumstances and with long-term exposure there are some concerns about possible long-term effects on the health of your eyes. Linux Mint uses a simple but effective application called Redshift to prevent such effects, as it reduces the emission of blue light and also schedules this for the most important moments of the day. Read my article “How to change default color temperature values of Redshift at startup” to set up Redshift.
“How to change default color temperature values of Redshift at startup“
12) Install basic software
Linux is great, but in the end, it is all about the applications you can run on it to be productive, creative, etc. We are all different and so are our needs, but there are probably some basic applications that should be part of your setup. Use for example my article “A yearly review – My 40 most favorite apps for Linux for 2023“. or my article “What are the best alternatives to Adobe products for Linux” to get inspired.
“A yearly review – My 40 most favorite apps for Linux for 2023“
“What are the best alternatives to Adobe products for Linux“
13) Remove unwanted applications
Linux Mint comes standard with many applications installed out-of-the-box, but you probably don’t need them all. If you are a tidy person like me, then you may need to feel the urge to remove these unused applications.
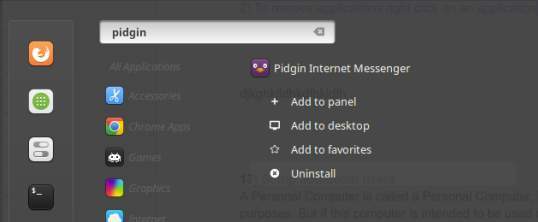
1) Open your Applications Menu and use the application categories or All Applications to browse through your currently installed applications. Look for applications that you won’t need. If you don’t use a scanner you can remove Simple Scan. If you don’t use chat networks you can remove Pidgin. But have a good consideration before removing applications.
2) To remove applications right-click on an application and choose Uninstall.
14) Set up additional users and parental control
A Personal Computer is called a Personal Computer, because it is mostly used for personal purposes. But if this computer is intended to be used as a family computer you probably want to set it up with multiple users. And if there are children in your house you may want to think about parental control options as well to arrange some restrictions for your children, such as the times at which they can use the Linux family computer or their own Linux computer, the length of the time they can use it and most likely you want the limit their rights to do administrative tasks.
In my article “How to setup Parental Control in Linux Mint” you can read more about how to disable the standard guest account, create accounts for children without administrator rights, determine when the children are allowed to use their computer, limit the applications you want your kids being able to use and limit the type of websites that the children are allowed to access.
15) Install additional fonts
After you installed Linux Mint a large number of fonts are already available and ready to use. But some fonts can be considered as a global standard, like Arial and Times New Roman. These fonts are not standard available in Linux Mint, so if you receive documents based on these kinds of fonts, an alternative font will be used. So why not add these fonts to prevent this kind of conversion?
1) Search for the Software Manager by typing “software” in the search bar of your Applications Start Menu.
2) Start Software Manager.
3) Search for “mscorefonts”.
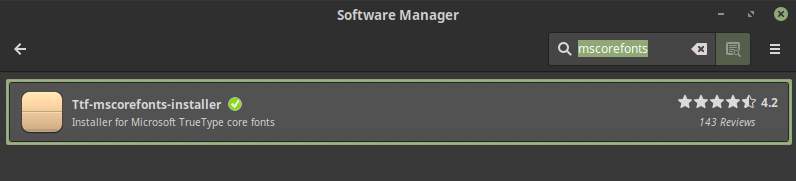
4) Select this entry and click on Install.
16) Install Stacer to optimize and monitor your system
Making clutter is easier than cleaning up clutter. Making a mess happens naturally to many people, but cleaning up the mess requires a bit of discipline. This works better for one person than for another, so if there is some help out there that makes the job easier, that would be a great gift for a lot of us. Because I try out many applications and settings as a basis for writing my blogs, the chance of digital contamination of my Linux system is very high. At a certain moment, you no longer know what you have and have not installed and whether you have removed everything you no longer need correctly and completely. In addition, I also need to see how my system is performing after a period of intensive use. One of the applications for Linux that we can use in this process is Stacer. In my opinion, Stacer is the most user-friendly system optimizing and monitoring tool for Linux and fits in the user-oriented Zorin OS distribution.
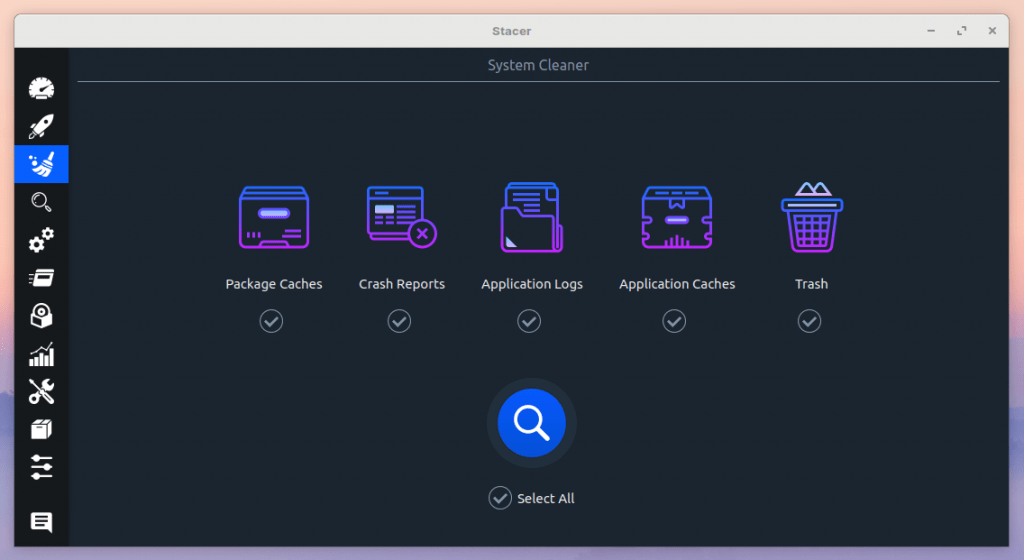
Stacer is an application heavily based on a graphical user interface that offers an extensive set of both cleaning and system monitoring functionalities for the Linux user. By using an accessible and beautiful user interface, Stacer wants to make the process of cleaning and monitoring easier for the average user. But also the experienced user can easily make it part of a Linux-based workflow.
Over time, after the initial installation of your Linux operating system, you build up lots of files without sometimes knowing what their actual goal is of being there and some of them are even not visible without actually looking for them. With Stacer, you can find these files easily and helps you out in safely removing them. Stacer is also a tool that helps you graphically monitor your system processes and offers tools to manipulate different aspects of your system.
You can read my article “Stacer is the best system optimizing and monitoring tool for Linux” to learn more about the installation, setup, and usage of Stacer.
“Stacer is the best system optimizing and monitoring tool for Linux”
17) Install and set up Flatseal
Just like for Windows and macOS, there are also specific application formats available for Linux to install an application. And technically they all work a little differently, but all aim to make it possible for you as a user to install your favorite applications. For example, for Windows, we know the EXE format, and for macOS the DMG format. For Linux, we know different formats, such as DEB, RPM, AppImage, Snap, and Flatpak. Modern application users are more and more used to both their desktop and mobile applications receiving regular updates, automatically or otherwise, with improved security and improved functionality. As a result, a format like Flatpak seems to be becoming increasingly popular at the expense of the classic .deb format. Users will sometimes find that when they use a Flatpak application, they are unable to access their data on an external drive, for example from RawTherapee or darktable. This initial limitation has to do with the sandbox nature of the Flatpak format and the standard lack of permissions. But the Flatseal app for Linux can help to solve that, and much more.
Read more about Flatseal in my article “How to use Flatseal to modify and review Flatpak permissions in Linux“.
“How to use Flatseal to modify and review Flatpak permissions in Linux“
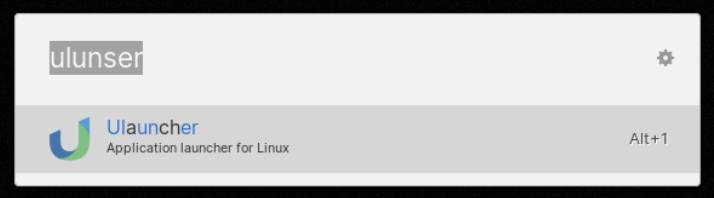
18) Install and set up Ulauncher
While the various Linux distributions allow you to neatly organize your applications into categories so that you can easily find and launch them later, there are much faster and more effective methods and tools available to launch your applications. But also starting a web browser and entering your search criteria for a search on the internet can sometimes be done in a much faster and more effective way. Many actions that often require several steps can be performed better and faster with Ulauncher. In my article “How Ulauncher can give you superpowers in Linux“, you will get an in-depth look at how Ulauncher can give you superpowers in Linux.
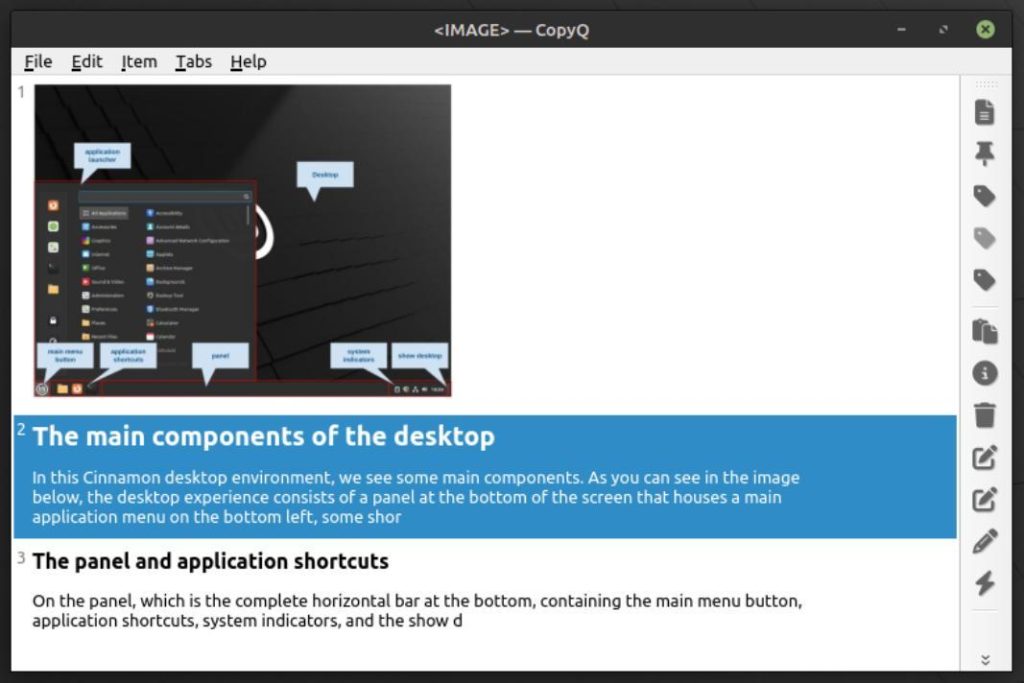
19) Install and set up a clipboard manager
If you use your Linux system productively, then you probably do a lot of copy-and-paste actions during your day. Out-of-the-box Linux Mint remembers just one item you copied. I prefer to have a stack available of my most recent copied items, which gives me the flexibility to undo mistakes, reuse copied items, etc. To make this possible there are a lot of dedicated clipboard managers available for Linux. I use CopyQ, a small nifty application that is conveniently placed in the system indicators area of my panel.
To install CopyQ, just open your Software Manager and search for CopyQ. Here you will find the Flatpak version to install. After installation, a small icon of scissors is visible in your panel.
20) Optimize screen real estate with fractional scaling
With the high-resolution screens on modern laptops, you can have a very nice and sharp user interface. But the problem can be that after installing your Linux distribution, everything looks too small to be usable for some of us. The out-of-the-box experience was intended for larger desktop screens, but current laptops with HiDPI screens, due to high resolutions in a relatively small format, will make components like text and icons, too small. The solution is fractional scaling.
1) In Linux Mint go to System Settings.
Here you will see a Scale section, with standard values like 100%, 200%, etc.
2) From there search for Display.
3) Select the Settings tab and change “Enable fractional scaling controls (experimental)”.
4) Go back to the Layout tab to see
Now you see scaling options, like 125%, 150%, 175%, etc.
For a lot of people, the standard 100% scaling on a 13-inch 1920 x 1080 is not comfortable to read and use, but 125% is. of course, everyone has their preferences, so try this option yourself until you find the right scaling for you.
21) Speed up application launch times with Preload
You probably have seen that some applications start slower than others. There are many reasons for this behavior, like the size of the application and the package type. If you want to have a faster start-up time for your favorite apps it can be wise to start these apps from memory and not from disk. Of course, every application must start initially from disk, but what if you can preload these applications before you choose to start them? When already in memory you will see a significant speed bump when starting your apps. To do this you can install the application Preload.
Preload is what they call in technical terms a daemon. This daemon is active in the background of all your processes. Preload is a nifty application that becomes better after a while because it monitors what apps you use most. Based on that behavior Preload expects that you will use these apps also more than others in the future. Based on that knowledge and assumption, it chooses to bring some apps already into memory for you. This should have a noticeable improvement for start-up time.
Installation of Preload is simple. Open your Terminal with the keyboard combination Ctrl + Alt + T and type or copy the below command into it:
sudo apt-get install preloadNow power off your system and start it up again. From now on Preload runs in the background monitoring your application behavior.
22) Use your system
22 ??? I thought the title of this blog post was “21 best things to do after installing Linux Mint”?
Yeah, you are right, but there is one thing that is probably obvious, but often forgotten. In my opinion, you should focus on actually using your nice new Linux Mint system instead of doing too much tinkering. I understand the need to just play with your system and change it to your liking, but we all lose so much time playing around, while the whole idea is to use our system for content creation and consumption. So don’t lose yourself in distro hopping and over-customization and just use your system to create beautiful, important, or world-changing stuff.
Have fun!
About the free Linux Mint tutorial series
Through several short Linux beginner tutorials, I want to offer a simple starter guide for those who have never done anything with Linux Mint and do not know exactly where to start and where to find the necessary information. In an accessible way, it guides you through among others the principles of Linux, finding and downloading a Linux distribution, creating a live medium, finding software, installing software, executing updates, and making sure your internal and external devices work properly. This article is part of my Linux Mint tutorial series. You can find an overview of the complete tutorial series via the link below:
Have a look at my latest book on Linux, in Paperback or Kindle format.
For more info on my book click here.
When you want to buy the book click on the image below.
If you appreciate what I do on this website…,