Making backups of both your system files and your personal files is extremely important. Thinking about a good backup strategy is of fundamental significance. Many people still think that problems with their important data will pass them by, but it’s probably only a matter of time before you too have to deal with a failed hard drive, corrupt data, accidentally deleted photo files, or even a ransom attack. There are different degrees to arrange your backups. In this article, we look at the simplest basics and see how to easily create backups of your personal files in Linux with Pika Backup.
Content of this article
- About the importance of a backup
- The 3-2-1 backup strategy
- Backup of system files vs personal files
- What is Pika Backup
- How to download and install Pika Backup
- How to use Pika Backup
- How to restore a backup
About the importance of a backup
Before I dive directly into Pika Backup, I first want to give some background on the importance of backups, backup strategies, and backup approaches.
Still, many people have stored all their data only on the internal storage of their laptop or desktop computer and do not seem to have arranged some kind of a proper backup strategy. In the event of a crash of this storage device, fire, or theft, they lose, among other things, their valuable photos and documents. This event is of course terrible for your private data, but imagine that the same thing happens in your professional life. Think about it. You can imagine the enormous impact when a wedding photographer loses all the photo files of a wedding session of the day before. Loss of these files will never be restored, resulting in an irreparable relationship between you and your customer. That is why a well-considered backup strategy is of vital importance for yourself and, if applicable, for your customers.
The 3-2-1 backup strategy
A simple but generic implementable backup strategy is the globally well-known 3-2-1 backup strategy. This strategy is even embraced by large companies and governments worldwide, so it will also be sufficient for us as simple human beings. What does the 3-2-1 strategy mean?
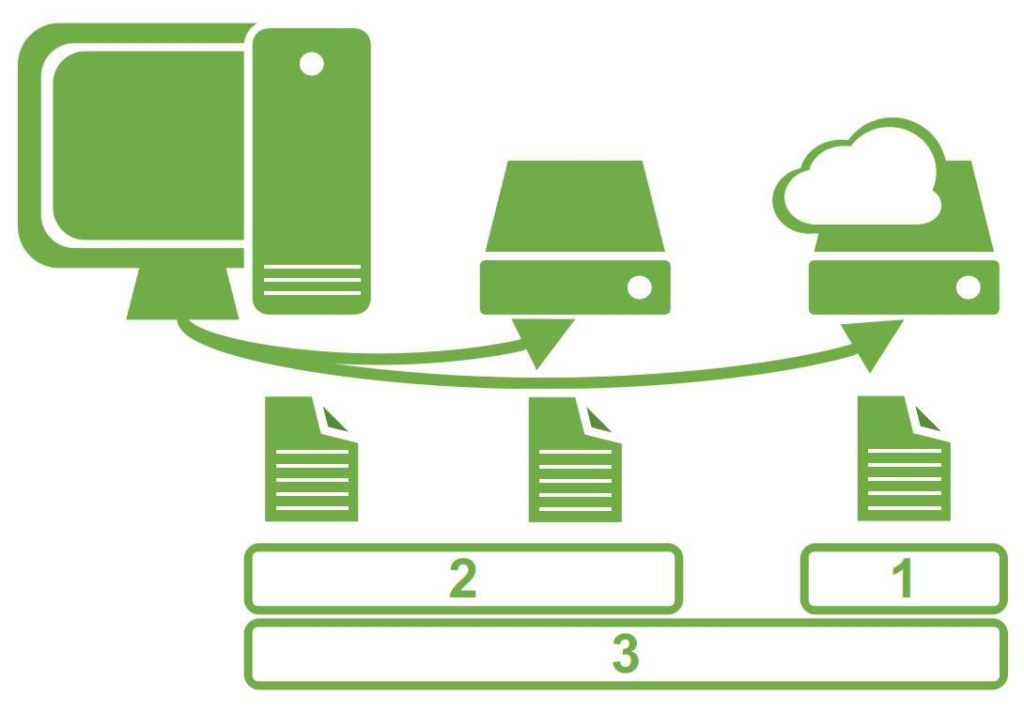
The 3-2-1 strategy simply means that you save at least 3 versions of all your data, of which 2 are stored locally (on site) but on different (types of) media and 1 version in a location out of reach (off-site) of your computer and your local versions. An example is:
- A photo file stored on the internal hard disk of your workstation (on site),
- A copy on an external hard disk connected to your workstation (on site) and
- A copy is stored in the cloud, such as Dropbox, Google Drive, or Onedrive (off-site), but this can also be a copy on an extra hard drive that you place at your parents or friend’s place or a NAS in an external location.
In this article, we will focus on creating a backup with Pika Backup on a local external drive.
Backup of system files vs personal files
There is a difference between system files and personal files, and you should handle them differently from a backup perspective. Here is my personal approach. To start with, I like to have my personal data like photos, videos, and material for blog posts (stored on external drives) physically separate from my system files (stored on the internal system drive). So I never organize and store my personal files in the standard Linux folders (Documents, Music, Pictures, etc.) in my Home folder. In this way, my system folders stay as clean as possible and is it always possible to completely wipe my system drive or reinstall my Linux distro, without even worrying about impacting my personal files.
Further, you have to be aware of the impact of recovering a system backup. If your personal data is stored in the before mentioned Home folders and is included in the scope of a system backup and you choose to do a recovery from an older point in time, your personal data from that moment will also be recovered. This means that everything you changed in your documents or created after that backup moment, will be lost.
That is why I prefer to always logically and physically separate my personal files from my system files and also have dedicated backup procedures for my system files and personal files.
You can read much more on my data organization and backup approach in my article “How I set up my data and backup strategy as a Linux user“.
In this article, we will focus on creating a backup of our personal files.
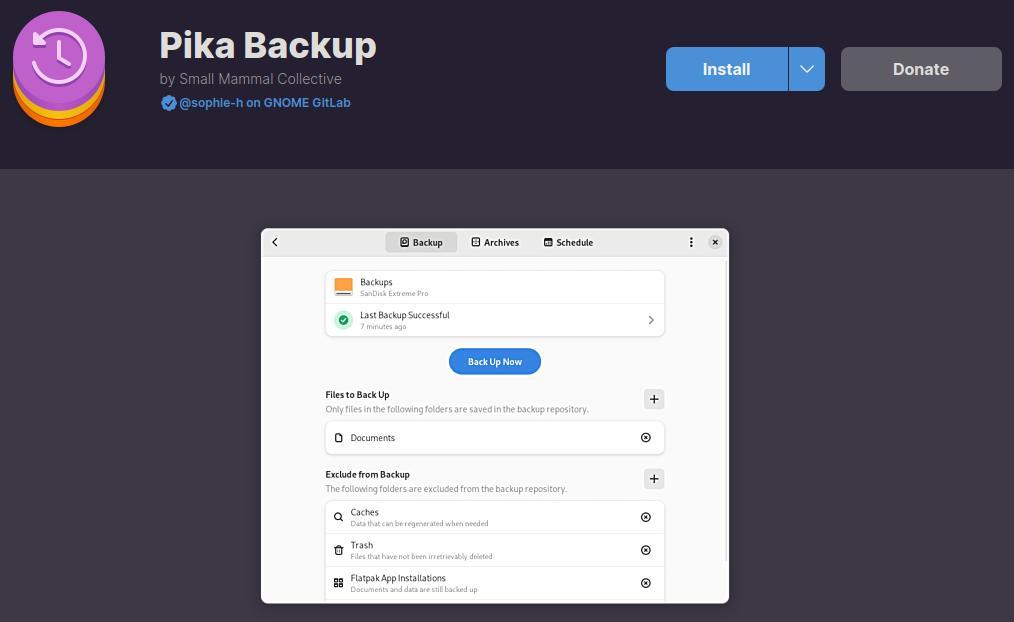
What is Pika Backup
Pika Backup is a backup application that is very simple, and easy to use but is based on a powerful and reliable foundation, called BorgBackup. BorgBackup, or in short Borg, offers what they often call deduplicating technology. This means that this technique is able to analyze your files and only store changes to these files, which makes it very suitable for high-frequency (hourly, daily, etc.) backups. So it doesn’t create full backups each time, which makes this technology faster and uses less storage space on your backup device.
As said, Pika Backup is easy to use. Unlike other backup solutions, Pika Backup has relatively few settings, but enough to reliably back up your personal files and restore them in case of an emergency.
Here are some characteristics of Pika Backup:
- You can organize your backups both locally (like a USB connected drive or a NAS) and remotely (like a cloud service).
- You can determine your own preferred schedule for planned backups.
- As said, because of the deduplication technology, you will save both time and disk space.
- You can decide if you want to encrypt your backups or not.
- Pika Backup does offer a simple recovery solution, so you can browse through the backup archives and through their contents and recover your files or complete folders by just copying and pasting them via your file manager.
Note: Because Pika Backup doesn’t provide full automatic system recovery options, it isn’t suitable for creating backups of your system files. Much better for that purpose is for example Timeshift (read for example my article “How to use Timeshift to backup and restore Linux Mint” for more details on Timeshift).
How to download and install Pika Backup
You can simply download and install PIka Backup via Flathub, or if your Linux distro has built-in Flatpak support, like Linux Mint or Zorin OS, you can search for it via your Software Manager. If your Linux distro doesn’t support Flatpak yet, make sure that you read the required information for the setup process via the link below:
Here you can find explanations on how to set up Flatpak support for many different Linux distributions.
When you have enabled Flatpak support, do the following:
1) Go to https://flathub.org/apps/org.gnome.World.PikaBackup.
2) Click on Install.
3) Go to your Downloads folder, find the “org.gnome.World.PikaBackup.flatpakref” file, and double-click it.
4) Now click on Install to finish the installation process.
How to use Pika Backup
Now that we downloaded and installed the application, let’s have a look at how to easily create backups in Linux with Pika Backup, how to set up backup Schedules, and how to handle Archives.
How to set up and create a backup
1) Search and start Pika Backup.
The first time you start Pika Backup, it looks like this:
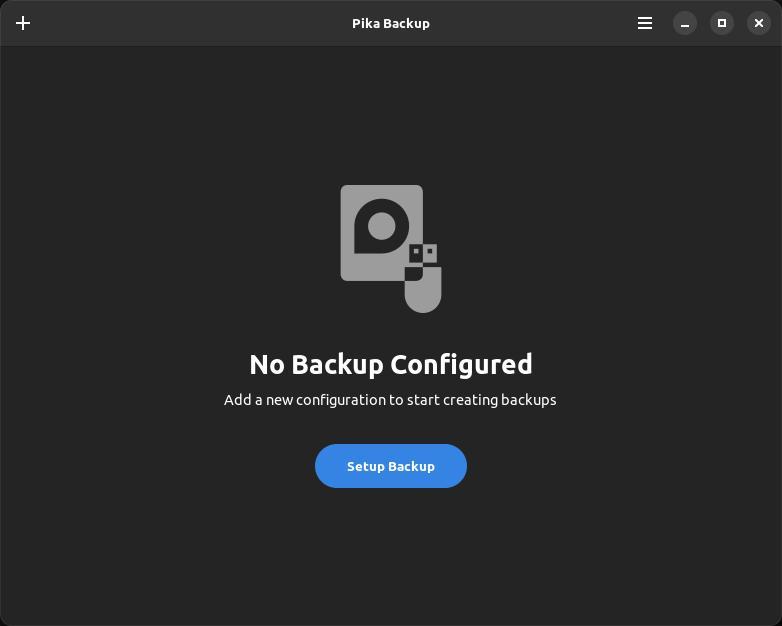
In the right top corner, you see a hamburger menu. This menu gives you access to Keyboard Shortcuts, Help, and About Pika Backup.
2) Click on the plus symbol or the “Setup Backup” button.
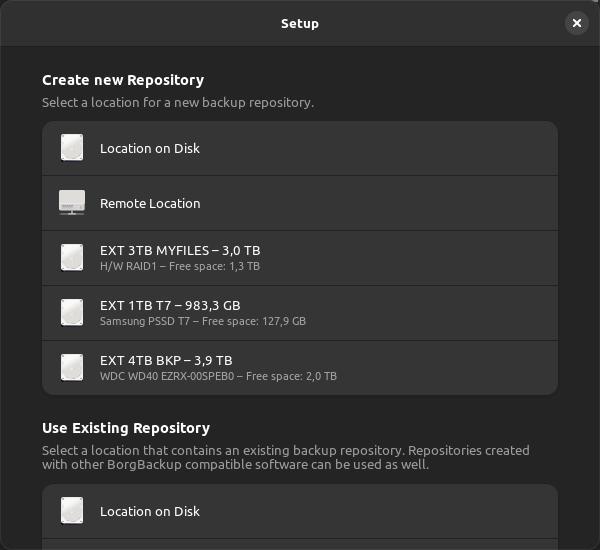
Here you see an overview of options to create a new repository for your backups, and options to select an existing repository. Select an existing repository if you had to reinstall Pika Backup, for example after a crash, or just because you are a distro hopper.
3) Click on “Location on Disk”, or select your external drive directly.

Here you see that a proposed name for your repository is already prefilled (backup + computer name + user name). If you prefer another name, just change it to your liking.
In this screen, you can also decide if you want to encrypt your backup repository. In my example for this article, I create a backup repository on a Samsung T7 Portable SSD, which I always take with me, wherever I am. So I choose encryption because if it gets stolen or if I lose the SSD, other people can’t access my data.
4) Select Encrypted and type your Encryption Password.
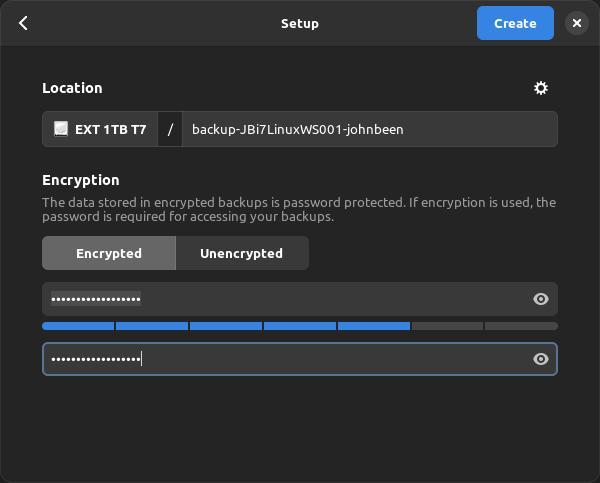
5) Click on “Create”.
After a short while the repository is created and you will see the following screen:
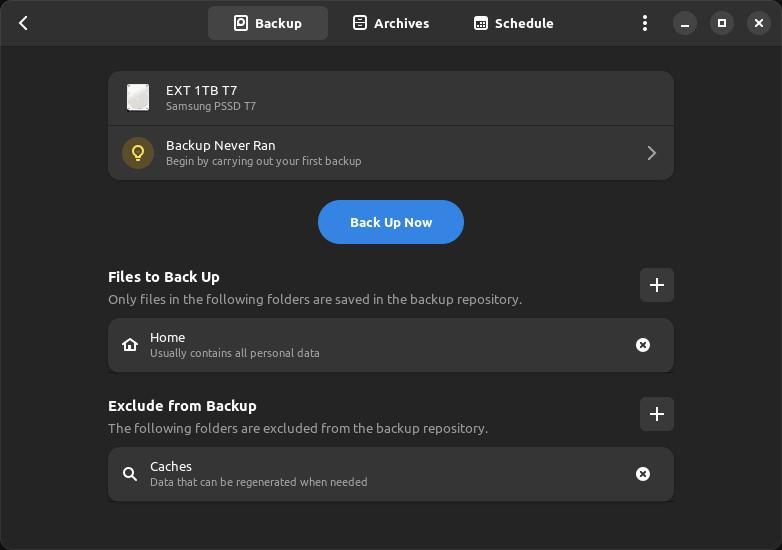
Here you see three main options: Backup, Archives, and Schedule. In the Backup section, you see information that the backup did never run before, a section to select one or more folders that you want to backup, and a section to exclude folders from your backup.
6) Use the plus symbol to add new folders to the list of “Files to Back Up”. Removing existing options can be done by clicking on the “x” symbol.
Your file manager will open and you are now able to select a folder or a complete drive. In my example, I want to include my “2 Personal” folder for backup, as part of my “EXT 3TB MYFILES” external drive. Further, I want to remove the existing “Home” option, because I don’t store any personal data in the standard folders in my Home folder.
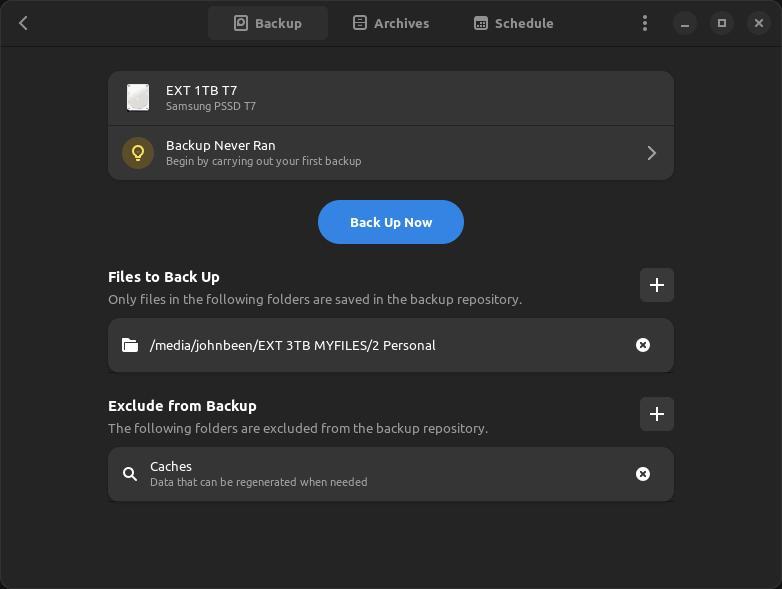
In the “Exclude from Backup” section you have different options that help you to exclude files or folders that you don’t want to be part of your backups.
7) In the “Exclude from Backup” section, click on the plus symbol.
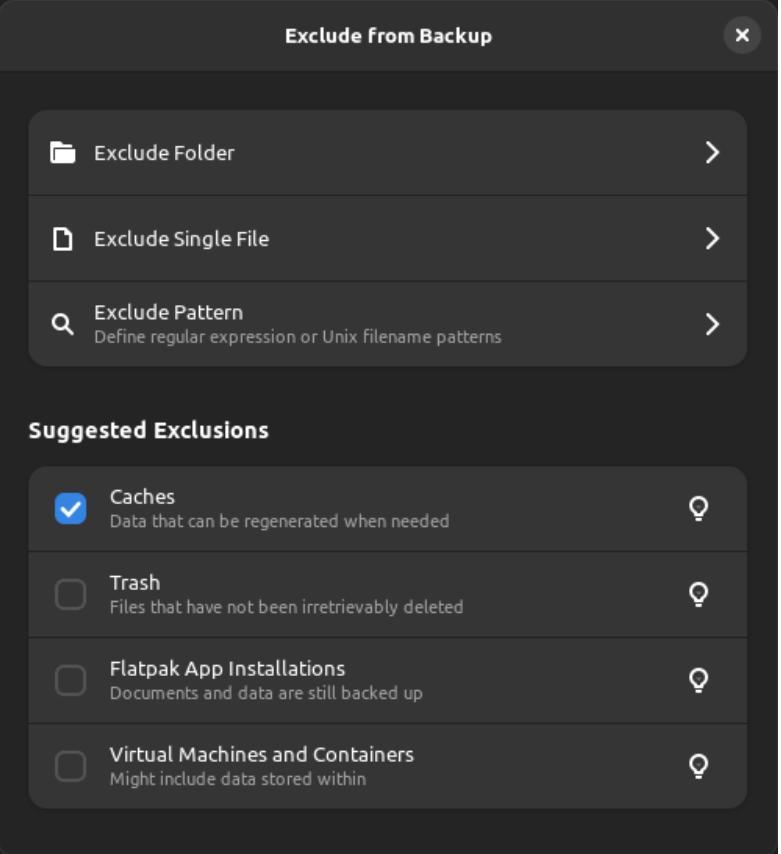
Here you can exclude a folder, a file, or define a pattern. Also, you see some suggested exclusions which you can select and include in your backup. For now, we leave things as they are.
8) Click on “Back Up Now” to start your first backup.
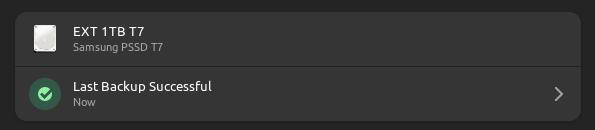
Depending on the size of the backup, you will see after a while that the last backup was successful.
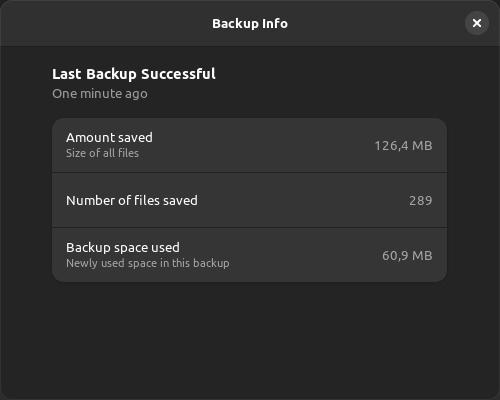
9) Click on the arrow at the right to open the backup information of your last backup.
How to set up a backup Schedule
In Pika Backup it is possible to schedule your backup frequency.
1) Click on Schedule.
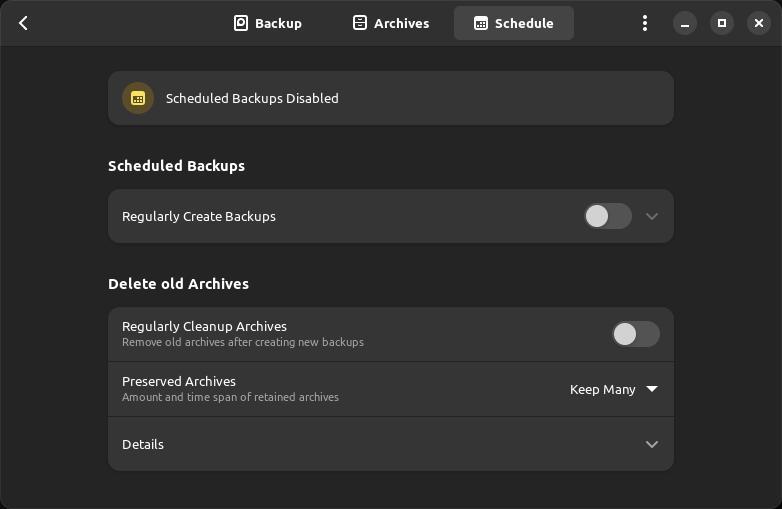
Here we see two main sections, Scheduled Backups and Delete old Archives.
2) Enable the option “Regularly Create Backups”.
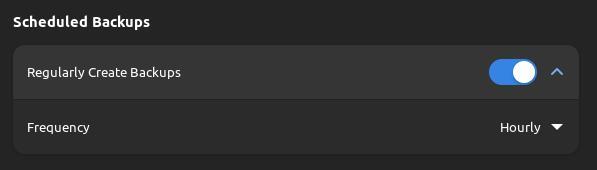
Now you can change the frequency between Hourly, Daily, Weekly, and Monthly. When you select Daily, you can set your Preferred Time. When you select Weekly, you can select your Preferred Weekday. When you select Monthly, you can select your Preferred Day. It depends on your preference which option you want to set.
You can also automatically delete old archives after creating new backups.
3) In the Delete old Archives section, enable Regularly Cleanup Archives.
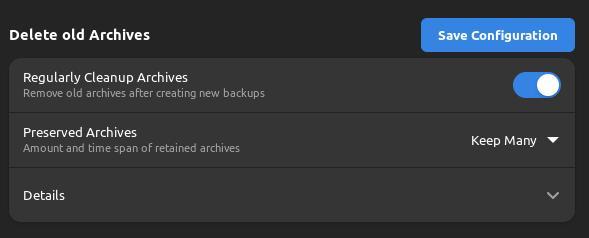
Here we can choose between Keep Many, Keep Some, and Custom. When you select Custom, the Details section opens in which you can customize settings for Keep Hourly, Daily, Weekly, Monthly, and Annual.
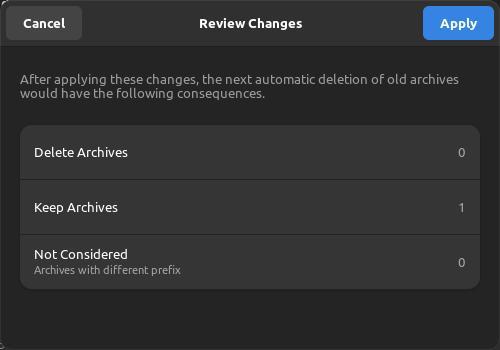
4) Make your preferred changes and click on Save Configuration.
Now you will see a summary of the impact your changes will have.
How to handle Archives
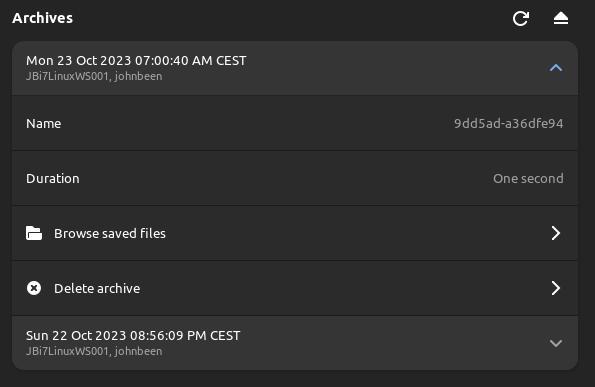
In the Archives section, you can manage your Archives.
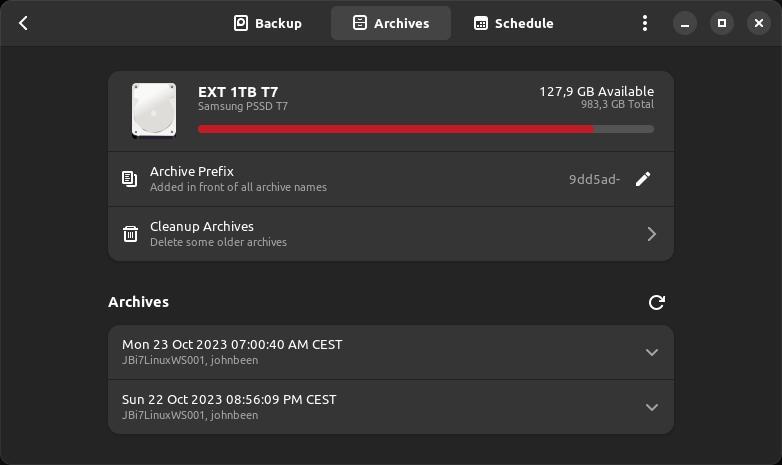
Here you can see how much storage space is left on your backup device, you can change the prefix you want in front of your archive names, and you can manually clean up some older archives. Further, you see a list of your available archives. When you select an archive you see the name of the archive, the amount of time that was required to create this specific archive, and the option to browse saved files and to delete the archive.
How to create a backup of your Home folder
I mentioned before that my preference is to not use the subfolders in my Home folder to store my Music, Pictures, Documents, etc. But if you prefer to do so, you have to keep in mind that directly after installation of a Flatpak-based application like Pika Backup, it can’t access the contents of your Home folder, because of the restricted nature of a Flatpak-based app.
In my article “How to use Flatseal to modify and review Flatpak permissions in Linux” I explain how to use Flatseal to change permissions for a Flatpak app. In Flatseal, go to the Filesystem section and enable “All user files”. Now you can also create a backup of your Home folder.
How to restore a backup
Of course, being able to create backups is nice, but it is more important that you can also restore your data from this backup in case of some data loss, system crash, etc. Pika Backup has no dedicated general restore options, like in some other backup applications, but offers a simple-to-understand approach of opening the archive in your file manager and manually copying the files back to the location that was impacted. I like this simple approach.
1) Click in Pika Backup on Archives and select one of the archives you created, depending on the point in time you want to restore from.
2) Click on Browse saved files.
Now your file manager will automatically open the archive you selected.
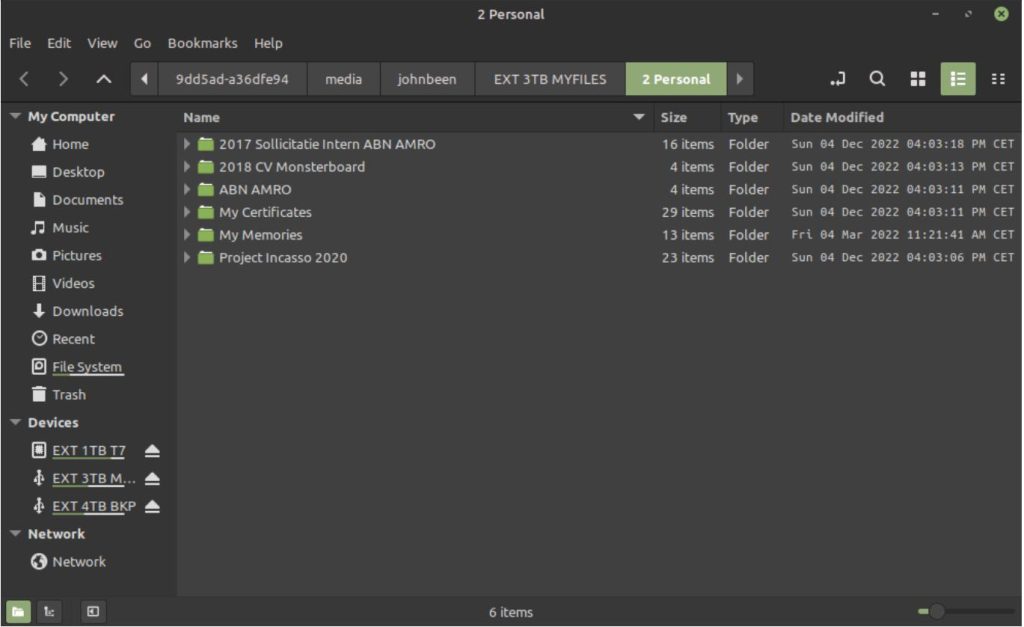
From here you can simply select the main folder, or (one of) the underlying folders, or only individual files in these folders, and copy them to the location that was impacted to restore a previous situation. Very simple and effective recovery procedure.
Final words
As already mentioned, having a backup strategy is important if you value your data. Many people are not sufficiently aware of the lurking dangers that can impact the security and continuity of your data. Even if you do not immediately have a perfect implementation of the 3-2-1 method, even with a simple backup solution like Pika Backup with storage on an external USB drive, you have already taken your first step in securing your important data. When you are away from your main computer, make sure your backup drive is also out of reach of this location. A simple portable USB-connected SSD drive on which you store your backup and which you always carry with you or keep with your family or friends is the first simple step to withstand unexpected unpleasant events. If you have good ideas about backup solutions and backup strategies, I would like to hear your story or your experiences via my contact page.
Have a look at my latest book on Linux, in Paperback or Kindle format.
For more info on my book click here.
When you want to buy the book click on the image below.
If you appreciate what I do on this website…,