I write a lot about applications running on Linux and how to use them productively. From the many responses I receive from my readers, these articles are generally highly appreciated. However, applications do not stand alone. They use data, they also produce data and they exchange data with each other. Data workflow, data organization and data management are subjects that have always fascinated me. But it is also an important topic that I think everyone should think carefully about. You don’t want to know how many people have not implemented a good backup strategy for their important data. Personally, I always like to read articles or watch videos about how other people have arranged their data workflow, because their specific situations are very educational, but also very different and help to think about your own data situation. So, in this article, I will share a behind-the-scenes insight into how I handle my data in my Linux-based workflow, hoping it gets you thinking, gives ideas or perhaps triggers improvements, in your existing workflow. So here is an insight into how I set up my data and backup strategy as a Linux user.
Content of this article
- My background
- How do I organize my data
- Structure of folders
- Naming conventions of files and folders
- Location of my data
- How do I handle my photo and video data
- My photo and video data in the field
- Initial organization of photo and video files
- Photo scoring and selection of photo and video files
- Naming conventions of photo and video folders
- How I keep my data clean and organized
- Find and remove unnecessary files on my system
- Find and remove duplicate files on my system
- Clean up my downloads folder
- Automatically delete my Temporary and Trash files
- Finding my data
- Backing up and Restoring my data
- The 3-2-1 strategy
- My personal backup strategy
- My complete hardware setup to organize and backup my files
My background
Before I dive into my personal data and backup strategy I first want to give you some background on the things that I use my linux based setup for. In my professional life I work as a Senior Solution Engineer at a large financial organization here in the Netherlands. Every day I work on the design, maintenance and improvements of our large-scale system landscape that supports our internal processes. In that role I mainly work with Windows-based applications, so I won’t elaborate on that world. But what is important is the fact that as a team we have to think carefully about our data and backup strategy, data exchange and sharing, findability, the security of our data, roll-back strategies if something goes wrong, how to deal with cyber attacks, etc. Those experiences have taught me to also think about my personal data and backup approach.
In my personal life, I use my Linux based computer for a wide variety of activities, as I have different interests and hobbies, but also just have to do the boring activities of life like everyone else, such as tax filing. I write for this website, so I need to be able to create my texts, take screenshots and edit images. I’m also a passionate landscape photographer and I enjoy editing small videos, so I need to be able to securely store, organize and edit the photo and video files I’ve taken. I’m also writing a book based on the articles I am writing for this website. For this I need a file structure that helps me to store and organize my research material and the text I am writing to easily find it again. I’m also in the process of learning to develop mobile apps, so those files also have to be placed in the right place. And as mentioned, I’m a normal person just like everyone else, so I have my administration that I try to organize as well as possible, such as incoming letters, invoices and receipts scanned by me. And to never lose everything I store in data, I try to implement a backup strategy that is as effective and safe as possible for me, so that I don’t have to worry. So this is the background that I am trying to translate into a workable data and backup strategy for me.
How do I organize my data
In this section I will discuss how I structure, organize and name all my data, except for my photo and video related data. I will cover my photo and video data in detail in a separate section later in this article, because of my specific approach that does not fit all my other data.
Everyone is different and that’s just beautiful. My wife is much better at keeping the kitchen tidy than I am, but less so at tidying her nightstand or our coffee table. And I’m much better at organizing our digital lives through the computer, while she’s much more handy with organizing stuff via the tiny screen of her cell phone. And we also sometimes have different ideas about what has been cleaned up and how something should be cleaned up. And when it comes to organizing our digital lives, I have a specific approach that may not seem convenient to others, and I’m sure it’s the other way around as well. But hopefully this article gives some ideas to implement in your own digital life.
Structure of folders
As you may have read in some of my previous articles, I like simplification through standard workflows, habits and standardization. I think that helps to reduce the need to think over and over again about repetitive tasks. So why would you put your house- or car keys always somewhere else if you already know that a little later you forgot where you put the keys. Better to give everything in your life its own home, so organize a fixed place for all the objects that you need regularly, so that you never have to think about where those objects are. This also applies to how I structure my digital folders. Not only for storing my files, but also for the organization of my emails, notes and bookmarks in my web browser, I use exactly the same main folder structure everywhere, which look like this:
- 0 Inbox
- 1 Family
- 2 Personal
- 3 Interests
- 4 Learning
- 5 Creativity
- 6 Work
So if I look at for example my Files file manager, my Thunderbird email application and my notes organization in Joplin, it is organized in exactly the same way, which looks like below:
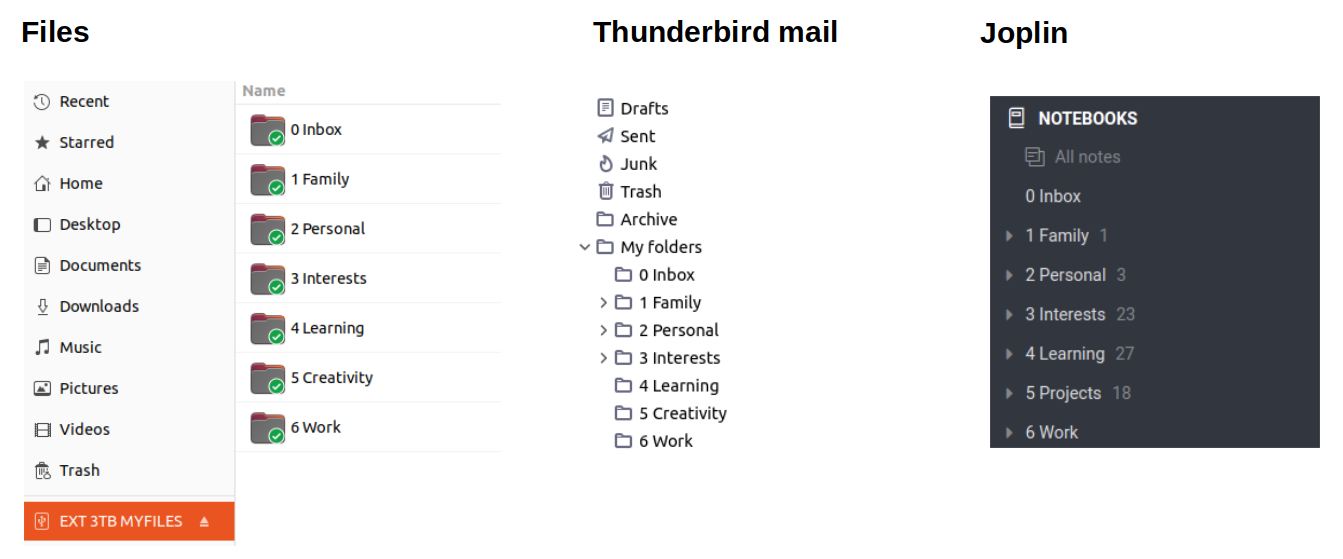
This standard structure in all the apps that are involved in data organization, helps me not to think about where to store something and where to find it again later. And because I use the exact same approach throughout my digital life, storing my files becomes a habit similar to brushing my teeth every day: I don’t have to think about it.
For every application, like Thunderbird and Joplin, I define a folder called Inbox. This helps me in case I need to store something quickly for which I haven’t defined a sub folder yet below the other categories and I don’t have time to do that right away. So once per week I do a clean up of all Inbox folders to organize that data in the proper place. I also describe this approach in my article “How I manage my productive life in Linux” and you see it in the summary below.

Naming conventions of files and folders
For the naming of my files and folders I try to implement a system that helps me to easily save new files, find existing files and in some situations clearly see the status of a file or the status of the entire content of a folder.
First of all, I think it’s important to be very specific in my naming, so I don’t use terms like “miscellaneous”, “diverse”, “something”, etc. The only folder I keep a bit generic is the aforementioned “0 Inbox” folder, which I try to empty as soon as possible and never use as a final state storage. But also I try to create folders that fit more than just one or two files, so I don’t restrict my folder categorization to very niche folders, as that only makes finding your files more difficult.
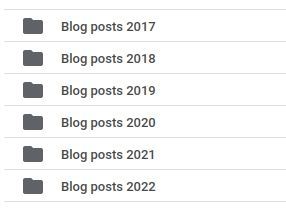
Then I find it useful to base my sub-folder structure on years where necessary. This is how my folder structure for my blog posts for this website looks like:
Within these folders I try to name my sub-folders and files by using a combination of the status, the date (in reverse format YYYYMMDD for automatic ordering) and then the description of the contents of the file. That looks like this:
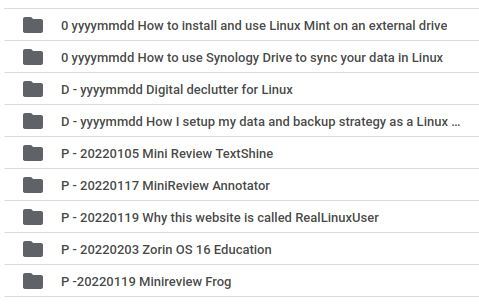
In the above example I make a distinction in status between 0 (idea), D (Draft) and P (Published). Then, as already indicated, I use an inverted date format to force an automatic ordering. you can of course wonder why I do that if you can also sort by the date column in your file manager. But I eventually use that date to indicate when that file was published and also in case I make a small change later (that automatically adjusts the storage date), the publication date as I use it myself in the naming always remains the same . It’s just my personal preference. Someone else will have a dissenting opinion here.
Location of my data
For my system files I like to have my personal data like photos, videos and material for blog posts, separate from my system data. So I never store my personal files in the standard Linux User folders, like Documents, Music and Pictures, being part of my home folder. So by separating my personal files (you can read later about my physical file separation), my system folders stay as clean as possible and is it always possible to completely wipe my system drive without even thinking about my personal files, which I store on a separate drive.
How do I handle my photo and video data
Even though I stopped my site hustle a few years ago as a professional portrait and wedding photographer, I still have a passion for photography. I always loved creating landscape photographs, as you can see at my website www.johnbeen.nl, and I never stopped enjoying being in nature, waiting for the perfect light and conditions and the process of getting the “perfect” composition. So, my photo and video data is very important to me and I definitely don’t want to lose those files before I get back behind my Linux computer at home, but of course also not when the images are stored and edited.
My photo and video data in the field
Because I know from my own experience that all technology can malfunction, I will never save all my data on a single memory card during a photo shoot. I also have several cameras that I alternately fill with several different SD cards during photo sessions in nature to spread the load and wear over the camera and cards, but also to not have the entire photo shoot on just one card. I would rather come home with at least part of my photos using multiple memory cards than one single defective card that contained all my photos. To safely store my memory cards while still being outside I use a Pelican 0915 SD Memory Card Case, which is water resistant and absorbs shocks in case of an unexpected accident.
Initial organization of photo and video files
Anyone who is very involved in photography or videography will automatically come to the point of thinking about a workflow, or an optimal process that includes, among other things, logical steps for importing files, the folder structure and the naming of the photo and video files. Rapid Photo Downloader’ is absolutely my favorite. Rapid Photo Downloader does not try to be an everything-in-one application, but is very clearly focused on just one part of a photo or video workflow. Where all-in-one applications are often a bit alright in everything, but do not really excel at anything, precisely because of this limited scope Rapid Photo Downloader has become a very powerful tool for the limited part for which it is intended. For me as a Linux user I am very happy that this application is available and it has therefore become my default starting point in my photo workflow. In my opinion Rapid Photo Downloader is the best open source photo and video download software for Linux.

The goal of Rapid Photo Downloader is to greatly simplify the transfer of photos and videos from the memory card to the computer via self-defined rules. When one or more memory cards are inserted into a card reader, Rapid Photo Downloader automatically scans the photos and videos on your media and is then given the opportunity to choose which files should be downloaded. Rapid Photo Downloader downloads your media files into designated folders. It automatically creates subfolders, based on the default options that can be set themselves. Setting up the folder structure is very extensive, but also very clear. Multiple levels can be set, using date / time, free text, filename, metadata and job code. The same can be done for the naming of the media files. Multiple name blocks can be set, using date / time, free text, filename, metadata, sequences and job code.
Before I knew about Rapid Photo Downloader my download process contained 13 steps:
- Connect card reader to pc
- Insert memory card in card reader
- Find memory card in file manager
- Open DCIM folder
- Find newest files
- Open extra file manager
- Select correct destination drive
- Go to photo main folder
- Create new folder for new files
- Create subfolders if required
- Copy new files to new (sub) folder
- Rename copied files to your own standards
- Create backup of your new files
But now that I use Rapid Photo Downloader I reduced it to 5 steps:
- Connect card reader to pc
- Insert memory card in card reader
- Start Rapid Photo Downloader
- Push Download button
- Select Job Code (if you use that in your preset) and hit OK
You can read all about Rapid Photo Downloader in my article Rapid Photo Downloader is the best open source photo and video download software for Linux.
You can find Rapid Photo Downloader here: https://www.damonlynch.net/rapid/
Photo scoring and selection of photo and video files
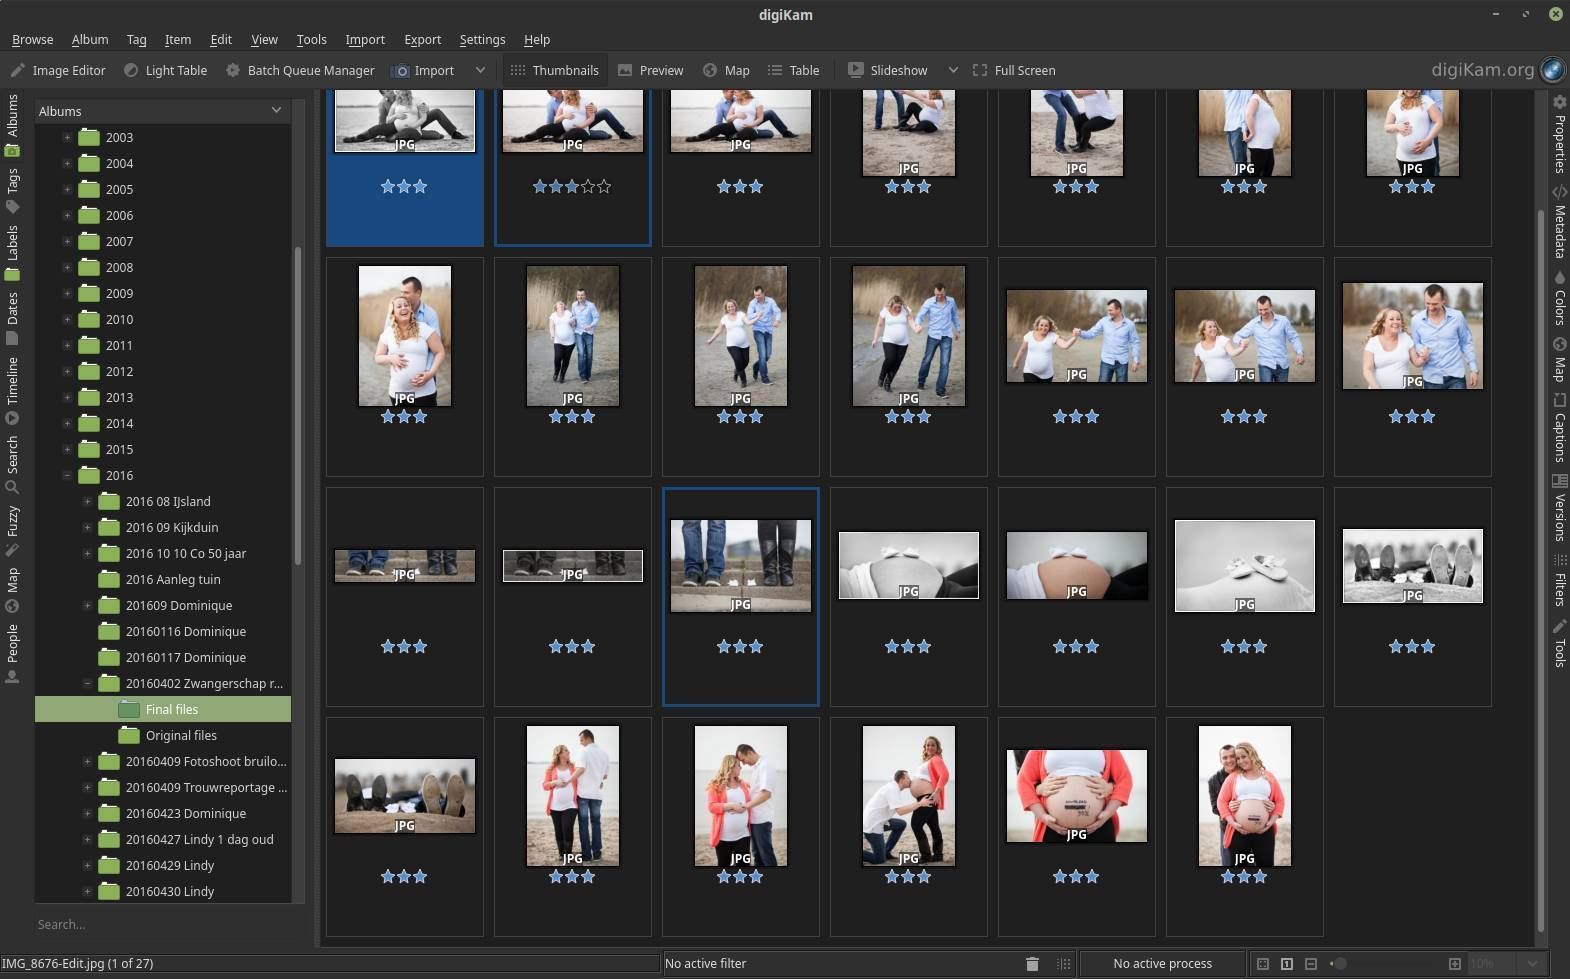
Before I start editing my photo and video files, I first want to clean, categorize and select the images with the help of ratings and keywords. The powerful application digiKam is an advanced open-source digital photo management application that enables me to do this in an efficient manner, by providing a comprehensive set of tools for importing, managing, editing, and sharing photos and raw files. Within digiKam I can quickly view a collection of images, I can add a star rating of 1-5 and then I can filter on these ratings. IPTC metadata such as keywords, description and copyright information can also be added here. You can find an extensive overview of all features here: https://www.digikam.org/about/features/
Naming conventions of photo and video folders
For the naming of my photo and video files and folders I try to implement a system that helps me to easily save new files, find existing files and in some situations clearly see the status of a file or the status of the entire content of a folder. I always distinguish my photo and video material between Original and Final, so I create sub folders with these names. In Original I store all my originals, also the files that are not my favorites. In Final I store the jpg files as a result of my raw editing process, so here are the final results of only the few photos that I selected and processed in darktable.
How I store my mobile photos
I’m not just always doing “serious” photography, like my landscape photography. Like many of us, I also regularly take pictures to remember nice moments with my mobile phone. I didn’t choose to synchronize these photos in the standard way (for Android phones) via Google Photos, but on my own Synology DS418j NAS device. Synology provides a handy and well-functioning software solution, named Synology Photos, that helps me to automatically synchronize my mobile photos with the NAS.
How I keep my data clean and organized
Setting up an initial file and folder structure is one thing, but keeping it clean and organized is another and for a lot of us maybe a bit more difficult. Below my approach on how I try to keep my data organized.
Find and remove unnecessary files on my system
One of the aspects that is important when cleaning up my digital life is finding out if I have unnecessary files on my storage media or without knowing in my system folders. Over time, after your initial installation of your Linux operating system, you build up lots of files without sometimes knowing what their actual goal is of being there and some of them are even not visible without actually looking for them. And a lot of these files probably are not required anymore, so you lose a lot of additional disk space and most of the time some performance as well for no reason at all. One of the applications for Linux that people like you and I can support in the cleaning process is Stacer. In my opinion, Stacer is the best system optimizing and monitoring tool for Linux. Well, at least with respect to my own requirements but probably also for yours.
Stacer is an application heavily based on a graphical user interface with the aim of offering an extensive set of both cleaning and system monitoring functionalities for the Linux user. By using an accessible and beautiful user interface, Stacer wants to make the process of cleaning and monitoring easier for the average user. But also if you are an experienced user you can easily make it part of your Linux based workflow. In my article “Stacer is the best system optimizing and monitoring tool for Linux” you can find more about the installation process, the setup and how to use the app to clean your system.
Find and remove duplicate files on my system
One of the aspects that is important when cleaning up your digital life is finding out if you have unnecessary duplicate files on your storage media. There are lots of alternative applications for Linux that focus on finding duplicate files on your system, but most of them are command line based. But many readers of my website prefer to use a graphical user interface as it is more convenient for regular users and visually oriented people. Luckily there is a duplicate finding tool with a graphical user interface which is called FSlint. The primary focus of FSlint is on finding duplicate files on your hard drives. But if you found duplicate files then you probably want to do something with it. For example, collecting and then deleting the unnecessary files. FSlint makes it possible to easily identify a location, such as a complete hard disk or a specific folder, and then search for duplicate files there. When these have been found, you can determine which files you want to remove or maybe merge. You just have to select the result files and choose the option Delete or Merge. But FSlint can do much more than search for duplicate files. Think about searching for temporary files or empty directories. Read more about FSlint in my article “How to find duplicate files in Linux with FSlint“.
Clean up my downloads folder
I notice that I have a strong tendency to keep all my downloads in my Downloads folder forever. Of course there are certain personal files in your Downloads folder such as downloads from the bank or other formal organizations (you should move these files to more logical folders), but all those application installation files really do not have to be saved. After all, you can download those deb, flatpak and snap files from the software manager or the internet as often as you deem necessary, so why should you clutter your valuable hard disk space with them. So go through all your downloads and immediately remove everything that you are sure you can retrieve from the internet later.
Automatically delete my Temporary and Trash files
If you don’t regularly remove your temporary files and your trashed files, your computer uses unnecessary disk space and the performance can noticeably deteriorate. You use the Trash option only to be sure that you don’t delete files directly and unrecoverable, but after a while it should be safe to clean up these trashed files. Cleaning up temporary system files and trash can be done manually, but on this website we like to do things as simply as possible whenever possible, so it would be more convenient if there is an automatic solution to schedule your cleanup. And there is. If you have a Ubuntu based distribution like Ubuntu itself, Linux Mint or Zorin OS, than you can do the following to schedule automatic deletion of temp files:
1) Go to your Settings.
2) Select the Privacy option.
3) Select the option File History & Trash.
4) In the section Trash & Temporary Files you can choose to automatically Delete. Switch the option Automatically Delete Trash Content and Automatically Delete Temporary files to On and set the Automatically Delete Period to your liking, with a maximum of 30 days.
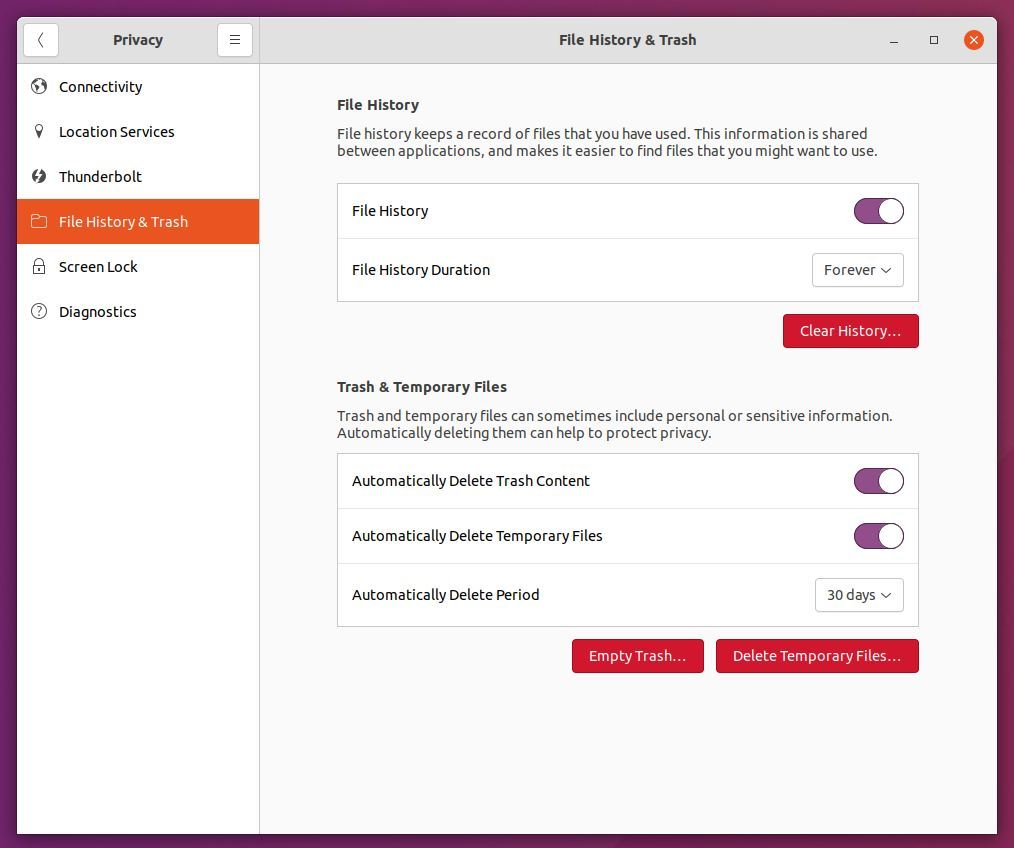
5) Close the screens to enable the selected options.
Finding my data
One of the superpowers of computers is being able to find what you are looking for quickly and efficiently. Finding a needle in a haystack may have been an impossible challenge in the pre-computer days, but the advent of the computer has made finding things a lot easier, faster and more effective. For us Linux enthusiasts, there are plenty of alternatives available to make finding specific files, such as documents, photos and videos, easier and faster. I personally use the built-in file manager if I know where to look for my files, but if I need to do a search for a specific file for which I don’t know the exact location, I use a tool like Albert. With Albert you have a simple starting point or a quick launcher, that can be activated via a simple key combination, to find, access or start all your own applications, files and folders and their paths, but it also helps to find bookmarks and helps you to browse the web in a focussed way.
In a recent article, “Albert and Catfish – search tools, and horses for courses“, written by Paul Surman, one of the readers of this website, this powerful Albert search application and also the application Catfish are described based on his personal experiences. Paul shares his enthusiasm for Albert and Catfish and the way these tools make his life in Linux easier.
Backing up and Restoring my data
Still many people have stored all their data only on their internal storage of their laptop or workstation and do not seem to have arranged some kind of a proper backup strategy. In the event of a crash of this storage device, fire or theft, they lose, among other things, their valuable photos and documents. This event is of course terrible for your private data, but imagine that the same thing happens within your professional life. Think about it. You can imagine the enormous impact when a wedding photographer loses all the photo files of a wedding session of the day before. Loss of these files will never be restored, resulting in an irreparable relationship between you and your customer. That is why a well-considered backup strategy is of vital importance for yourself and, if applicable, for your customers.
The 3-2-1 strategy
A simple but generic implementable strategy is the globally known 3-2-1 backup strategy. This strategy is even embraced by large companies and governments worldwide, so it will also be sufficient for us as simple human beings. What does the 3-2-1 strategy mean?
The 3-2-1 strategy simply means that you save at least 3 versions of all your data, of which 2 are stored locally (on site) but on different (types of) media and 1 version in a location out of the reach (off site) of your computer and your local versions. An example is:
1) a photo file stored on the internal hard disk of your workstation (on site),
2) a copy on an external hard disk connected to your workstation (on site) and
3) a copy stored in the cloud, such as Dropbox, Google Drive or Onedrive (off site), but this can also be a copy on an extra hard drive that you place at your parents or friends place or a NAS in an external location.
My personal backup strategy
It is important to determine what requirements you have for a backup tool. Do you want to be able to access your backed up files directly? Do you want all your changes to be saved so that you can go back in time to select a previous version again? Do you want to be able to set a backup agenda with a specific frequency yourself? These are examples of important questions that you need to get clear before finding and selecting the right tool.
I have been busy for quite some time trying to find a good backup solution for Linux that meets my specific requirements. When it comes to Linux backup software, we as fans of free and open source software, have little to complain about. There are many alternatives to find, with all their specific functionalities and target groups. Some solutions offer only basic functions, but are therefore very suitable for a novice user who does not want to worry about too many options. At the other end of the spectrum we have solutions in which every technical detail can be changed as needed, but which is therefore targeted at experienced users.
As mentioned before, for my system files I like to have my system data separate from my personal data like photos, videos and material for blog posts, so I never store my personal files in the standard folders being part of my home folder. And based on that concept I like to have dedicated backup procedures for the system files and personal files. Further it is very important that you backup your system files in such a way that you can roll back your system to a moment in time when the system was still working properly in case you for example broke something while experimenting with your system. So the tools you choose for your system data must support incremental backup and restoring functionality based on time.
In my opinion the application Timeshift is superb for backup and restore of your system files. Timeshift works on the basis of incremental backups. The first time, when there is nothing backed up yet, Timeshift will have to make a full initial backup of course, but from then on Timeshift only looks at the modified files and then only makes a backup of those changes. The advantage of this approach is that these follow up backups are much faster, since the number of files that are in scope is much smaller. But also the amount of storage needed is much smaller.
Timeshift is not meant for every backup situation, because if you don’t think wisely about your backup strategy for Timeshift, it also unexpectedly recovers your personal data in for example your Documents, Videos or Pictures folder from another moment in time, so you lose the latest updates on the files you created. To backup and restore your individual personal files, such as text documents, spreadsheets, photos and films, it is advisable to use another backup application such as LuckyBackup or Cronopete. That is also the reason why Timeshift excludes your home folder and all sub folders by default and you have to actively indicate to include it in the backup scope if you want to go against this advice. But for securing your system implementation, Timeshift is a perfect solution, as it enables you to recover your whole system to another moment in time, when something really went wrong. Perfect for those who like to experiment a bit.
Read my article “How to use Timeshift to backup and restore Linux Mint” for more in depth information on Timeshift.

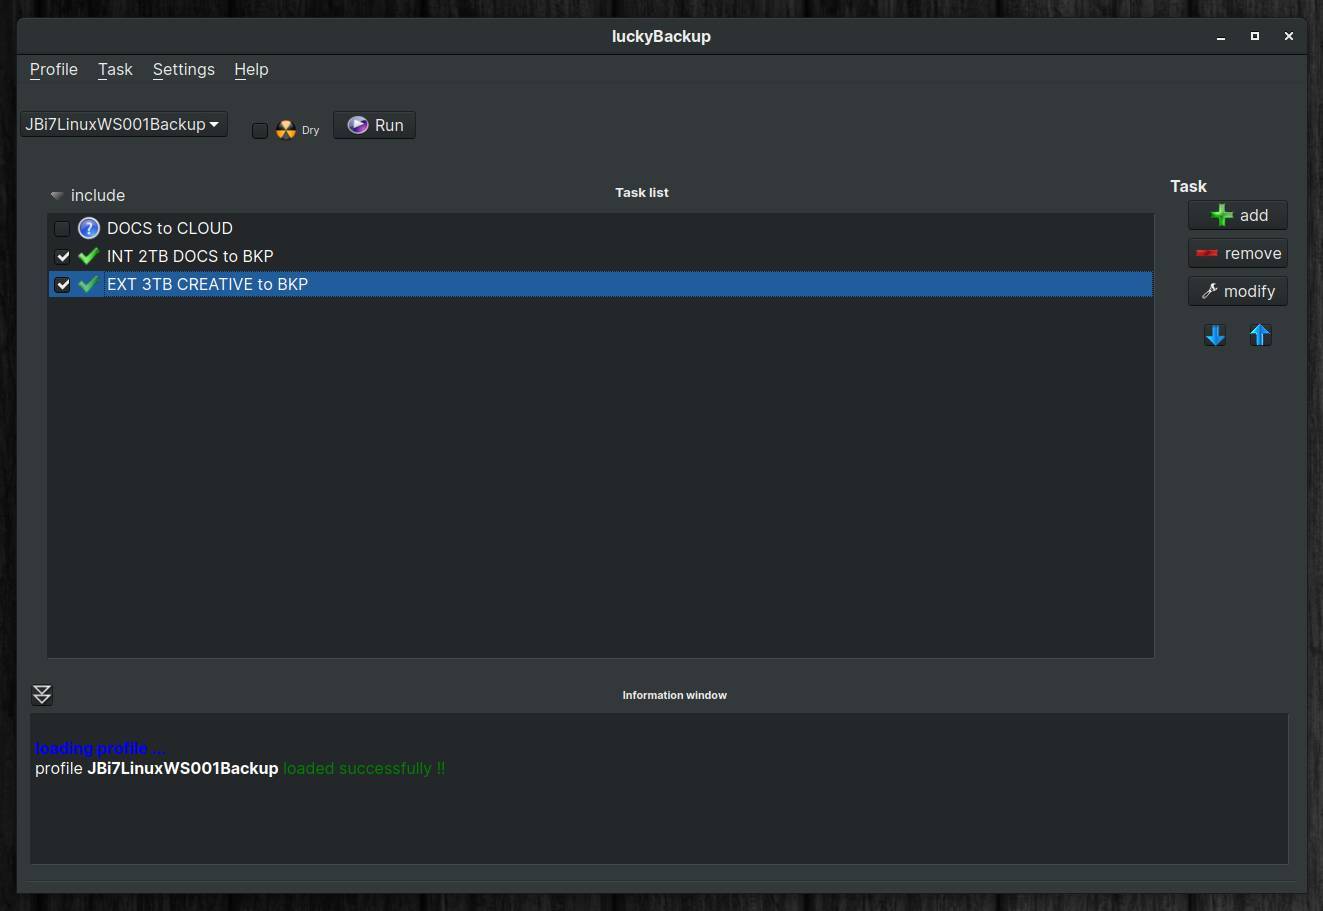
For my personal files I have some specific requirements, like being able to directly read (without needing the backup software) my backed up files, write different sources to different targets, activate or deactivate parts of the backup procedure as needed, set up and use the software completely within a graphical environment. For me the application luckyBackup fits all those needs perfectly.
Read my blog post “luckyBackup is a powerful backup solution for linux” for more information on luckyBackup.
You can also read more on generic backup strategies in my article “How to design your perfect backup strategy for Linux“.
Or have a look at my Linux Mint or Zorin OS focused articles “How to setup and use backups in Zorin OS” and “How to setup and use backups in Linux Mint“.
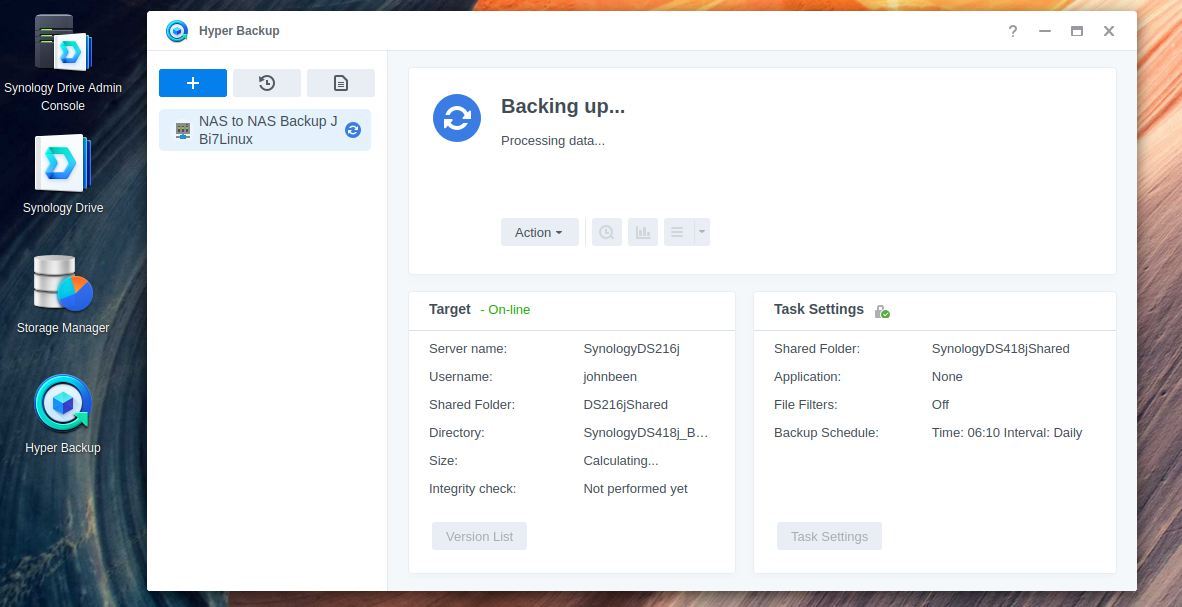
Timeshift and luckyBackup are not my only backup solutions. I also use a backup solution based on two Synology NAS devices, the Synology DS418j 4-bay NAS and the Synology DS216j 2-bay NAS. With the Synology Drive software I sync all my personal data between my external drive with my personal data and the DS418j NAS, which is a local device. And via the Synology Hyper Backup software on both devices I backup the data on my local DS418j to my offsite DS216j. More about that in the next section of this article.
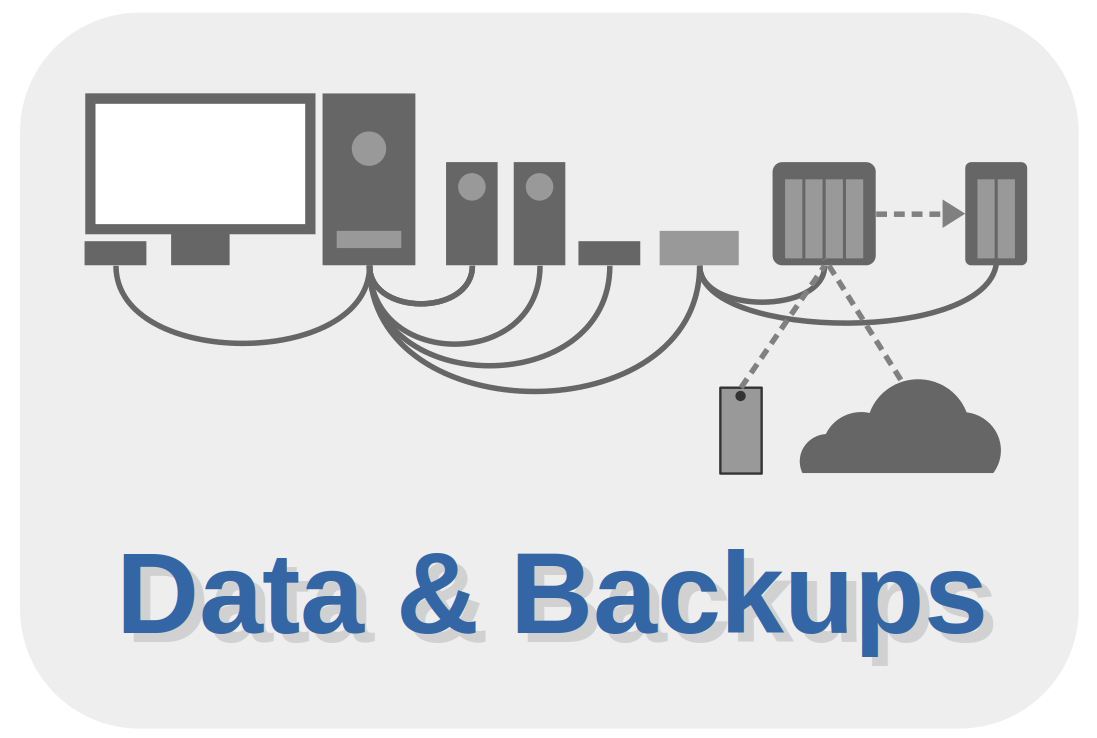
My complete hardware setup to organize and backup my files
In this article I wrote a lot about the more functional side of my data strategy and backup strategy, but I also have to say something about the physical implementation of those strategies. As I mentioned before, my entire strategy is based on the 3-2-1 concept. This is a simple but very effective and reliable data strategy. The 3-2-1 strategy simply means that you have at least organized your data in 3 different versions, of which 2 are stored locally (on site) but on different (types of) media and 1 version in a location out of the reach (off site) of your computer and your local versions. My personal physical implementation of this strategy looks like below:
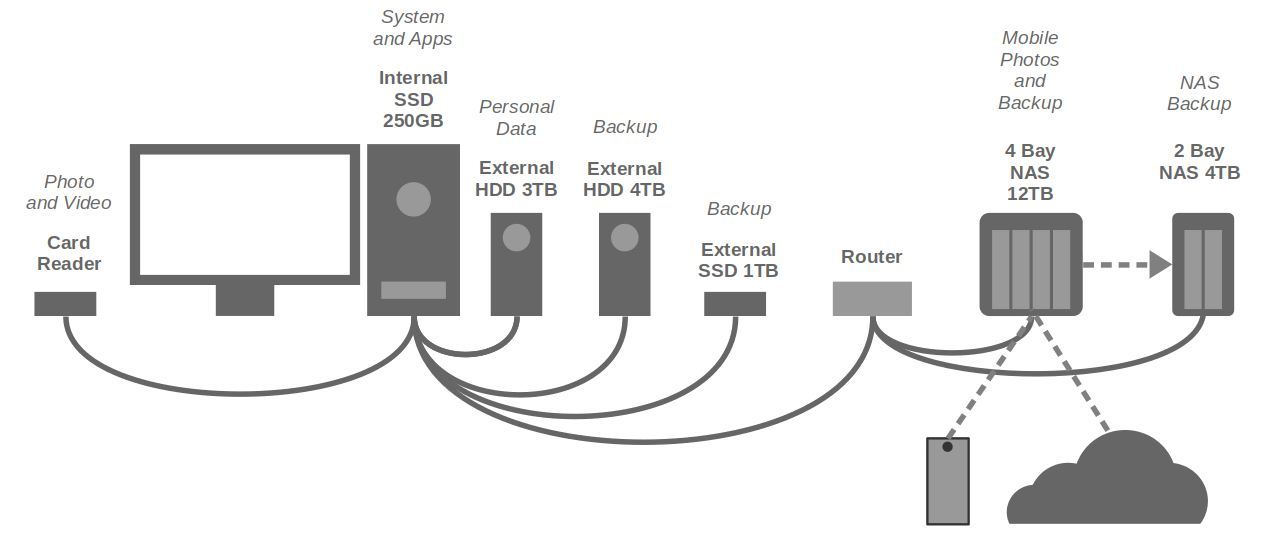
In this setup you see a number of things:
- Lexar USB 3.0 Multi-Card reader: For reading photo and video files from my SD memory cards.
- Internal SSD 250GB: I only store my operating system and my applications on this internal SSD. I don’t have any additional internal hard disks or ssds for my personal data in my computer enclosure.
- WD Western Digital My Book Studio 3TB: Here I store all my personal files, like photos, videos, creative projects, administration, etc. Because it is an external drive, it is easy to pick it up in case of an emergency. And it is also convenient when I do a complete install of an Operating System, because I don’t have to consider my personal data when wiping the internal drive clean.
- WD Western Digital My Book Studio 4TB: This is my main backup drive.
- Samsung Portable SSD T7: I use this small portable SSD as a backup of my most important data and have this device always with me, wherever I go.
- Synology DS418j 4-bay NAS: I use this 4-bay NAS with currently 3 hard drives in the first place as a network attached backup device. Next to that I also sync all the photos and videos I create with my mobile phone to this NAS, instead of syncing to Google Drive. Further I sync all my data from my Google Drive and Microsoft Onedrive cloud storage to my DS418j NAS, so in the theoretical situation Microsoft or Google decide I can not access my account, or in case I have an internet outage, I can always access this data as well.
- Synology DS216j 2-bay NAS: I use this 2-bay NAS as a third offsite backup. The DS418j backups directly every change to the DS216j.
So what you see above is that I have a situation in which I 1) separate my personal data from my system data, that I use 2) external drives for my personal data so I can pick them up more easily in case of an emergency than picking up a complete tower with internal disks, that I have 3) multiple backups on-site and off-site, and that I have 4) a small device that I carry wherever I go.
I hope you liked my description of my personal data and backup strategy and implementation. Probably you have a specific opinion about my choices and you would do things completely differently. I would really like it if you want to share your ideas on data and backups from your Linux perspective. If you like you can share your story to be published on this website.
If you appreciate what I do on this website…,