Anyone who is very involved with photography or video will automatically come to the point of thinking about a workflow, or an optimal and standard process that includes, for example, steps for importing files, building the folder structure and naming the photo files and video files. Rapid Photo Downloader is a free and open source application built for Linux operating systems. It has been developed by a photographer for professional and amateur photographers. The purpose of the application is, based on your own pre-defined rules, to greatly simplify and standardize the transfer of files, so transferring your photos and videos from the memory card to the computer will be a breeze. In my opinion Rapid Photo Downloader is the best open source photo and video download software for Linux. Now let’s see if you agree.
About Rapid Photo Downloader
Rapid Photo Downloader is designed and built by Damon Lynch, who is doing a PhD in sociocultural anthropology. He researches what war does to a war survivor’s sense of time. He hopes his research findings will help peacebuilders better incorporate an appropriate sense of time in their theory and practice. He is a photographer as well and his pictures have a great social context. You can find his pictures via https://500px.com/damonlynch. Being a photographer himself helps to better understand what a photographer actually needs.
Rapid Photo Downloader does not try to be everything in one application, but is very clearly focused on just one part of a photo or video workflow. Where all-in-one applications are often a bit alright in everything, but do not really excel at anything, precisely because of this limited scope Rapid Photo Downloader has become a very powerful tool for the limited part for which it is intended. For me as a Linux user I am very happy that this application is available and it has therefore become my default starting point in my photo workflow. It is unfortunate that Windows and macOS users can not benefit from this solution. In my opinion Rapid Photo Downloader is the best open source photo and video download software for Linux.
The global workflow of Rapid Photo Downloader
In the next section we go through a real work situation in order to get all functionalities clear. But before we start working on it, I think it’s important that we first clarify the global workflow underlying this application. As already indicated, Rapid Photo Downloader is limited to a small use case, namely only downloading and storing photo and video files. As a layman you might wonder why you should have a complete application for that. You can also manually copy the files to a hard disk. But people who are serious about photography or even perform this on a professional level, need to automate repetitive actions. They want to use standard naming, standard folder structures, recognizing already imported files and the fastest possible process to do that time and time again. And that process is what Rapid Photo Downloader perfectly supports.
Below are the steps that need to be taken in an example manual workflow that could be automated with Rapid Photo Downloader to a large extent.
1) Connect card reader to pc
2) Insert memory card in card reader
3) Find memory card in file manager
4) Open DCIM folder
5) Find newest files
6) Open extra file manager
7) Select correct destination drive
8) Go to photo main folder
9) Create new folder for new files
10) Create subfolders if required
11) Copy new files to new (sub) folder
12) Rename copied files to your own standards
13) Create backup of your new files
As you see this is quite a process and if you need to do this maybe each day or many times per day, it becomes quite cumbersome. Rapid Photo Downloader can automate most of these steps. After a correct setup of Rapid Photo Downloader the process could look as follows:
1) Connect card reader to pc
2) Insert memory card in card reader
3) Start Rapid Photo Downloader
4) Push Download button
5) Select Job Code (if you use that in your preset) and hit OK
That’s it! 😉
The User Interface of Rapid Photo Downloader
The user interface of Rapid Photo Downloader is very clean and well organized. Input related decisions are on the left site, output related decisions on the right site and an overview of the files to be moved in the middle. Very logical and well laid out. Below a screenshot of the main screen of the application.
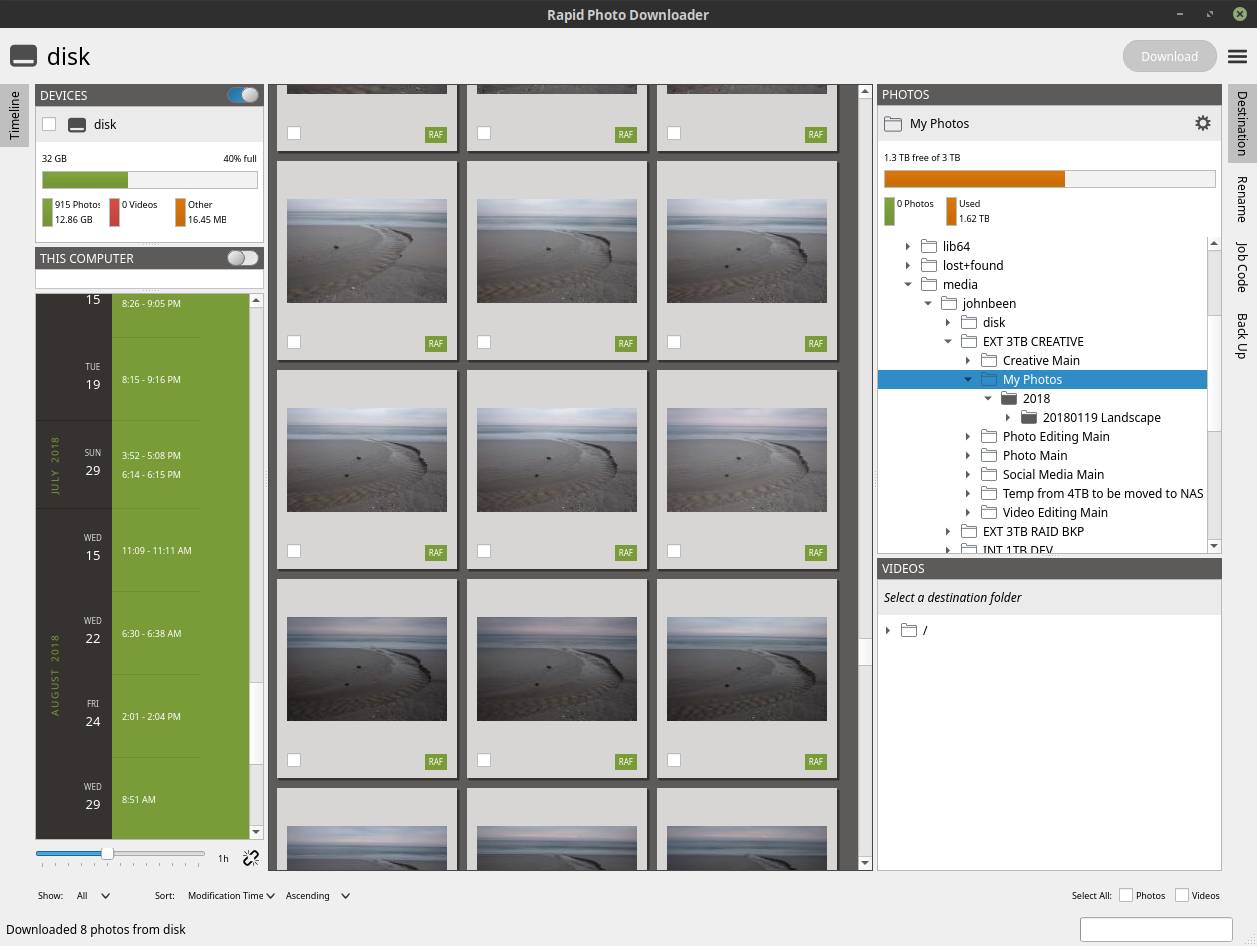
On the left site you find a kind of timeline that enables you to easily navigate the content of the memory card in a more visual way. Here you see the size of the source device, how much is available and how many files are on the drive.
On the right site we have 4 main personas: Destination, Rename, Job Code and Backup. We discuss these later in this post. Further you see all information on the target drive and how much space is available.
In the middle you see the files and the type like RAF or JPG. Here you can make sub selections or choose all files.
Backup is well organized in Rapid Photo Downloader
In previous blogs, like my blog about setting up a backup strategy, I have already stressed the importance of determining a good backup strategy, or at least arranging a simple backup on a cheap external hard drive. It is often jokingly said, but it is quite right, that there are two types of people in the world, those who have already had a hard drive crash and those who will get one soon. The question is not if your hard disk will break down once, but when it will actually happen.
I am therefore very pleased that also within Rapid Photo Downloader backup functionality is very well implemented. At the moment that the photo or video files are being imported, it is possible to directly back up according to the same folder structure and naming conventions to one or even several internal or external hard disks. For example, photos can be backed up to a disk other than the videos. And you can even backup to a network attached drive, which is not that normal when looking at other backup tools for Linux. And once you have tuned in the settings, you then no longer have to think about creating backups for these specific files for subsequent imports of media files.
Rapid Photo Downloader explained by using a practical example
To clarify what Rapid Photo Downloader can do and how the application can support the workflow of a photographer or videographer, we can in my opinion best just simulate a practical situation. Based on this practical situation I will take you into the possibilities of the application and what you have to arrange and setup to make the application optimally work for you.
The use case
One of my passions is landscape photography. I try to create fine art landscape photographs (www.johnbeen.nl) and sell them via an online gallery (johnbeen.werkaandemuur.nl). After creating the originals, which need to picked up later for further processing, I want to have them stored in a for me clear folder structure with a good naming convention. The file result of a specific photoshoot should look like this:
- Hard drive: EXT 3TB CREATIVE
- Main folder: My Photos
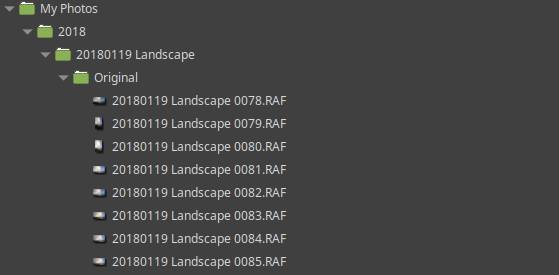
- Folder structure: [Year]/[YearMonthDay] [Job Name]/Original/
- File naming convention: YearMonthDay [Job Name] [Number]
Based on the above criteria a set of photo files of a landscape photoshoot dated January 19th 2018, Rapid Photo Downloader should automatically create the following:
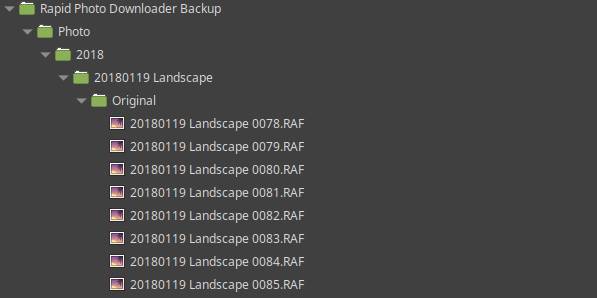
And in the same time the backup should be created as well:
So how are we going to set this up?
The setup process
1) Click on Destination.
2) Click on the gear symbol and choose Custom…
3) Now the Photo Subfolder Generation Editor will be shown.
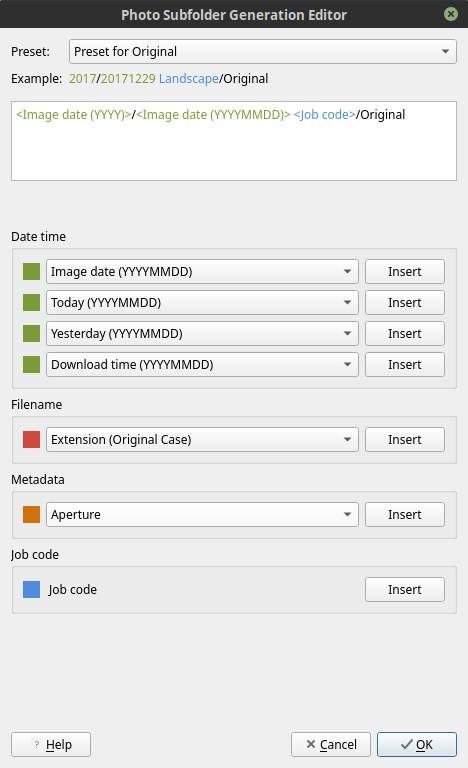
Here you can define the automation rules for folder creation. Here we do not assign the main folder level. We do that when we actually are going to process the files.
In the practical case as described before we need the following string:
<Image date (YYYY)>/<Image date (YYYYMMDD)> <Job code>/Original
We can create this by implementing the following steps:
4) In the Date time section select Image date (YYYY) and hit Insert.
5) Add a forward slash.
6) In the Date time section select Image date (YYYYMMDD) and hit Insert.
7) Add a Space.
8) In the Job code section hit Insert.
9) Add a forward slash.
10) Type “Original”.
11) Hit the OK button.
Now we need to format the file naming convention.
12) Click on Rename.
13) Click in the Photo Renaming section on the drop down of Preset and select Custom…
14) Now the Photo Renaming Editor will be shown.

In the practical case as described before we need the following string:
<Image date (YYYYMMDD)> <Job code> <Stored number (Four digits)>
We can create this by implementing the following steps:
15) In the Date time section select Image date (YYYYMMDD) and hit Insert.
16) Add a Space.
17) In the Job code section hit Insert.
18) Add a Space.
195) In the Sequences section select Stored number (four digits) and hit Insert.
20) Hit the OK button.
Now we need to create the required Job Code.
21) Click on Job Code.

22) Click on New…
23) Select “Remember this choice” and add a new Job Code and hit OK.
The new Job Code will now be visible in the list with job codes.
Now we want to setup the automatic backup process.
24) Click on Back Up.
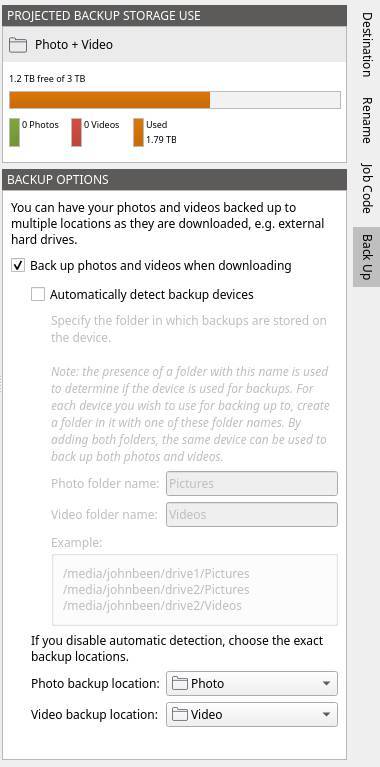
25) Select Backup photos and videos when downloading.
26) Click on Photo backup location and choose Other…
27) Select the drive and folder where you want to create your backup copies of the original files.
That is basically it for the setup. Not a real problem I think as it is a one time activity.
Downloading the files
28) Connect card reader to pc.
29) Insert memory card in card reader.
30) Start Rapid Photo Downloader.
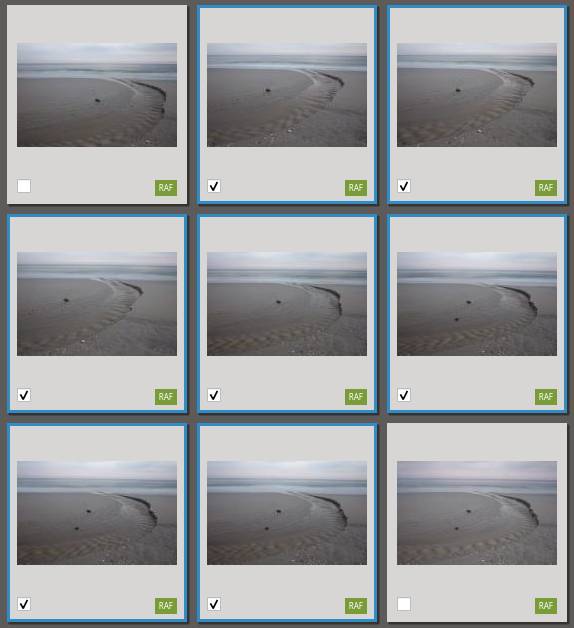
31) Select the files to be stored by clicking on the first in the selection, then hold the shift button and then click on the last file in the selection.
32) While the selection is made click on one of the white squares to confirm the selection.
33) Select via Destination the main folder where you want the create the sub folder structure and store the files.
34) Push Download button.
35) Select Job Code and hit OK
Now all files will be stored according to all the rules you created during the setup process. And from now on it is just always the following steps:
1) Connect card reader to pc
2) Insert memory card in card reader
3) Start Rapid Photo Downloader
4) Push Download button
5) Select Job Code and hit OK
I think it is all worth it.
How to install Rapid Photo Downloader
The installation process is script based for Ubuntu, Linux Mint, openSUSE, Debian and Fedora.
1) Go to https://www.damonlynch.net/rapid/download.html
2) Right click on the “Install script” button and select the option “Save link as…”
3) Select your Downloads folder to save the script file.
4) Open your file manager and go to the Downloads folder.
5) Right click somewhere in the Downloads folder and choose “Open in terminal”.
6) In the terminal window type “python3 install.py” and give Enter.
The program sudo may prompt for your administrator (root) password during the install process, if required. Give again Enter after providing the root password.
7) Let the script do its work so the application will install.
Note: You probably need to logoff and logon again to make Rapid Photo Downloader visible via your applications menu (“Menu” in Linux Mint).
How to uninstall Rapid Photo Downloader
I see no reason why, but if you want to uninstall Rapid Photo Downloader type the following in your terminal:
python3 install.py –uninstall
That was all for now. I hope you enjoy Rapid Photo Downloader as much as I do.