
The Linux and Open Source world is an ecosystem that is constantly evolving. Every day thousands of passionate people worldwide are working alone or together in groups to improve the kernel, the distributions, the desktop environments and applications. There is a huge number of applications available for the Linux platform for different use cases. Some of these applications are dedicated for a specific distribution, but most of these applications can be used under any Linux distribution. The great thing about a Linux distribution like Linux Mint is that it has some sort of app store from which it is very easy and convenient to search for, install or remove applications. But there are also other ways to search and install applications, each with its own advantages and disadvantages. In this chapter of this Linux Mint beginners course I will explain which ways there are to install applications in Linux Mint, how these different ways work and what you need to do to enable these different approaches.
Different ways to install applications
As indicated in the introduction, there are several ways to install applications under Linux Mint. You may be wondering why there isn’t just one way. In a world where software is not developed for commercial reasons but from an open source community perspective, there are many people involved with many opinions that can lead to many different approaches and different solutions This can be a good thing, but it can also lead to confusion and decision-stress for the end user, especially for beginning Linux users. The good thing is that there are multiple levels of convenience, simplicity and safety, but the question is what approach is the best for you. Some users just need stable software that they can install in a simple way, similar to a Google Play store or an Apple App store. Other users feel the need to always install the latest bleeding edge versions of software, perhaps those even still under development, and find it less important that software is stable. That is why there are different approaches for different users.
For Linux Mint we can distinguish the following software installation approaches:
- Software Manager
- Synaptic Package Manager
- PPA Personal Package Archives
- .deb package
- Flatpak
- Snap
- Appimage
Software installation via the Linux Mint Software Manager
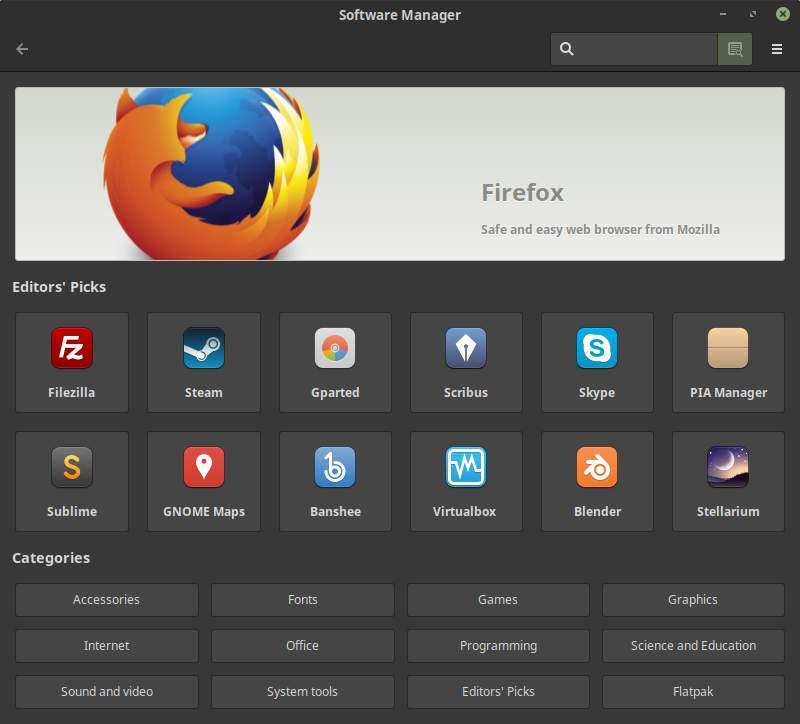
The Linux Mint Software Manager is probably the most convenient software platform and offers the simplest way to search for, install and remove software. If you are very visually oriented and you appreciate the way in which the Google Play store or the Apple App store works, you will also appreciate the Software Manager. The Software Manager shows you by means of different categories, such as Accessories, Games, Graphics, Office, Programming and Sound and Video, which software is available in the repository. It gives a short description and screenshots of each application, it shows how popular an application is and gives user reviews if available. But there is a catch.
What is important to know is that Linux Mint is based on Ubuntu and uses the Ubuntu software repository (you can read more on the release cycle of a Linux Mint distribution in an earlier chapter of this beginners course). Linux Mint 19, 19.1 and the upcoming 19.2 and 19.3 are and will be based on the LTS (Long Term Support) stable base of Ubuntu 18.04 which was released on April 26 2018. The software in the LTS based repository of Ubuntu will not change until the next LTS release. There is a two years release cycle for the LTS releases, so at the first day the LTS version of Ubuntu is being released, most software in the repository is up to date. But it takes two years before the software in the repository will be updated again and this also applies to Linux Mint. If that is not a problem for you the Software Manager should be your first choice as it is convenient, but more important, it is safe. You can trust that the software in this repository is not being compromised by viruses and other nasty things. But there are situations that you want to look further. For example some applications are not in the repository at all, or some applications are brand new and are released to the public after the most recent repository was created. Or you just want the latest and greatest.
So how to use the Linux Mint Software Manager?
1) Click on the Linux Mint menu item to open the application main menu.
2) In the search bar type “Software Manager”.
3) Click on Software Manager.
The following screen will be opened.
In this screen you can just browse through different categories, or if you know the name of the application you need, you can directly search for it. As an example let’s look for the application Blender. You just type Blender in the search area and as you type, the result becomes more accurate until you end up with only Blender.

Now click on this result and all kind of nice details will be presented to you on this application, like a description, the average rating given by users, a screenshot and ratings and reviews by individual users.
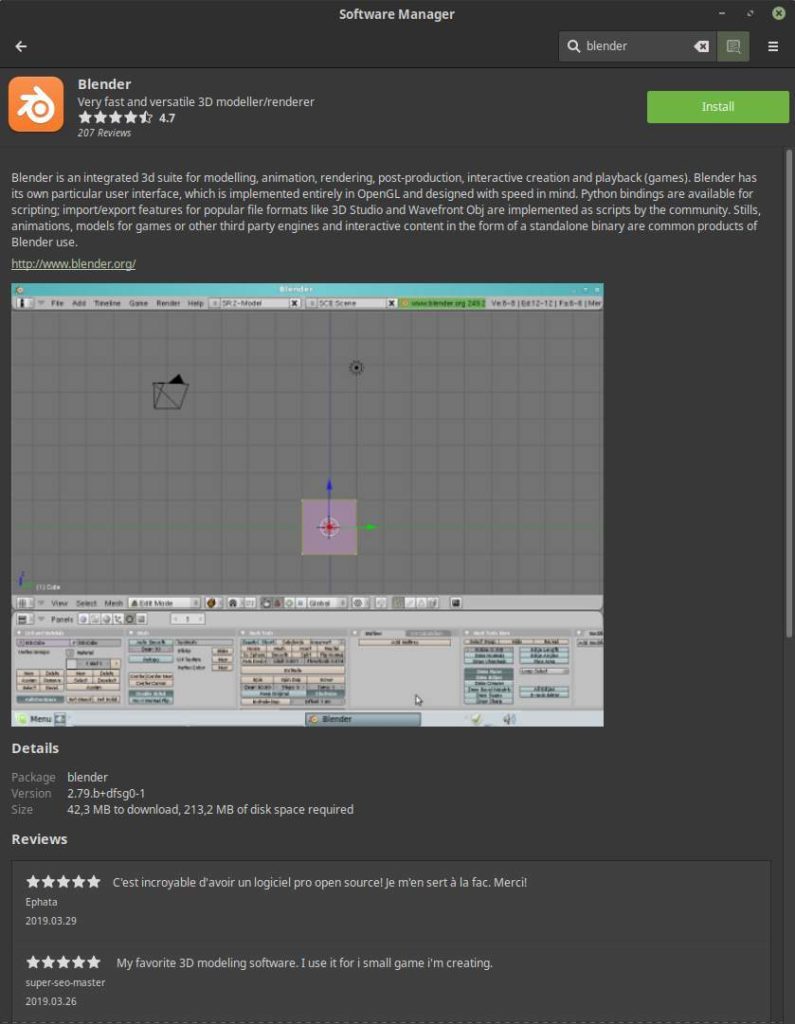
To install the application simple click on Install. Probably a pop up will be shown that asks to confirm that some additional software will be installed required by the application selected by you. Then the system will ask for authentication, so you need to give your password. And then the application will be installed in a short time.
Now you will see two new buttons: Launch and Remove.

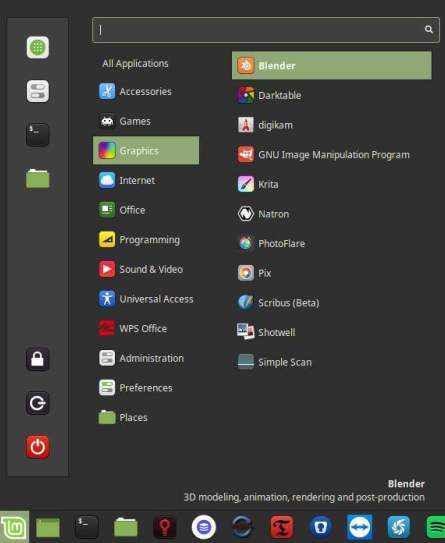
You can start the application by clicking on Launch, or as you normally will do, by starting the application via the Linux Mint main menu.
And if you want to get rid of the application in the future, just go back to the Software Manager, search for Blender and hit the Remove button. Very simple stuff.
Software installation via Synaptic Package Manager
A somewhat longer existing alternative to the Software Manager is the Synaptic Package Manager. The Software Manager and the Synaptic Package Manager actually work in the same way, but there is a big difference in the presentation. The Synaptic Package Manager feels much more technical than the Software Manager and may seem less friendly to the beginner. But on the other hand, the Synaptic Package Manager offers many more options to be in control of what you do and do not want to install. The Synaptic Package Manager also provides much more detailed insight into what is installed on your system and more advanced functions such as software package repair.
As I already explained in the section on the Software Manager, you should be aware that Linux Mint is based on Ubuntu and uses the Ubuntu software repository. The software in the LTS based repository of Ubuntu will not change until the next LTS release, which is in April 2020, as there is a two years release cycle for the LTS releases. So it takes two years before the software in the repository will be updated again and this also applies to Linux Mint. This means that the same pros and cons as described for the Software Manager also apply for the Synaptic Package Manager.
So how to use the Linux Mint Synaptic Package Manager?
1) Click on the Linux Mint menu item to open the application main menu.
2) In the search bar type “Synaptic”.
3) Click on Synaptic Package Manager.
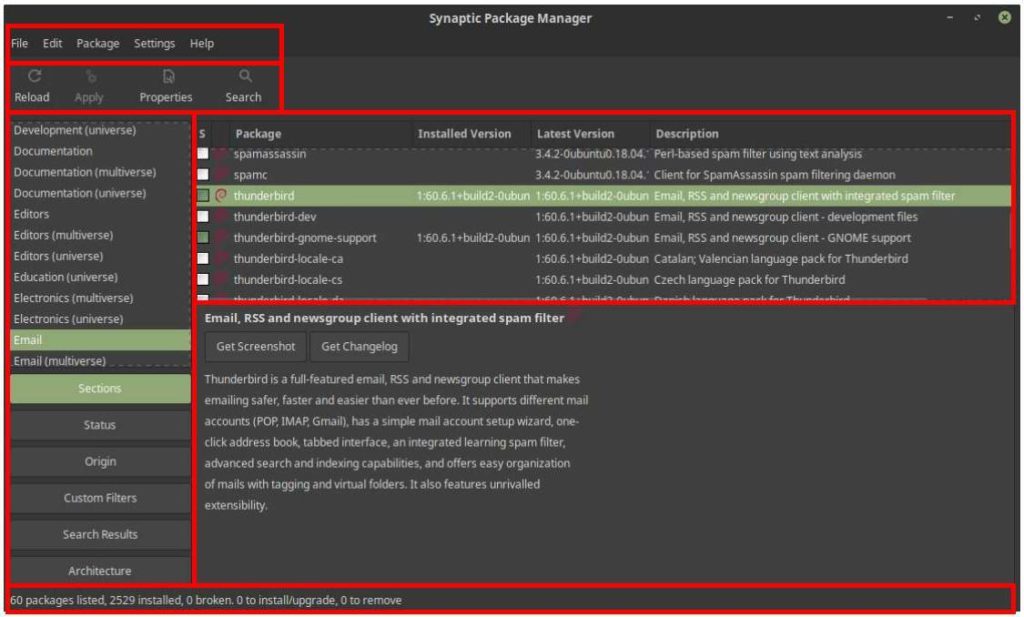
The following screen will be opened.
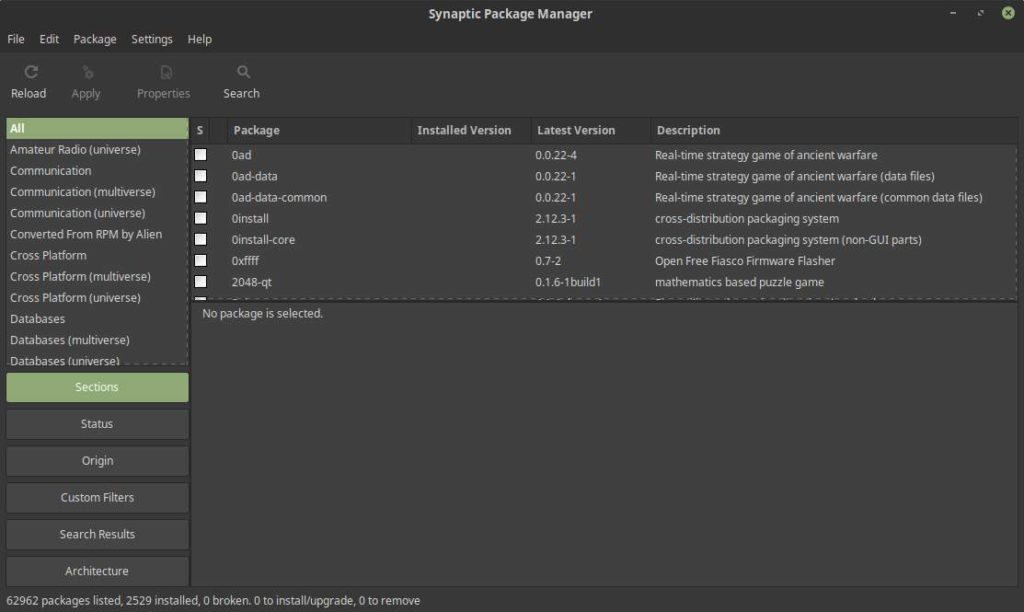
In this screen you see different sections. The menu bar for all menu options, the toolbar for the main actions, the category selector with different scopes on the software packages, the package list, the description field that shows the description of the selected package, and the .
status bar.
For this tutorial it goes too far to discuss each individual option of Synaptic Package Manager. For now it is more important to follow an example that explains searching for applications, the installation itself and removing of packages. Let’s for example try to install the application Krita, which is designed for users who focus on digital drawing and painting.
1) Click on Search.
2) Type “Krita”.
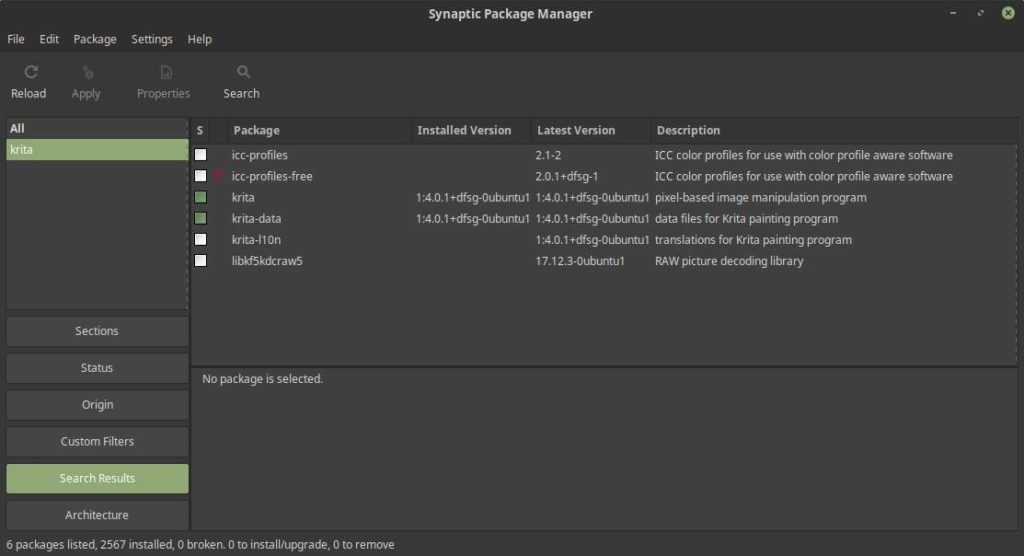
Now you see the following screen:
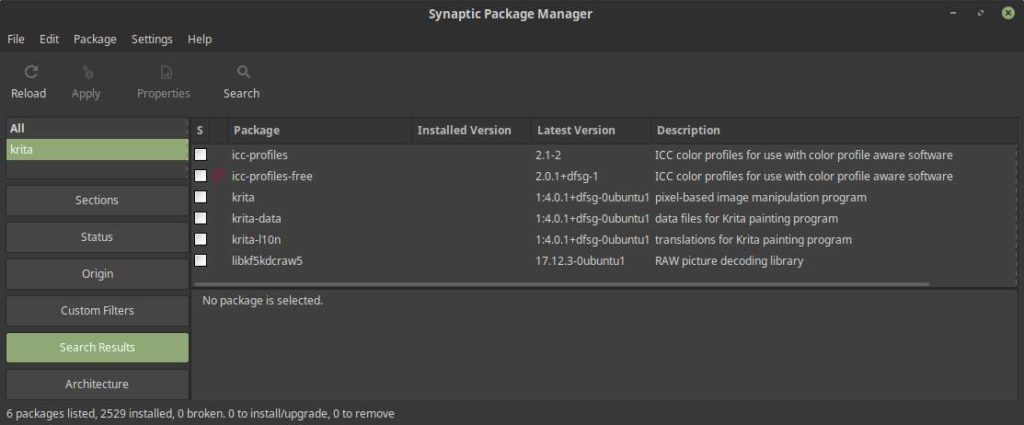
In this screen you see multiple packages that show up because of your search criteria.
3) Select the package “Krita” by clicking on the selection box.
A pop up opens.
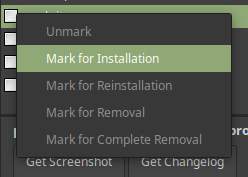
4) Select the option “Mark for installation”.
Another pop up opens which indicates that there are other packages that will be affected and that there are more packages that need to be installed because of your selection of Krita.
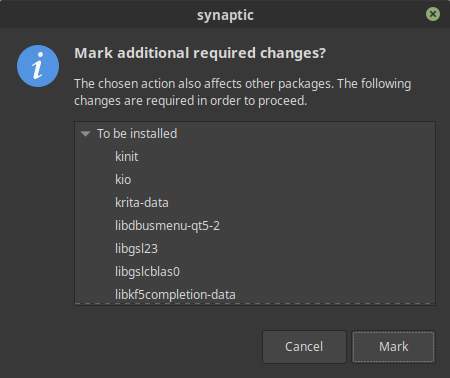
5) Click on “Mark”.
Now you are back on the main screen and additional packages are selected.
6) In the toolbar click on “Apply”.
A summary will pop up.

7) Click on “Apply” to install the selected packages.
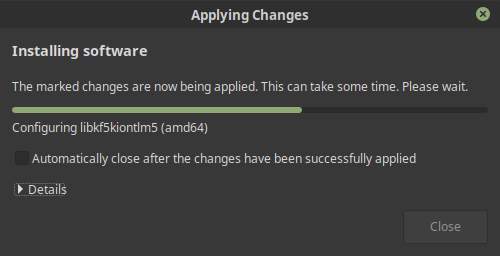
8) When the “Changes applied” screen is visible click on “Close”.
Now Krita has been installed including all dependencies and is ready for you to use.
So now Krita has been installed there maybe comes a moment you want to remove it again.
1) Click on Search.
2) Type “Krita”.
Now you see the following screen in which Krita and related packages have a green marking, which indicate that the application is installed on your system.
3) Select the package “Krita” by clicking on the selection box.
A pop up opens.
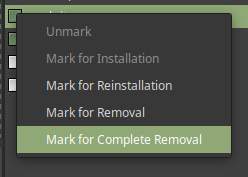
4) Select the option “Mark for Complete Removal”.
5) Click on “Apply”.
A summary will pop up.
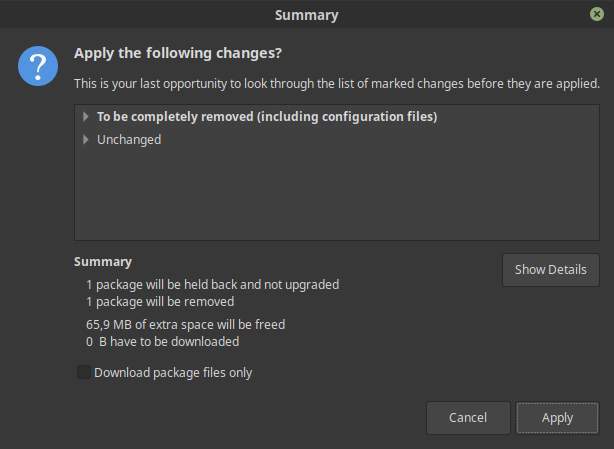
6) Click on “Apply”.
7) When the “Changes applied” screen is visible click on “Close”.
Now Krita has been completely removed including all dependencies.
Software installation via PPA Personal Package Archives
I already indicated earlier in this chapter that the Linux Mint repository contains a huge number of applications, but that they are not always up to date. In addition, there are many applications available for Linux that are not in the standard repository, but are offered through alternative repositories. These alternative repositories, also known as PPA or Personal Package Archives, can be added to Linux Mint so that it is clear to the operating system where these sources are located.
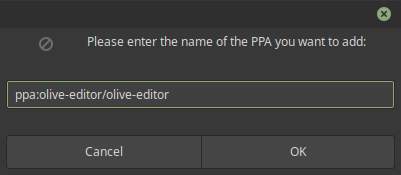
Adding a PPA to Linux Mint can be done in two ways, namely via Software Sources and via the command line. But before we can actually do this, we need to know what a specific PPA looks like and if there is a PPA available. As an example let’s have a look at the new video editing application Olive.
1) Go to https://www.olivevideoeditor.org/ in your web browser
2) Click in the top menu on Downloads or go to https://www.olivevideoeditor.org/download.php.
3) Click on the Linux icon or go to https://www.olivevideoeditor.org/linux.php.
Here in the section “Ubuntu 18.04/Linux Mint 19 and later” it is explained that you can use the following PPA:
ppa:olive-editor/olive-editor
So, as already mentioned, there are two ways to add this PPA: via Software Sources or via the command line. So let’s look at both approaches.
Software Sources
1) Open the Linux Mint main menu and search for “Software Sources”.
2) Click on “Software Sources”.
The following screen shows up:
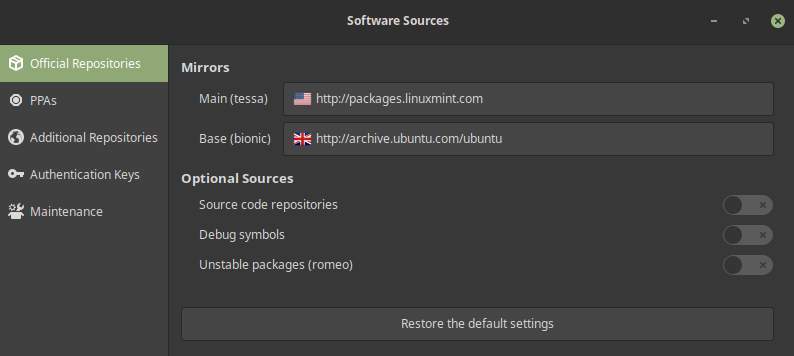
3) Click on “PPAs”.
4) Click on “Add”.
5) Enter “ppa:olive-editor/olive-editor”.
6) Click “OK” and click “OK” again.
Now that the PPA is added the final step is to install the application on your system, as the PPA is only a reference to a additional repository. Because you added the PPA you can find the application now tin the Software Manager or in the Synaptic Package Manager.
7) Click on the Linux Mint menu item to open the application main menu.
8) In the search bar type “Software Manager”.
9) Click on Software Manager.
10) Search for “Olive-editor”.
Now you will see Olive in the search results.

From here you can install the application like explained in the section on Installing via Software Manager.
Command line
In my Linux Mint beginner course I told you many times that I try to stay away as much as possible from the command line. But sometimes the command line is indeed very simple as the developers of applications most of the time share the commands you need, so it is only a matter of copy and paste.
As an example let’s have a look at the application Olive again.
1) Go to https://www.olivevideoeditor.org/ in your web browser
2) Click in the top menu on Downloads or go to https://www.olivevideoeditor.org/download.php.
3) Click on the Linux icon or go to https://www.olivevideoeditor.org/linux.php.
Here in the section “Ubuntu 18.04/Linux Mint 19 and later” it is explained that you can use the following commands:
sudo add-apt-repository ppa:olive-editor/olive-editor
sudo apt-get update
sudo apt-get install olive-editor
So do the following:
4) Open the terminal via Ctrl + Alt + T.
5) Type the following command to add the PPA to your system:
sudo add-apt-repository ppa:olive-editor/olive-editor
6) Type the following command to update the package lists for packages that need upgrading, as well as for new packages that recently have been added to the repositories:
sudo apt-get update
5) Type the following command to install the Olive editor:
sudo apt-get install olive-editor
That’s all. Olive can be searched for and started now via the main menu. Oh, and if you want to remove it again, read about it in the sections on Software Manager or the Synaptic Package Manager in this article.
Software installation via a .deb file
When you use a Linux distribution that is based on Ubuntu, like Kubuntu, Ubuntu Budgie, Linux Mint and of course Ubuntu itself, it uses software packages in the .deb file format. When you use the Software Manager or the Synaptic Package Manager, you are actually installing software from these .deb files.
A lot of developers that don’t have their software in the Ubuntu repository offer their applications via .deb files available to download from their websites. Take for example the .deb file for Google Chrome, which you can download from https://www.google.com/chrome/, or the .deb file for the Vivaldi browser, which you can download from https://vivaldi.com/download/.
1) Open your browser and go to https://vivaldi.com/download/
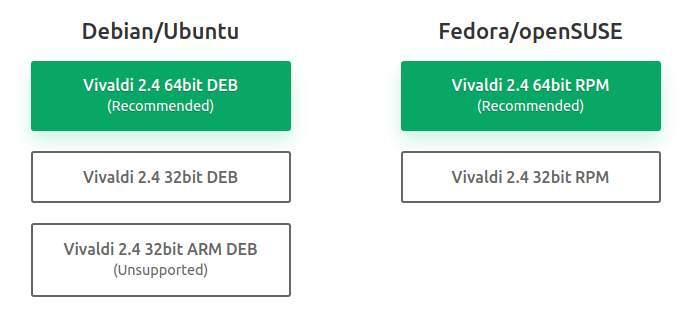
2) Select the 64 bit .deb file for Debia/Ubuntu.
3) When the download is finished go to your Downloads folder and double click the Vivaldi .deb file.
A package installer opens.
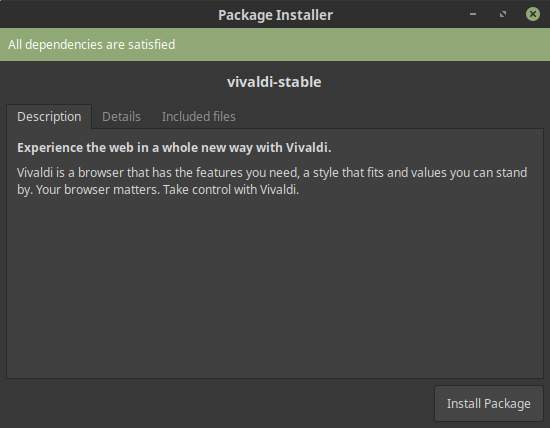
4) Click on “Install Package” and the software will be installed.
That’s all. The Vivaldi browser can be searched for and started now via the main menu. Oh, and if you want to remove it again, read about it in the sections on Software Manager or the Synaptic Package Manager in this article.
Alternative ways for software distribution
As you maybe already concluded from the previous approaches described in this article, some of them are a bit restrictive for people who want the latest and greatest and for developers who have a high frequency of bringing new releases of their software to their users. A repository with a two year update cycle can be limitative. But also the fact that developers need to create different versions of their software for Debian/Ubuntu based or Fedora/OpenSUSE based distributions to reach their users. And what about all the dependencies that are needed to make your software run. All this resulted in some alternative approaches that are more generic, that can be used for all distributions and that can always offer updated software with their dependencies included. Let’s have a look at Flatpak, Snap and Appimage solutions.
Software installation via Flatpak
Instead of the need to create separate dedicated .deb files for Debian and Ubuntu based distributions and .rpm files for Red Hat, Fedora and derivatives such as CentOS and openSUSE, with the relatively new Flatpak file format you have distribution independent packages. These packages run on whatever distribution without the necessary effort to connect the application to the right dependencies and libraries. Because as a developer you use container technology you pre-bundle the required libraries with your app, so you always know your application will work on every platform and you offer the user of the application a hassle-free solution. As a developer, with Flatpak you just create one application for the entire Linux desktop domain and on top of that you are in control on updates as well. Flatpak can be compared with Snap, which will be described in the next section, but Snap is backed by only one company while Flatpak is independent community based. From Linux Mint 18.3 Flatpak is supported out of the box without the necessary additional settings or adjustments. You can find Flatpaks directly in the Software Manager, but there is even a software store comparable with the Google Play store or the Microsoft Store where lots of Flatpak based applications are gathered and ready to download.
Let’s have a look at the Software Manager first.
1) Click on the Linux Mint main menu item to open the application main menu.
2) In the search bar type “Software Manager”.
3) Click on Software Manager.
The following screen will be opened.
In this screen you can see in the right hand lower corner the option Flatpak.
Let’s try to install a Flatpak based app.
4) Click on Flatpak.
Now you see an overview with all the available Flatpak based applications.

5) Click for example on Telegram Desktop.
Now the same presentation and options will be given as described in the section on software installation via the Linux Mint Software Manager.
Another way to find Flatpak based applications is via the Flathub store.
1) Via your browser go to https://flathub.org/home.
The following screen will be presented to you.
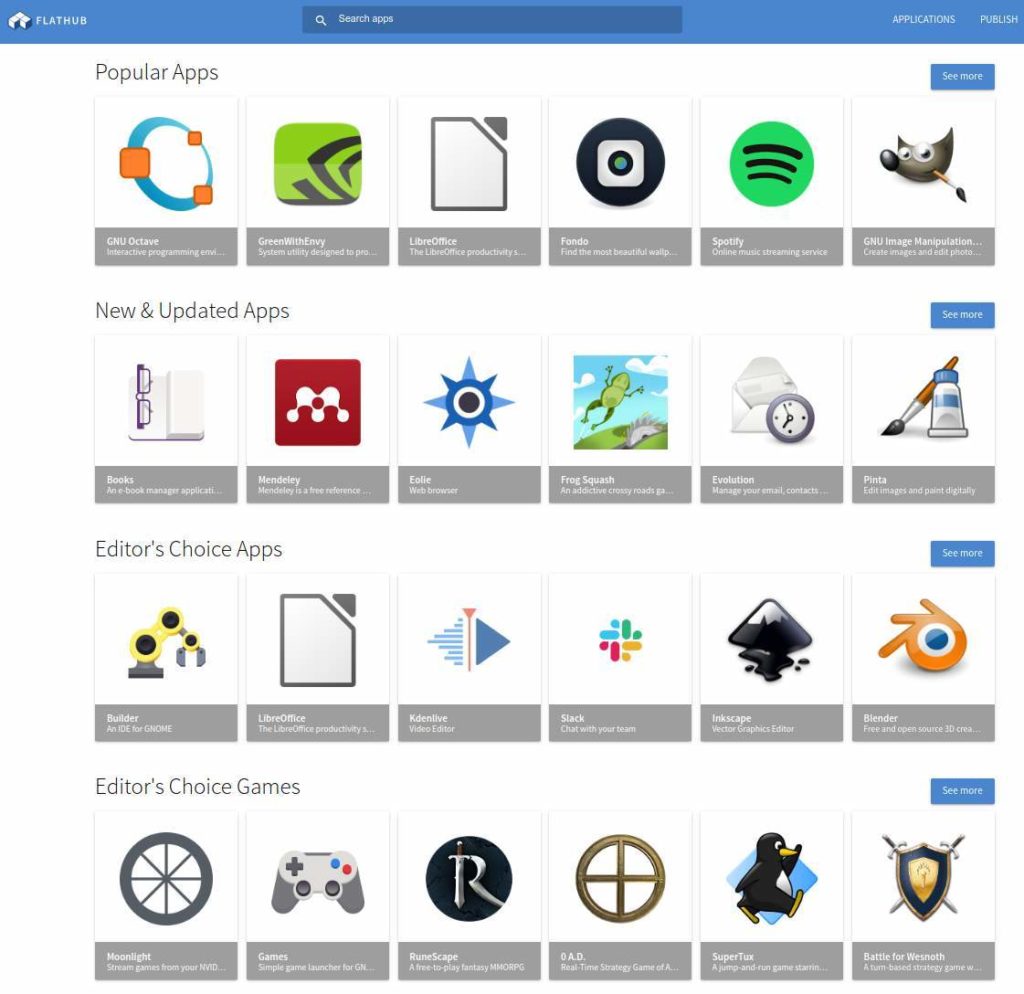
If you know the name of an application you directly can search for it. But if you just want to browse through the categories that is possible as well. The main more generic categories are Popular Apps, New & Updated Apps, Editor’s Choice Apps and Editor’s Choice Games. Here you can click on See more to show all the apps in a specific category. On top of the screen you see the option Browse the apps. Via this option you can find applications via more specific categories: All, Audio & Video, Developer Tools, Education, Games, Graphics & Photography, Communication & News, Productivity, Science, Settings and Utilities.
As an example let’s pick the Media Center application Kodi. You can directly search for it via the search function or click on the category Audio & Video.
2) Click on the category Audio & Video.
3) Scroll down through the results till you find Kodi.
4) Click on the Kodi logo.
Now the Kodi details screen opens. Here you find a description, links to the website, Donate, Help, Issues and Translations. Some additional information informs you about last update, version, developer and publisher. At the bottom you find the command line instructions to install the Flatpak and to run the application. At the top of the screen you find an Install button.
5) Click on the Install button.
6) A file tv.kodi.Kodi.flatpakref will be saved in your Downloads folder.
7) If the download is finished search for the file and double click it.
8) The Software Manager opens and you need to provide your password.
Now the Kodi install page will be opened.
9) To install the app click on Install.
If you don’t use Linux Mint, but another distro like Ubuntu, Fedora, Solus or Elementary OS, you have to do some setup first to be able to install Flatpaks.
1) Via your browser go to https://flatpak.org/setup/
Here you see the logos of more than 20 different distributions.
2) Click on the logo of your distribution.
Some distributions like Fedora already have Flatpak support pre installed. But for example Elementary OS has not. Follow the instructions as described for your specific distribution.
Software installation via Snap
Snap is a software package format created by Canonical, the company behind the Ubuntu operating system. A Snap has bundled all of its dependent components and libraries, so the software can be used on most Linux distributions. A software developer that offers an application via Snap doesn’t need to worry about creating different versions for Debian, Ubuntu, Fedora, Arch, etc. Another great thing is that Snap based applications are automatically being updated. And there is even a dedicated software store comparable with the Google Play store or the Microsoft Store where all Snap based applications are available and ready to download.
Linux Mint does not support Snap out of the box. The team behind Linux Mint choose for the equivalent alternative Flatpak as described earlier in this article. Snap and Flatpak both function in a similar way, but are also different. But both can be installed and used on all kind of distributions. Flatpak support is built into Linux Mint 18.3 and higher, so no special setup is required. But what if an application is not available as Flatpak but only as Snap? For this we need to install “snapd”, which supports installing, configuring, refreshing and removing snap packages.
The easiest way to install snapd is from the Linux Software Manager.
1) Open your applications menu and search for “Software Manager”.
2) Start “Software Manager”.
3) In the “Software Manager” search for “snapd”.
4) Open “snapd” by clicking on it.
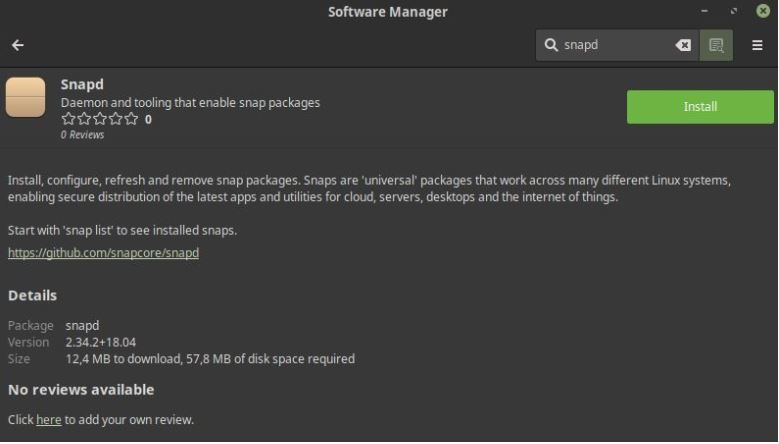
5) Click on Install.
You can also install snapd from the command line:
1) Open the command line tool via Ctrl + Alt + T.
2) Type the command “sudo apt-get update” and give enter.
3) Type the command “sudo apt-get install snapd” and give enter.
Now that snapd has been installed you can easily install Snap based applications.
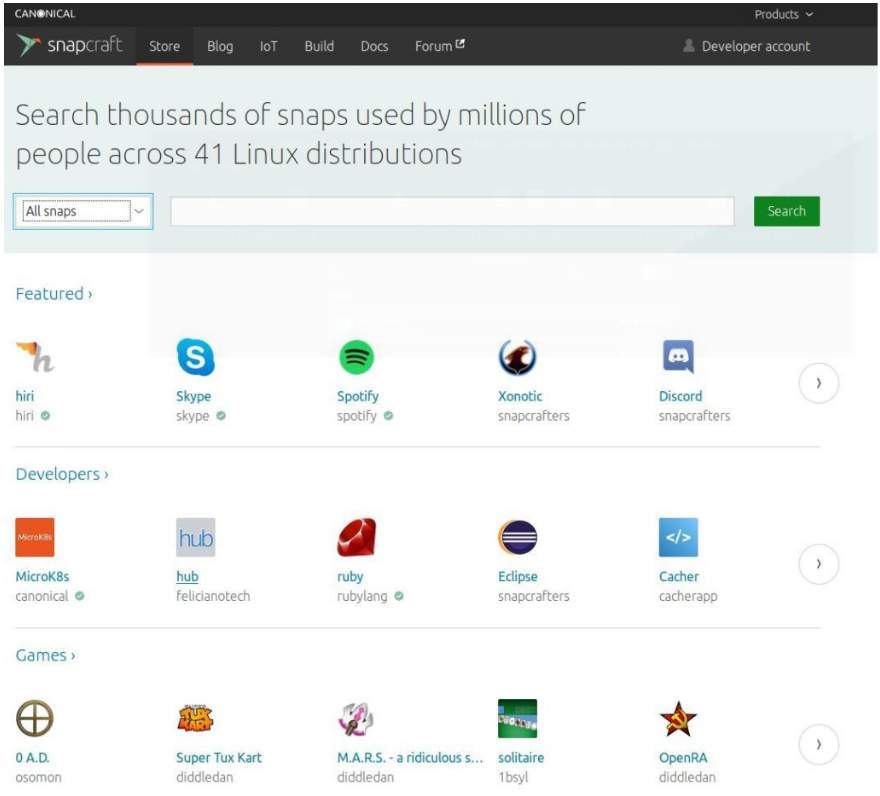
1) Go to https://snapcraft.io
2) Here you can search for applications in different categories, like Developer, Games, Video and Music.
3) Click on the application you want to install.
4) In the screen with all the details about this specific application click on Install.
What you will see now is some information on how to install the Snap package.
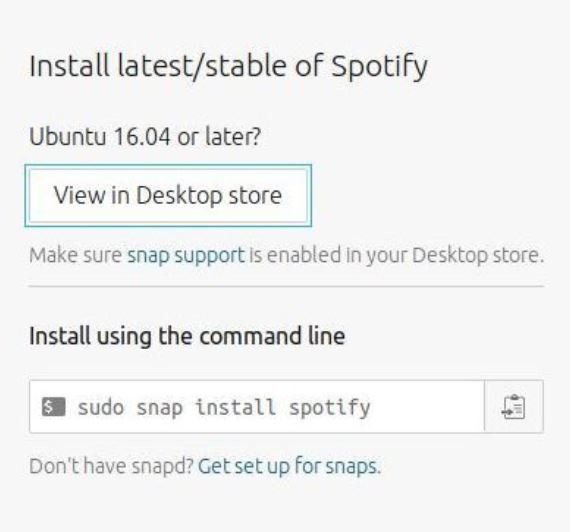
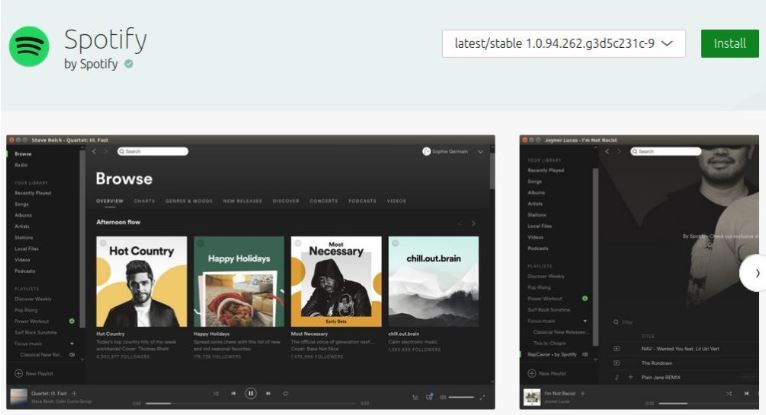
Unlike Flatpak, which is integrated in the Linux Mint Software Manager, you won’t find Snaps in the Linux Mint Software Manager. So we need to use the above proposed terminal command to install Snap based packages in Linux Mint. In the example above it says that you can install the Snap of Spotify by typing the following command in the terminal:
sudo snap install spotify
And if you want to install for example Deepin Music you type:
sudo snap install deepin-music
After you typed the specific command in the terminal (Open with Ctrl + Alt + T), an installation process will be visible and after a short while the application has been installed.
You can update your Snap based applications once in a while by using the “refresh” command. To update all the Snap based applications on your system to the latest versions type:
sudo snap refresh
Snaps can easily be removed from Linux Mint as well via the command sudo snap remove [name of application].
For example:
sudo snap remove deepin-music
Software installation via Appimage
Software distributed as AppImage is probably the most simple solution for the end user as it is not required to actually install the software. You just download an application, convert it to executable, and you can run it from whatever location you like. It doesn’t matter if you use a Debian/Ubuntu based distribution or other distros like Arch or Fedora. It runs everywhere. And as the AppImage is a file that contains the application and all of its dependencies, you know it will always run as it was designed.
More and more developers are creating AppImages to distribute their software. Some of them are offering their AppImages directly from their website, like Krita and digiKam, but more convenient is to search for applications via https://bintray.com/probono/AppImages or https://appimage.github.io.
So let’s try the AppImage of the application Krita.
1) Go to https://krita.org/en/download/krita-desktop/.
Here you see different download options. AppImage is one of them.
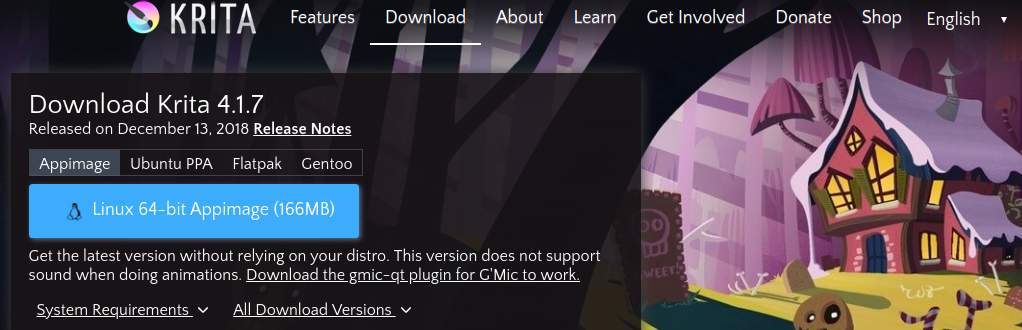
2) Click on Linux 64-bit AppImage and the download starts.
3) When the download finished go to the Downloads folder.
4) Move the .appimage file for example to your Desktop.
5) Right click on the .appimage file and select Properties.
6) Click on the tab Permissions.
7) Select Allow executing file as program.
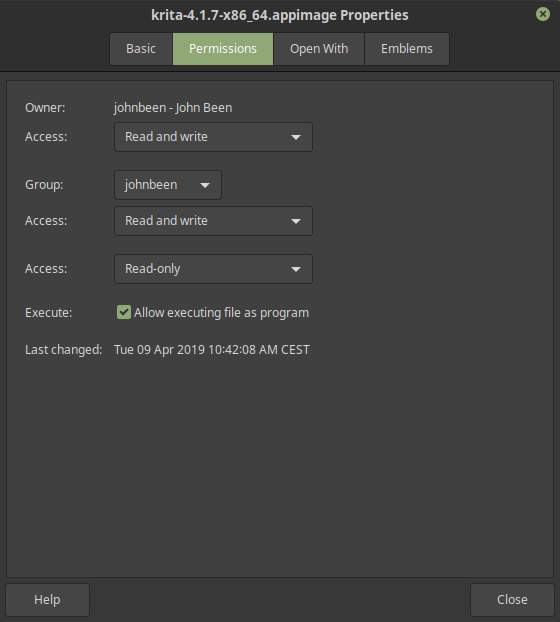
8) Click on Close.
9) Now double click on the .appimage file and Krita will start.
Wrapping up
In this chapter I have shown several ways how you can search, select, install and remove new software under Linux Mint or whatever other Ubuntu based distribution. Often you will not use just one method. Personally, I always like to go to the website of an application developer first. There I find all information about how it works and about updates and it is usually explained what the recommended method is to install the software under Linux. But other users prefer to go directly to the Software Manager and install a stable version from there. In theory installation via the Software Manager is more secure than downloading a .deb file, but in practice there have not that many known security breaches as a result of this way of software offering. I hope it has become clear in any case that there are different methods and that they all have their own advantages and disadvantages. Have fun!