Not so long ago Linux Mint was my favourite Linux distribution and my reason to make the switch. Linux Mint is still really great, as it is fast, stable, complete and offers an interface that resembles Windows, so most beginners feels right at home. But also more experienced users that are more focussed on getting things done will feel really happy with Mint. But recently I downloaded Zorin OS and first tried it on a spare computer. From the moment I started Zorin OS it blew me away. And even now I am really impressed with the looks, configurability, speed, stability, the integration and all the nice things that most other distributions don’t offer in the same package. Zorin OS offers a complete package of usability and reliability and is a great option for both beginners and experienced users. But although Zorin OS is from my set of requirements close to perfect, there are always things that need to be done or can be done to optimize your system and improve your user experience and pleasure even more. In this blog post I will give you my 15 best things to do after installing Zorin OS 15 from a beginner’s perspective.
Note: This article is part of my (in progress) Zorin OS for Beginners tutorials series.
The Goal of this article
In this article I will discuss 15 things that you should do after having Zorin OS 15 installed that will help you setup a superb initial implementation for your computing needs. If you first want to read more about downloading Zorin OS and how to create a bootable USB stick with Zorin OS then please visit my articles “How to download Zorin OS” and “How to create a Zorin OS bootable usb in macOS and Windows“.
Or just go to the Zorin OS homepage for more information.
But let’s now dive in the 15 best things to do after installing Zorin OS 15 and have a look at the following topics:
- Change to nearby update servers
- Update your operating system
- Check and install drivers
- Setup Timeshift for backup and recovery of your system files
- Setup a backup strategy for your personal files
- Improve use of internal memory
- Setup a firewall
- Improve battery life
- Install Tweak tool
- Setup AppFolders extension
- Setup Zorin Connect
- Setup AppImageLauncher
- Install Stacer to optimize and monitor your system
- Setup Night Light
- Install basic software
1) Change to nearby update servers
In the standard installation of Zorin OS the Main and Base mirrors, which are the starting point for retrieving your software updates, are probably not the closest to your location and not the fastest option for your specific situation. To change to a more nearby update server to improve update performance you can do the following:
1) Click on the Zorin icon on the left of your panel in the lower part of your desktop to open the applications menu or applications grid (depends on your theming).

2) Search for “Updates” and click on the icon with the name “Software & Updates”.
3) Select the tab “Zorin Software”.
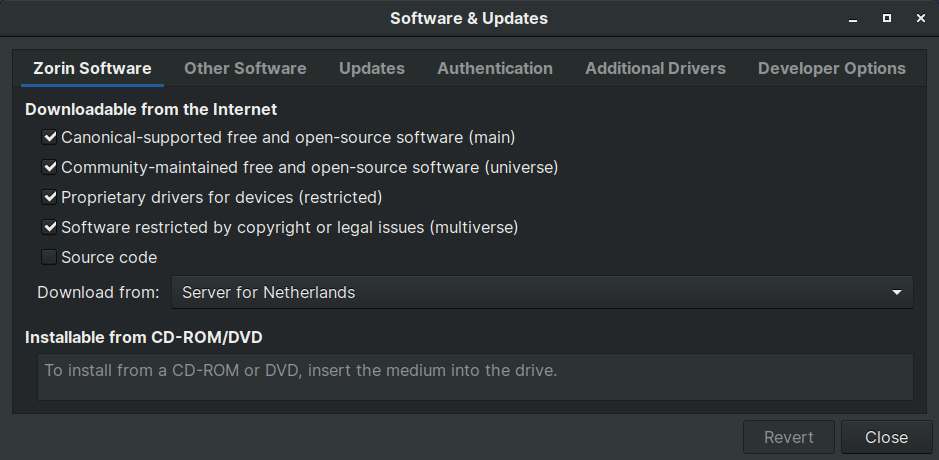
4) Click on the dropdown next to “Download from”.
5) Select the option “Other…”.
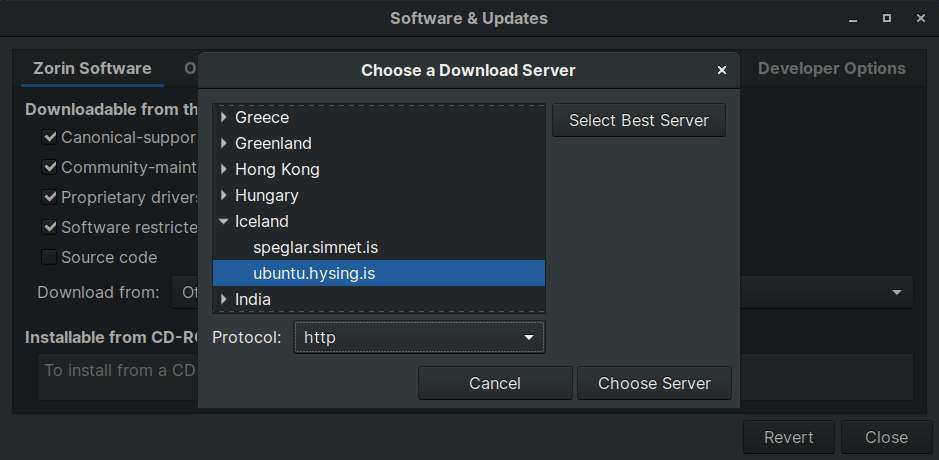
6) In the “Choose a Download Server” screen first choose your (nearest) country and within that option choose a server.
7) Now click on “Choose Server” and enter your password when asked for.
8) You can now close the (Software & Updates” screen.
The following message will be presented to you.
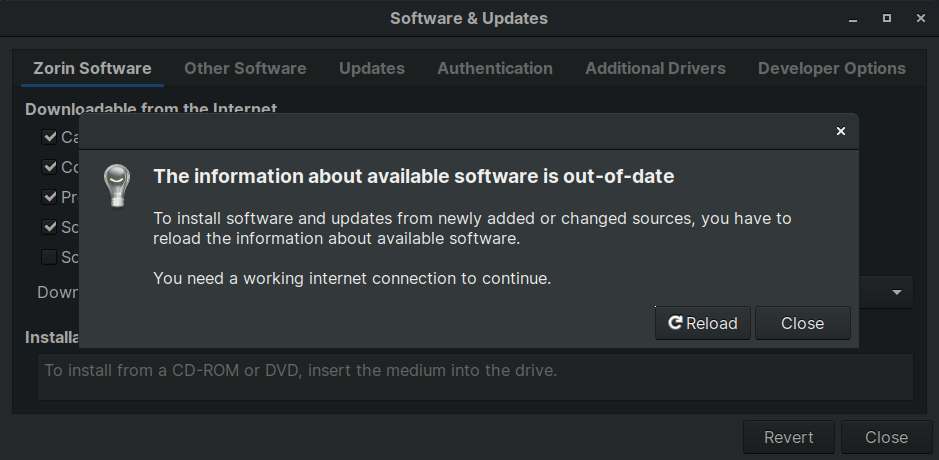
As you change to another server, you have to reload the information about available software.
9) Click on “Reload”.
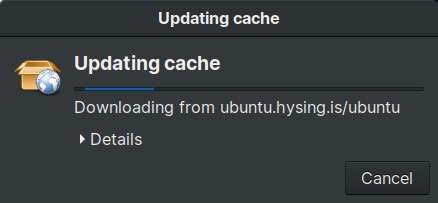
The cache will be updated. After the update process this screen will close automatically. Based on your changes you will probably notice an improvement of the update performance of your system as you get your data from a source more nearby your location.
2) Update your operating system
After we changed to a nearby server for optimal download results we should update our package index files and upgrade to install the newest versions of all packages to start with the most up-to-date foundation. Then we know we install the most recent software. An update should always be performed before an upgrade.
1) Open a terminal session with keyboard combination Ctrl + Alt + T.
Update is required to resynchronize the package index files.
2) Type the following command and give enter:
sudo apt-get update
Upgrade is required to install the latest versions of all packages currently
installed on the system
3) Type the following command and give enter:
sudo apt-get upgrade
You will get the message “Do you want to continue? [Y/n]”.
4) Type “Y” and give enter.
Your system is now updated.
3) Check and install drivers
Modern Linux distributions have out of the box terrific support for most of the available hardware components, like graphics cards, printers and WiFi adapters. But it is always possible that the setup procedure doesn’t come up directly with the correct or most optimized drivers. So it is advisable that you check and adapt your drivers for devices and hardware components like your Wifi adapter, graphics card and Printer.
1) Click on the Zorin icon on the left of your panel in the lower part of your desktop to open the applications menu or applications grid (depends on your theming).
2) Search for “Updates” and click on the icon with the name “Software & Updates”.
3) Select the tab “Additional Drivers”.
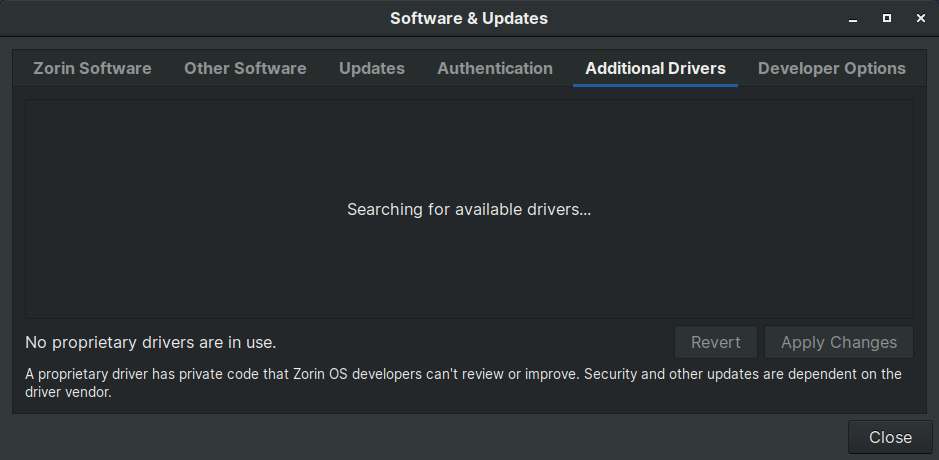
After it searches for available drivers, in my case it finds drivers for my old NVIDIA GTX 750 Ti.
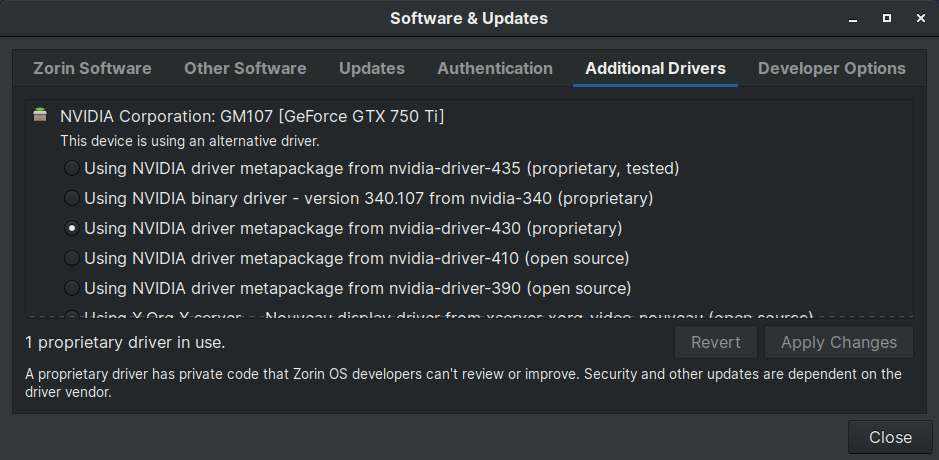
Here another driver can be selected.
4) Select the desired driver and click on “Apply Changes”.
4) Setup Timeshift for backup and recovery of your system files
There are two types of people in the world, those who have already had a hard drive crash and those who will get one soon. The question is not if your storage device will break down, but when it will actually happen. Every storage device like a hard drive or SSD device has a limited lifespan and the moment it stops working is always at an unexpected and undesirable moment. But the risks are not only about crashes, as it also involves data loss due to flooding, fire and lightning strikes, but also as a result of just wrong human actions and decisions. So we need to be aware of those situations and act on it by setting up a good backup implementation for your system files. In a separate item we will discuss backing up your personal files.
Although Zorin OS includes a backup utility, in my opinion the application Timeshift is superb for the backup and restore of your system files. Timeshift is not meant for every backup situation. To secure and restore your individual personal files, such as text documents, spreadsheets, photos and films, which are maybe even stored on separate drives, it is advisable to use another backup application such as LuckyBackup or Cronopete. But for securing your system implementation including your home folder, Timeshift is a perfect solution, as it enables you to recover your whole system when something really went wrong.
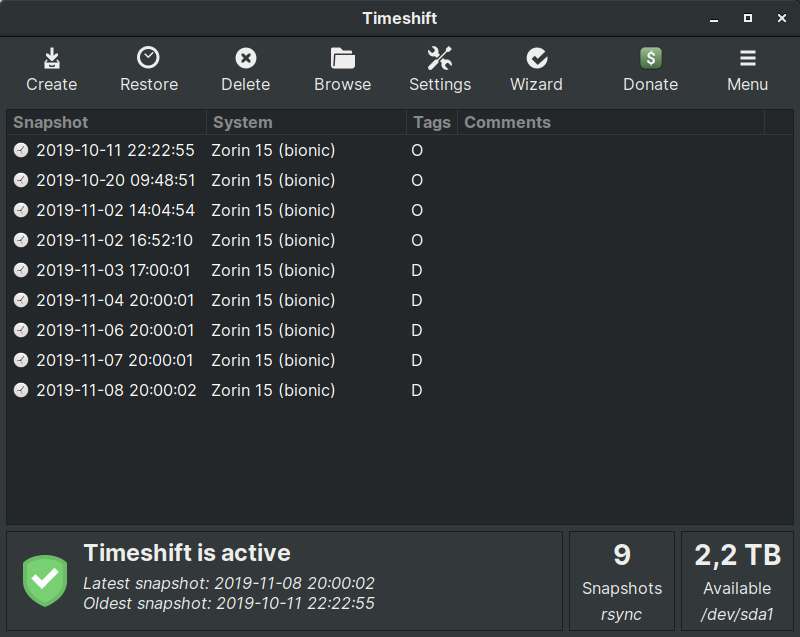
Timeshift works on the basis of incremental backups. The first time, when there is nothing backed up yet, Timeshift will have to make a full initial backup of course, but from then on Timeshift only looks at the modified files and then only makes a backup of those changes. The advantage of this is that these backups are much faster, since the number of files that are in scope is much smaller. But also the amount of storage needed is much smaller.
As the procedure to install and setup Timeshift is almost the same on any Ubuntu based Linux distribution, to set it up on Zorin OS you can read my article “How to use Timeshift to backup and restore Linux Mint” for further details.
5) Setup a backup strategy for your personal files
As already explained for item 4 the question is not if your storage device will break down, but when it will actually happen. In the previous item I focused on backup and recovery of your system files, but your personal files are probably far more important so a good backup strategy is very important. In my article “How to design your perfect backup strategy for Linux” you can read about the globally known 3-2-1 backup concept. This strategy is even embraced by governments worldwide, so it will also be sufficient for us as simple souls. The 3-2-1 strategy simply means that you save at least 3 versions of your files, of which 2 are stored locally (on site) but on different media and 1 version in a location out of the reach of your computer and local versions (offsite).
After you read the article on setting up a backup strategy, it is time to actually setup and use backup software. In my article “luckyBackup is a powerful backup solution for linux” and “Cronopete backup software for Linux is a good alternative to Apple Time Machine” you can read about some great alternatives and how to set them up.
6) Improve use of internal memory
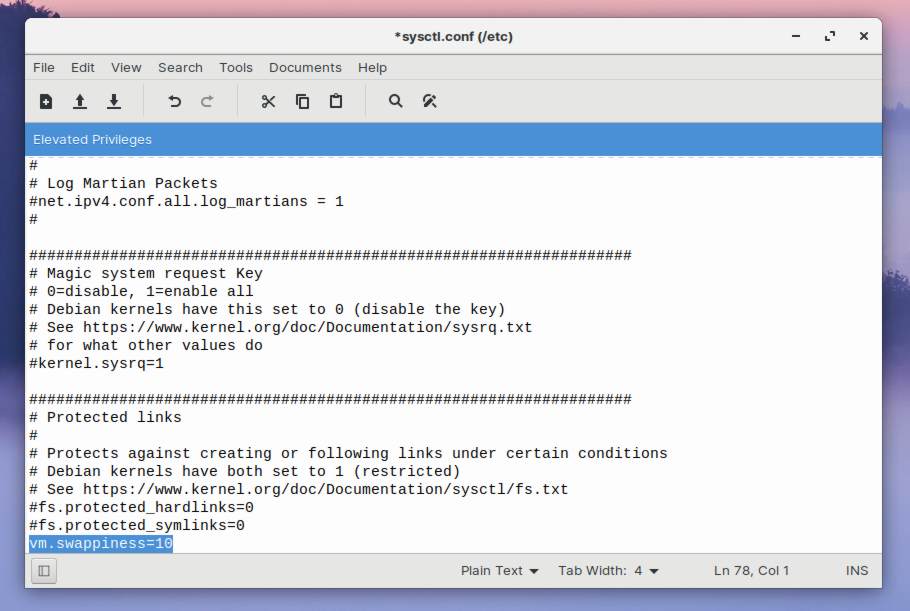
Zorin OS is configured in such a way that if your memory usage reaches a certain percentage of the internal memory in your machine, it is starting to use the swap. The swap is a technique to use a special swap partition or swap file as additional working memory. But using swap is much slower than your internal memory so it should be used only when really required. The default value is 60 and means that swap comes into operation when 40% of the RAM is in use. This standard turning point of 60 is in my opinion a bit early, especially if you have only 2 or 4 GB of internal memory. My advice is to bring this value down to 10, which means that swap comes into operation when 90% of the RAM is in use. This can be adjusted by defining the swappiness in the sysctl.conf.
1) Open a terminal session with the keyboard combination Ctrl + Alt + T.
2) Type “sudo xed /etc/sysctl.conf” and give enter.
Note: If xed is not available on your system, you can read more about it in my article “How to use your internal memory optimally in Linux“.
An editor will be opened with elevated privileges. Here we can edit the sysctl.conf file.
3) Go to the last line in the file and give enter to start a new line.
4) Type “vm.swappiness=10”.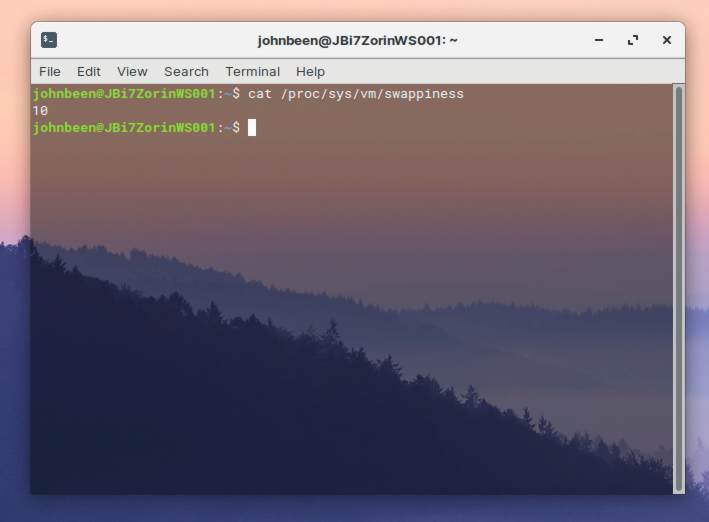
5) save the file and close the file.
6) Reboot your computer.
When the computer is up and running again you can check the new configuration.
7) Open a terminal session with the keyboard combination Ctrl + Alt + T.
8) Type “cat /proc/sys/vm/swappiness” and give enter.
Here you can see that the swappiness value is indeed 10 now, which means that your system will use up to 90% of your internal memory before switching over to a swap file. This should keep your system more responsive when using heavier workload.
7) Setup a firewall
Setting up the firewall in Zorin OS is childishly simple.
1) Search for “Firewall” in your Applications Menu.
2) Start Firewall Configuration.
The following screen will appear.
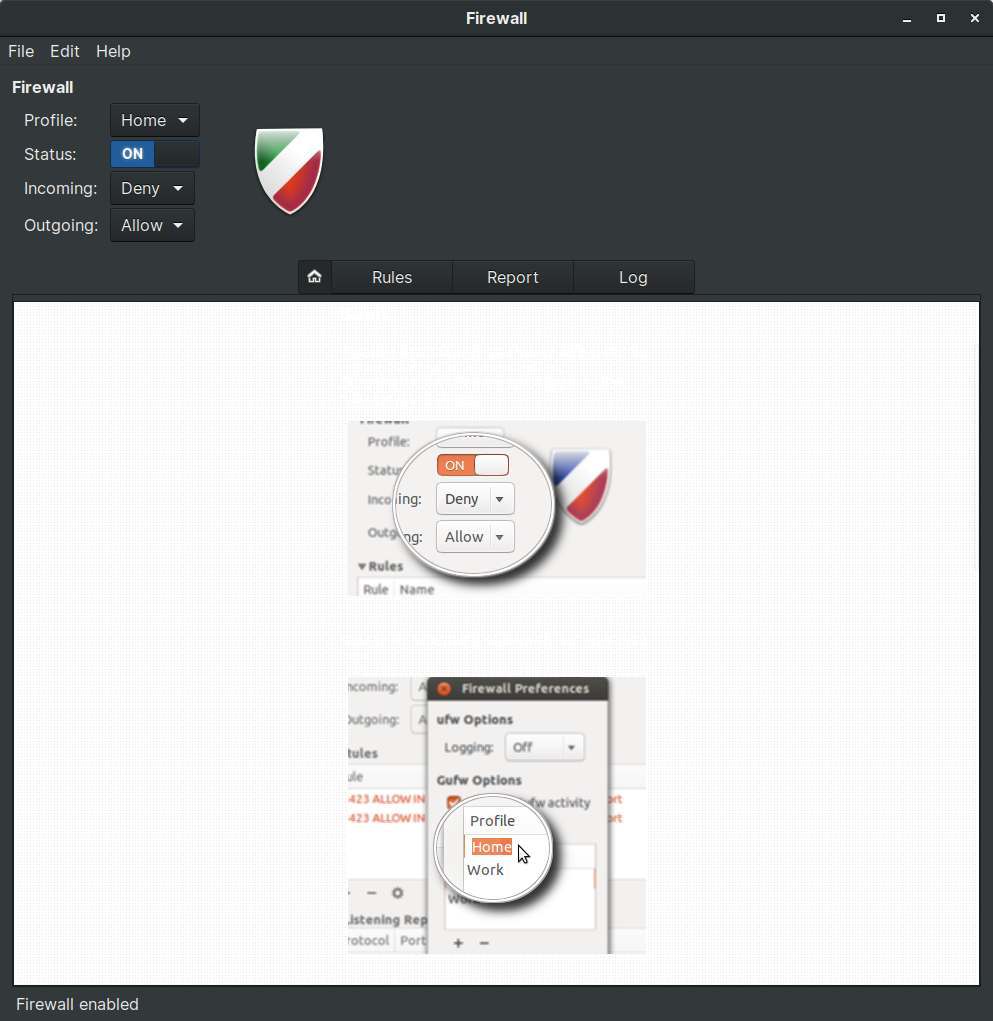
3) If you are just a regular user then make sure that you have the following settings:
Status = On
Incoming = Deny
Outgoing = Allow
8) Improve battery life
The Linux operating system is really great since it is stable, robust, modern, user friendly and therefore it can easily compete with the established operating systems and even surpass them at some points. But linux is not equally strong at all points. One of the areas that deserves more attention is battery life when running on a laptop. Most Linux distributions are out of the box not really optimized to get the most out of your laptop. On a desktop you don’t need to improve battery life of course, but on your laptop you should give some attention to optimize your power consumption, so you can use your machine as long as possible during the day. Up till this very moment it has never been possible to squeeze as many hours out of a Linux based laptop as compared to macOS and Windows based machines. But things can be improved with an application like TLP. So let’s see How to improve battery life on your Zorin OS based laptop with TLP.
1) Start a terminal session via the keyboard combination Ctrl + Alt + T.
2) Add the TLP Package Repository to your package sources with the following commands:
sudo add-apt-repository ppa:linrunner/tlp
sudo apt-get update
3) Install the packages tlp, tlp-rdw, tp-smapi-dkms and acpi-call-dkms via the following command:
sudo apt-get install tlp tlp-rdw
ThinkPads require an additional command:
sudo apt-get install tp-smapi-dkms acpi-call-dkms
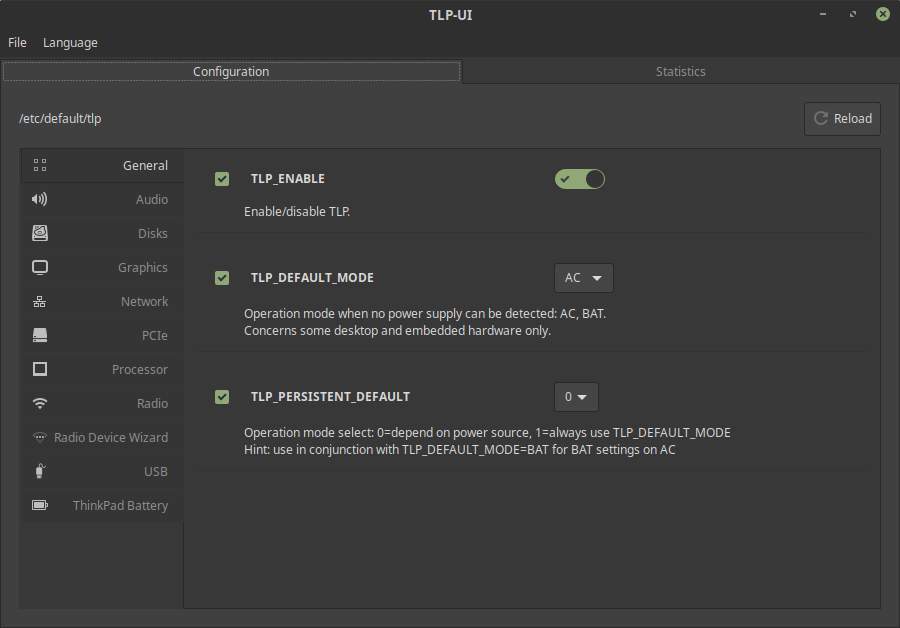
This was just a minimal description of the installation process. If you want more details of everything TLP has to offer, how to install the graphical interface TLPUI and how to setup these applications, please have a look at my recent article “How to improve battery life on Linux laptops with TLP” or visit the TLP website.
9) Install Tweak tool
Zorin OS has built in a lot of options to change the system to your likings. In your Settings menu you can adapt standard values with respect to Wi-Fi, Bluetooth, Appearance, Notifications, Accounts, Sound, Printers, etc. There is quite a lot to customize out of the box. But you can go even further with the Tweak tool and for example for the next topic, AppFolders extension, you need this tool.
With the tweak tool you have more fine grain control over your Appearance settings, you can change your themes, you can manage your extensions, you have more control over your font settings, the scaling, your windows and your workspaces.
Before installing applications it is wise to update your software repositories first, so you have the most recent and up to date content as a base for your installation process.
1) So open a terminal with the keyboard combination Ctrl + Alt + T and type the following command and give Enter:
sudo apt-get update
2) Add the Ubuntu Tweaks to your system with the following commands:
sudo apt install gnome-tweaks
3) Now you probably need to restart your system before you can find the Tweak tool in your applications.
4) Click on the Zorin icon on the left of your panel in the lower part of your desktop to open the applications menu or applications grid (depends on your theming).
5) Search for “Tweaks” and start the application.
10) Setup AppFolders extension
In operating systems such as Android, iOS and macOS, applications grids are used in which you can organize your application icons. In addition to being able to determine for yourself where on the screen you want to place your icons, it is also possible within these systems to create app folders in which you can group a number of application icons and manage them per topic, such as Office, Art, Games and Health. Until recently this was not possible as standard in the application grid of Ubuntu and related distributions like Zorin OS that use the GNOME desktop environment. In the latest Ubuntu 19.10 this grouping of applications is possible, but what about distros that don’t use the latest GNOME? Well, lots of people are probably not aware of this, but there is an app folder management solution available for distros like Zorin OS.
Appfolders Management is a GNOME Shell extension that enables convenient management of your app folders directly within the applications grid. You can for example create folders by dropping icons on top of others, you can add and remove applications using drag-and-drop movements, you can rename and delete icons just with a simple right-click.
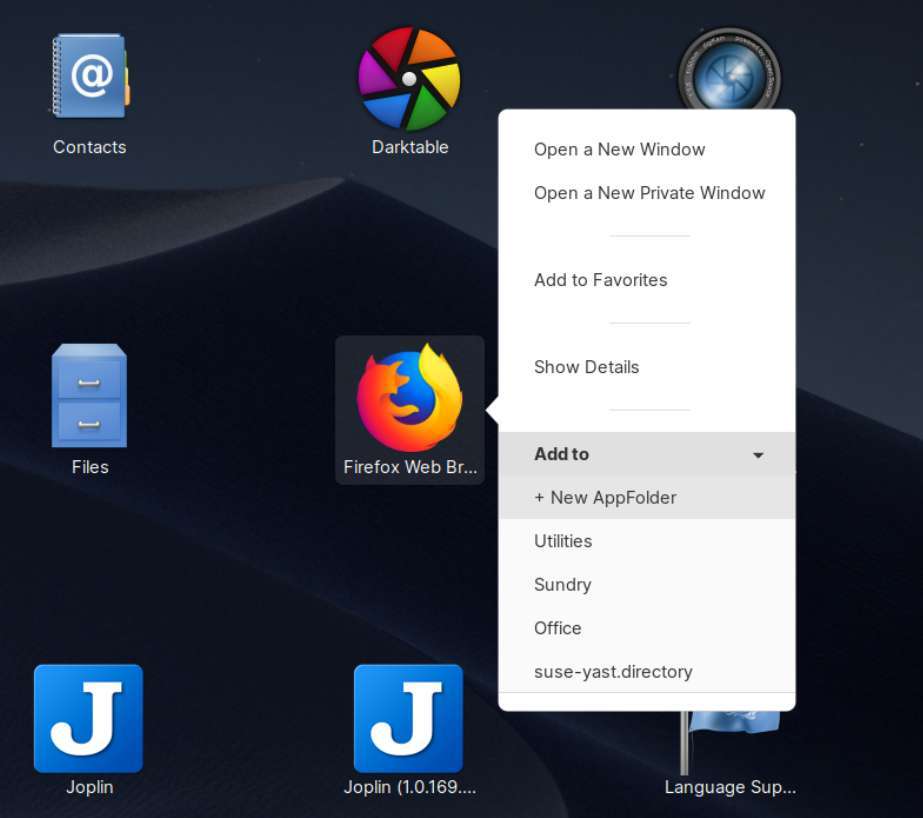
Read my article “How to create and manage app folders in pre Ubuntu 19.10 distros” to find all the details on how to enable Appfolders Management in Zorin OS and other GNOME based distros.
11) Setup Zorin Connect
Zorin OS is a beautiful and very accessible and friendly operating system and offers a lot of functionality directly out of the box, which in other distributions often has to be installed or adjusted afterwards. One of these functionalities is the connection between your Zorin OS computer and your Android phone, which is supported in an impressive way through Zorin Connect.
Zorin Connect is a software solution that provides convenient and intelligent functionality to integrate your Android mobile phone and your Linux Zorin OS based pc or laptop. Zorin Connect is designed and created and in active development by the team behind the Zorin OS Linux distribution. Zorin Connect is a software solution that makes communication possible between your Zorin OS device and your Android mobile phone, as long as your computer is connected to your network and your Android phone is connected to the same network via WiFi. If this setup has been arranged and the software has been installed and configured on all devices involved, you will have a great experience.
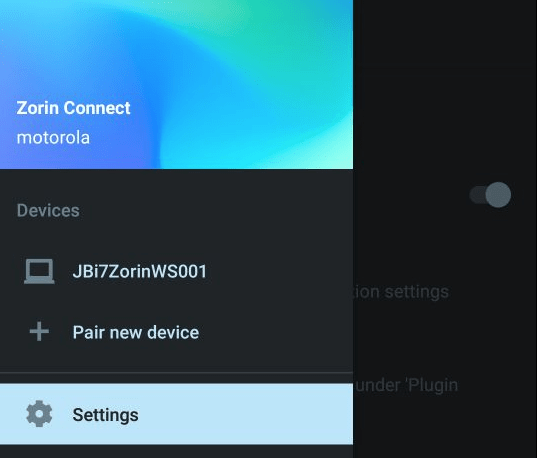
With Zorin Connect it is possible to receive the notifications that normally appear on your phone on your desktop as well. So when there is a WhatsApp or Telegram messages coming in, a pop up will also be visible on your desktop, that you even can react to or remove without touching your phone. But you also can browse the photos on your phone, share both files and links between your devices, get notifications for incoming phone calls and SMS messages on your computer and you can even use your Android phone as a remote control to control some software on your computer. And that’s not all. You can see the battery status of your phone on your desktop, you can browse the file system remotely, launch the camera app to take and transfer images, find your Android Phone via your computer, send SMS messages from your desktop, use your Android device for changing slides in a presentation or the pages in your LibreOffice document, it provides a remote control function for your media player and you can use your phone as a touchpad or keyboard. That’s all pretty great in my humble opinion.
For all the details about setting up Zorin Connect on both your desktop and your Android mobile phone you can read my article “How to Connect your Android phone to Zorin OS with Zorin Connect“.
12) Setup AppImageLauncher
The Linux and Open Source world is an ecosystem that is constantly evolving. Every day thousands of passionate people worldwide are working alone or together in groups to improve the kernel, the distributions, the desktop environments and applications. There is a huge number of applications available for the Linux platform for different use cases. Some of these applications are dedicated for a specific distribution, but most of these applications can be used under any Linux distribution. There are different formats being used to distribute Linux software, like .deb. Snap and Flatpak. Another format is AppImage which is a one file concept that contains everything the application needs. When you browse the internet for specific applications the chance is growing that you will find these in AppImage format.
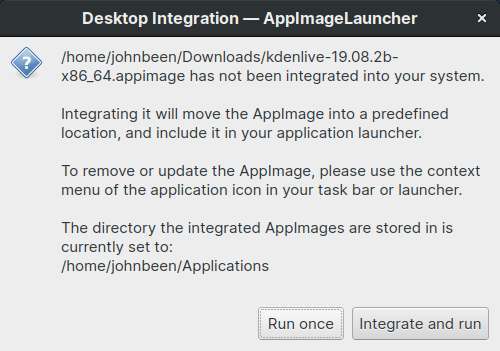
Although the concept of AppImage is based on simplicity, you still need to do some things before you can use an application. Normally you need to make an AppImage executable before being able to execute it. And it is not that obvious how to make an AppImage icon show up in your applications grid. To simplify the whole installation and setup process around AppImages you can install AppImageLauncher. With AppImageLauncher this all integrates deeply in your system.
When you installed AppImageLauncher and you start an AppImage file, the application checks whether the AppImage has been integrated already. If this is the first time you will see a popup to inform you to run the AppImage once, or move it to a predefined location and adding it to your application menus, launchers, etc, including the correct application icon.
1) Go to the following web address:
As this article is based on Zorin OS 15, we need to download the Ubuntu 18.04 Bionic version.
2) Click on the following download link:
3) Double click on the downloaded .deb file to install AppImageLauncher.
Now you can just double click each new AppImage based application to integrate it in your Zorin OS system.
4) Click on Integrate and run to integrate the AppImage based application optimally in your system.
5) You can remove an AppImage application by right clicking on the icon and choose for Remove AppImage from System.
13) Install Stacer to optimize and monitor your system
Making clutter is easier than cleaning up clutter. Making a mess happens naturally to many people, but cleaning up the mess requires a bit of discipline. And this works better for one person than for another, so if there is some help out there that makes the job easier, that would be a great gift for a lot of us. Due to the fact that I try out many applications and settings as a basis for writing my blogs, the chance of digital contamination of my Linux system is very high. At a certain moment you no longer know what you have and have not installed and whether you have removed everything you no longer need correctly and completely. In addition, I also have a need to see how my system is performing after a period of intensive use. One of the applications for Linux that people like you and I can use in this process is Stacer. In my opinion, Stacer is the most user friendly system optimizing and monitoring tool for Linux and fits in the user oriented Zorin OS distribution.
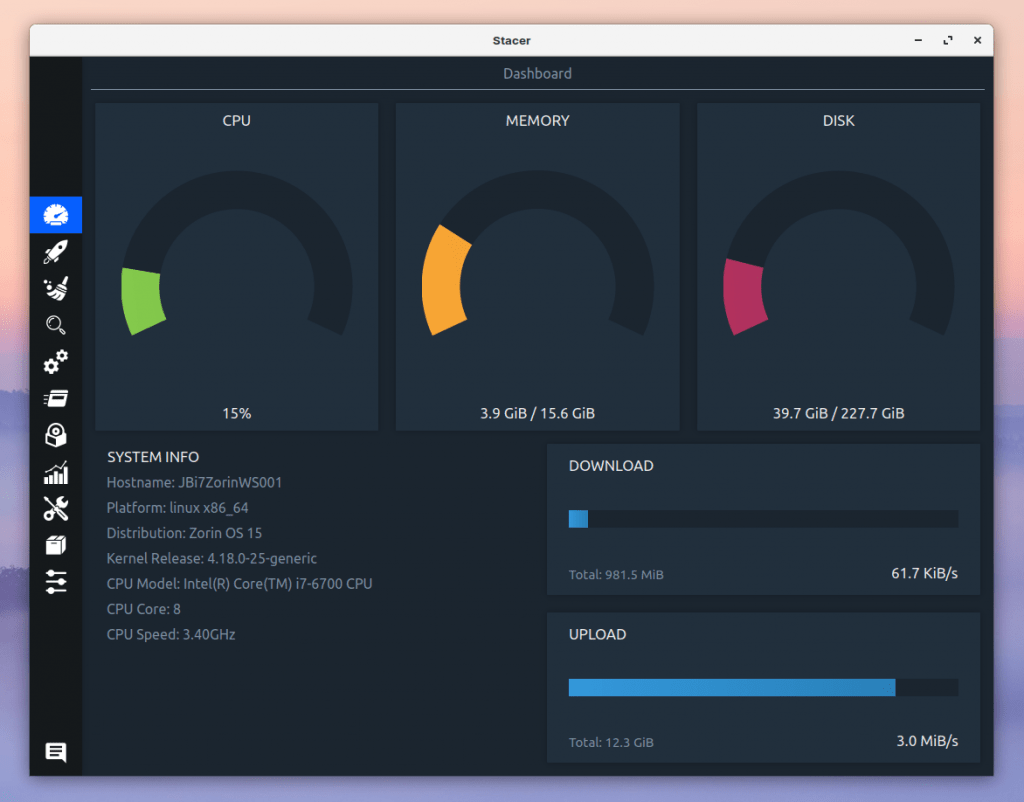
Stacer is an application heavily based on a graphical user interface with the aim of offering an extensive set of both cleaning and system monitoring functionalities for the Linux user. By using an accessible and beautiful user interface, Stacer wants to make the process of cleaning and monitoring easier for the average user. But also the experienced user can easily make it part of his or hers Linux based workflow.
Over time, after your initial installation of your Linux operating system, you build up lots of files without sometimes knowing what their actual goal is of being there and some of them are even not visible without actually looking for them. With Stacer you can find these files easily and helps you out in safely removing them. Stacer is also a tool that helps you to monitor your system processes in a graphical way and offers means to manipulate different aspects of your system.
You can read my article “Stacer is the best system optimizing and monitoring tool for Linux” to learn more about installation, setup and usage of Stacer.
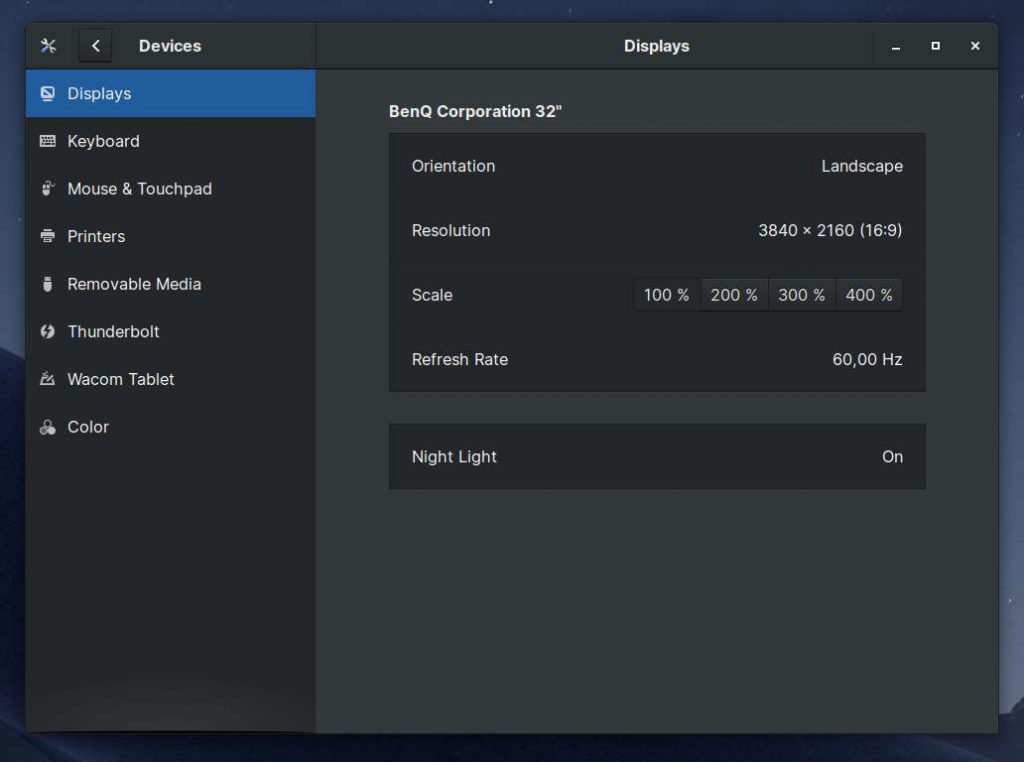
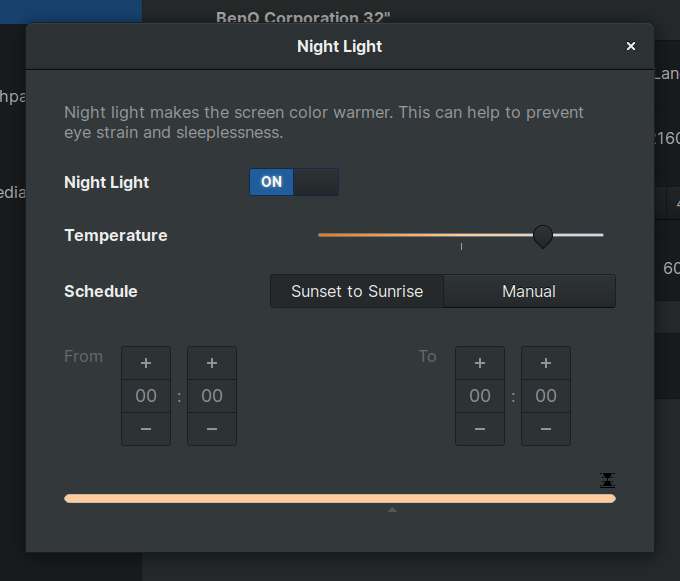
14) Setup Night Light to prevent negative effects of blue light emission
Lately we read and hear more and more about the dangers of looking too long at displays. Displays of computers and mobile devices emit significant amounts of blue light. Under certain circumstances and with long-term exposure there are some concerns about possible long-term effects on the health of your eyes. Zorin OS uses a simple but effective application called Night Light to prevent such effects, as it reduces the emission of blue light and also schedules for the most important moments of the day.
1) Click on the Zorin icon on the left of your panel in the lower part of your desktop to open the applications menu or applications grid (depends on your theming).
2) Search for “Settings” and click on the Settings icon.
3) On the left of the settings screen click on Devices.
4) On the left of the Devices screen click on Displays.
5) On the right part of the Displays screen click on Night Light.
6) Change settings for Temperature and Schedule to your needs.
15) Install basic software
Zorin OS is great, but at the end it is not about the operating system but all about the applications you are going to use to do great things. We are all different and so are our needs, but there are probably some basic applications that should be part of your setup. You can use my list of my favorite Linux applications or read my article “What are the best alternatives to Adobe products for Linux” to get inspired.
Final words
I hope these 15 best things to do after installing Zorin OS 15 will help you enjoy this great distro even more. But there is one extra thing you shouldn’t forget that is probably obvious, but often forgotten. In my opinion you should focus on actually using your nice new Zorin OS system instead of doing too much tinkering. I understand the need to play with your system and change it to your liking, but we all lose so much time with playing around, while the whole idea is to actually use our system to create amazing stuff. So don’t lose yourself too much in distro hopping and over-customization and just use your system to create beautiful, important or world changing things.