Using Linux Mint for the first time – Linux Mint 21.2 tutorial series
by John Been October 13, 2023 · Latest blog / Start with Linux
In the previous Linux Mint 21.2 tutorials we learned what distributions are, how to choose the best Linux distribution and desktop environment for your needs, how to download Linux Mint, how to create a Linux Mint Live USB stick in Windows or macOS, how to use Linux Mint without installing on a PC or on a Mac and how to install Linux Mint on a PC or Mac. So. now we finally reached the moment you were waiting for: we can have a first look at what Linux Mint is, how it looks, and what it can do. So in this part of my Linux Mint 21.2 tutorial series, we are using Linux Mint 21.2 for the first time.
Content of this article
- Linux Mint for the first time
- The main components of the desktop
- The panel and application shortcuts
- System indicators
- Show desktop
- Application launcher
- Lock, Logout, and Quit
- Update Manager
- System Settings
- Appearance
- Preferences
- Hardware
- Administration
- Applications and Software Manager
Article information
- Linux Mint 21.2 Cinnamon
Linux Mint for the first time
Now that Linux Mint has been booted into a live session on your PC or Mac, or you even installed it on your hard drive, the real fun can begin.
If you want to have a relook first at what you learned before, here are the links:
- How to use Linux Mint without installing on a PC – Linux Mint 21.2 Edition
- How to use Linux Mint without installing on a Mac – Linux Mint 21.2 Edition
- How to install Linux Mint on a PC or Mac – Linux Mint 21.2 Edition
If everything went well you will see a relatively empty desktop environment that probably looks something like the screenshot below.
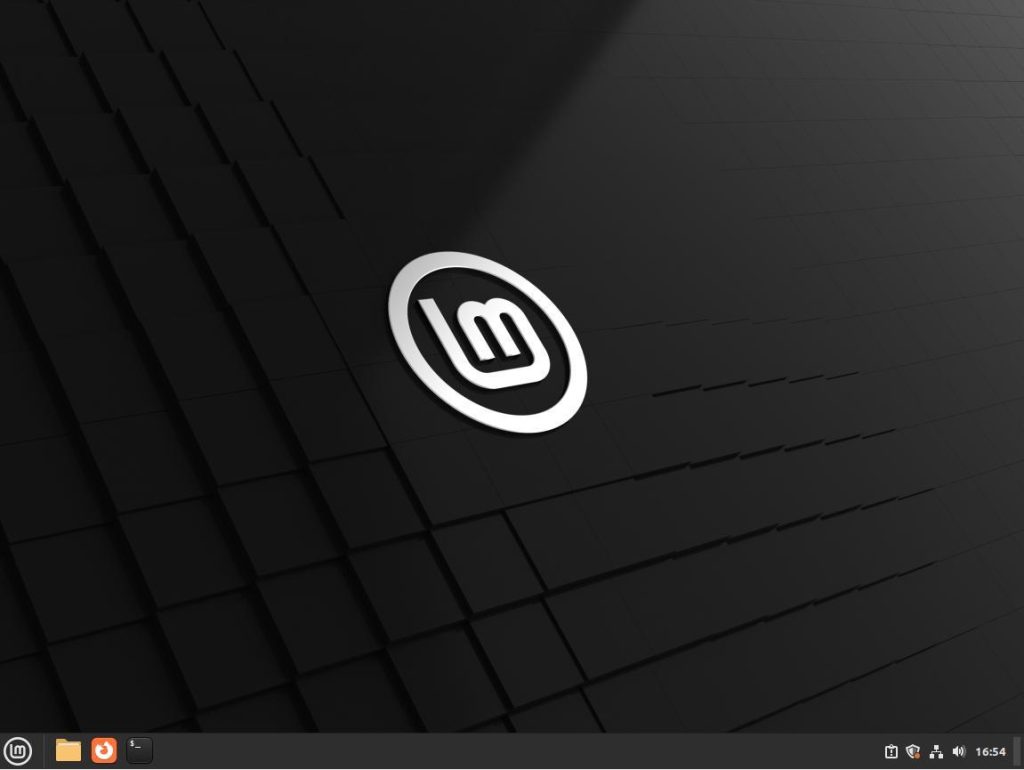
Click on the Linux Mint logo in the left corner at the bottom to open the main Menu of Linux Mint.
Maybe the first thing you would notice is that this desktop (which is called the Cinnamon desktop environment) and the main menu look a lot like the more classic design principles of Windows XP and Windows 7. And for beginning Linux users with a Windows background that is probably a good thing as it is recognizable and it makes you find the things you need quite easily in your new Operating System. But as you already could read in one of my previous tutorials “How to choose the best desktop environment for your needs“, there are lots of other desktop environments available, so maybe, when you are further in your Linux journey, your preference is not Cinnamon, but for example Pantheon, Budgie or KDE Plasma. When you prefer something different be free to try it out after ending this tutorial series, but for the remainder of this course, we will use the Cinnamon desktop environment.
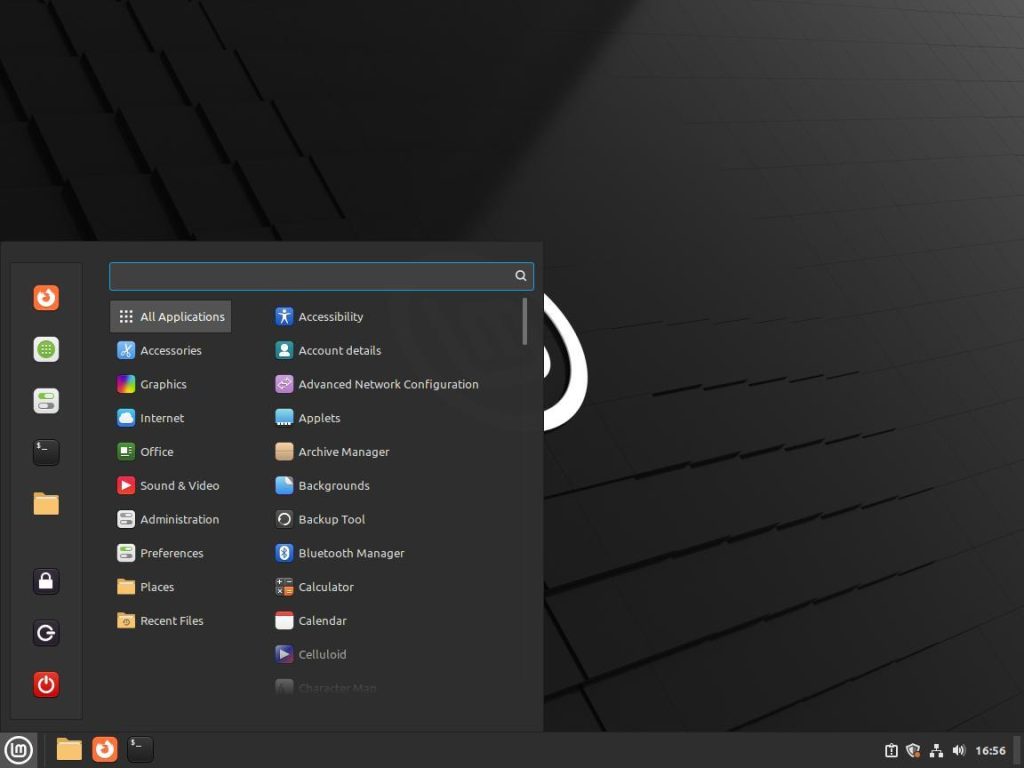
The main components of the desktop
In this Cinnamon desktop environment, we see some main components. As you can see in the image below, the desktop experience consists of a panel at the bottom of the screen that houses a main application menu on the bottom left, some shortcuts to your applications directly at the right from the main menu icon, a system indicator section on the bottom right, a show desktop button, an application launcher area that pops up if you activate the main menu button, and of course, the desktop itself where you can add additional icons to your liking.
The panel and application shortcuts
On the panel, which is the complete horizontal bar at the bottom, containing the main menu button, application shortcuts, system indicators, and the show desktop button, you can add extra applications and applets (for more info on Applets read my article How to use Applets in Linux Mint Cinnamon).
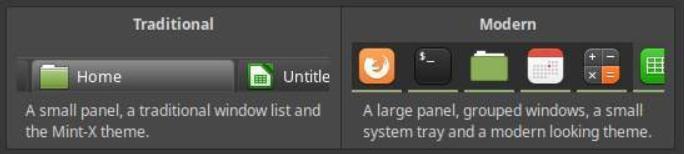
In Linux Mint 19.1 and newer you could choose between a traditional and a more modern desktop layout, right after the installation, but this option is not available anymore in Linux Mint 21.2 and the standard is the modern desktop layout. In the traditional layout, you had a relatively thinner panel and a traditional open window list. If you selected the modern desktop layout you got a higher panel and a grouped open windows presentation.
Although you don’t get this choice directly after installation in Linux Mint 21.2, it is still possible to switch to the traditional layout by following the below steps:
1) Start one of your applications (doesn’t matter which one).
2) Right-click on the application icon on the panel.
3) Select “Applet preferences”.
4) Select “Configure…”.
The “Grouped window list” settings screen will be opened.
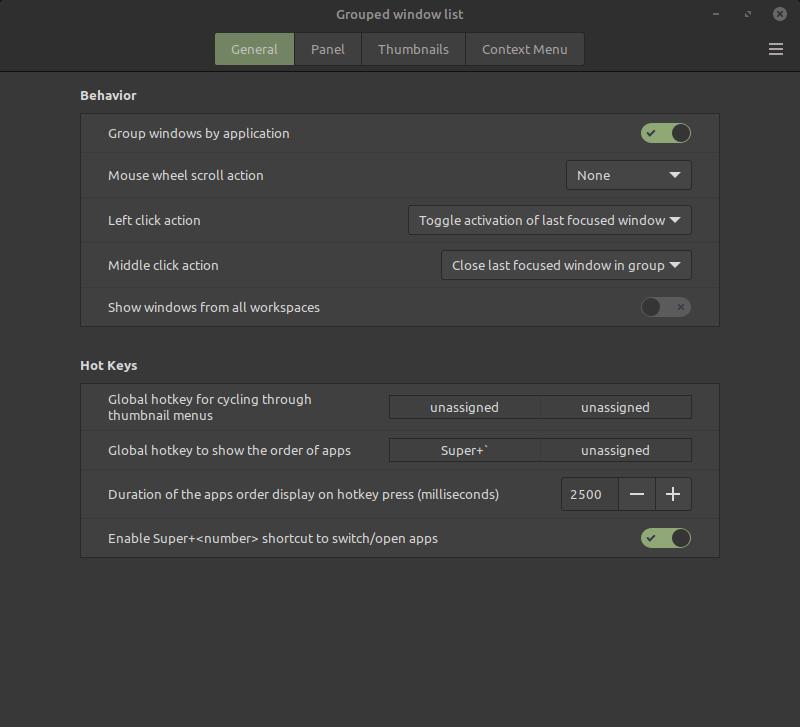
5) Go to the “General” tab.
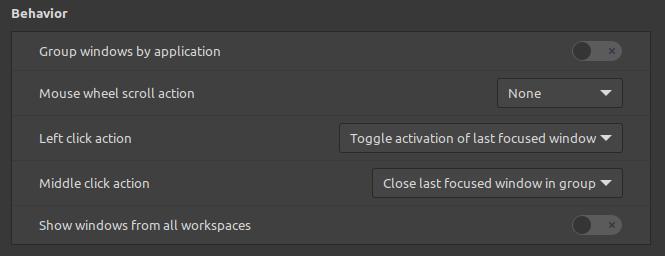
6) Disable the option “Group windows by application” in the “Behavior” section.
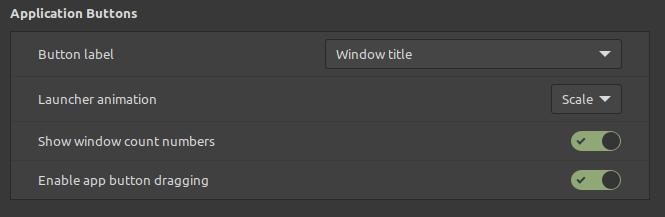
7) Now go to the “Panel” tab.
8) Click on the “Button label” drop-down and select the option “Window title”.
Now you will have your preferred traditional layout.

Now let’s continue with checking out the Panel.
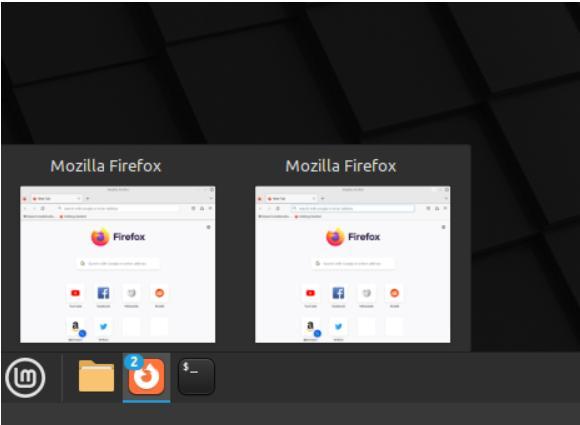
When you have open application windows, you can see one or more miniaturized previews of these open windows when you hover over the panel icons. This is very convenient if you have for example multiple open browser sessions or multiple open spreadsheets.
Further, you can add extra application icons to the panel to have the most important or the most used applications in a convenient and visible place. If you search for an application via the application main menu and right-click on the application name, a small menu will be opened. From this menu, you can select the option to add the application to the panel.

The application icons can be easily dragged and dropped in another location, to organize them exactly to your liking.
You can also move the complete panel to another location (Top, Left, Right). Just right-click on the panel and select the option “Move”. Now click on one of the highlighted sections to move the panel.
You can also add an extra panel if that’s handy for you. Just right-click on the panel, and choose “Add a new panel”. Now click on one of the highlighted sections to add an extra panel.
System indicators
On the right side of the panel, we have the system indicator area. Out-of-the-box, it already has some indicators, but when installing some new applications, this will probably add extra indicators. After a fresh installation of Linux Mint, you see indicators for the Update manager, Removable drives, Network, Date and Time Settings, and Sound Volume. If applicable, a system report indicator will also show up.
Show desktop
In the right corner of the panel, you see a small grey area. If you have multiple windows open and you want to see the desktop without minimizing or closing all windows one by one, just click this area to hide all windows at once.
Application launcher
When we focus on the main menu, which is the application launcher, we see five main areas: application categories, applications, search bar, favorites, and the lock/logout/quit section.
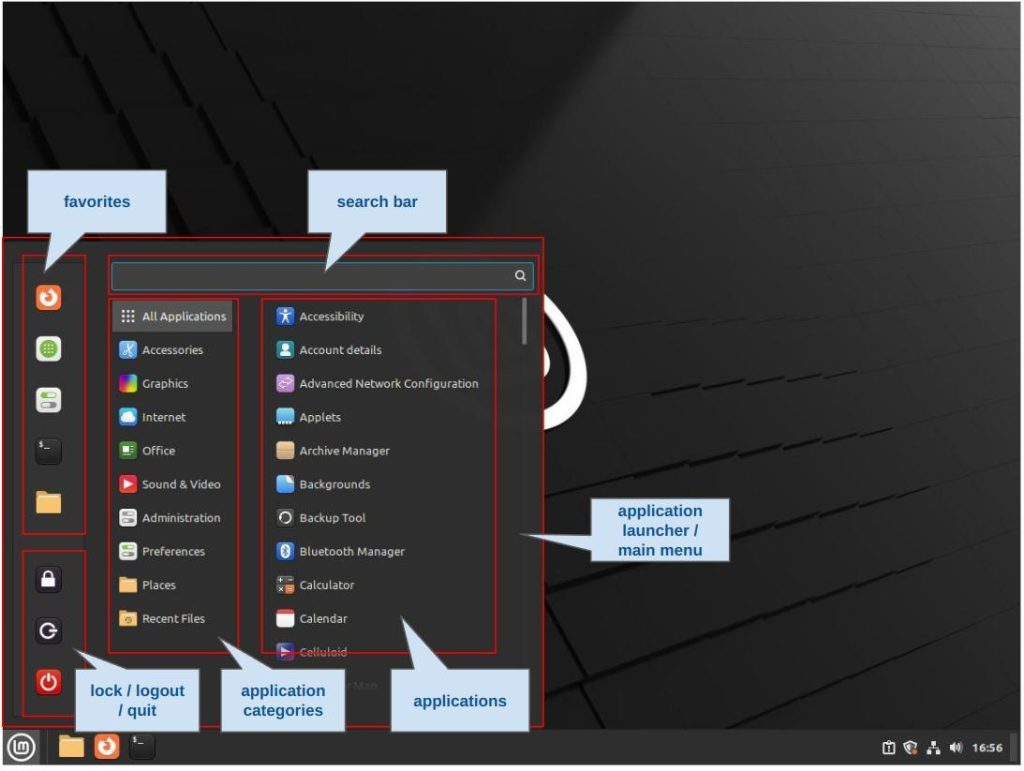
To start with the left-hand side, we see a vertical area with space for some favorite applications. You can add some of your favorite or most used applications here. Just drag and drop them into position. In the lower part of that same area, you will find icons to lock the screen, logout (leave the session), or quit (shutdown the computer).
At the top of the main menu, you find a search bar. Here you can type the name of an application or just the first characters of a name to find one or more installed applications that fit your search criteria.
In the middle part of the main menu, you find different application categories. These categories contain one or more applications that fit the category. The name of a category can be changed, categories can be removed or new categories can be added. The great thing about the Cinnamon desktop is that you don’t need to click on the categories to see the containing applications. Just hover over the categories with your mouse pointer and you directly see on the right-hand side the installed applications within a specific category.
The right part shows you all the applications in a specific application category, or all the applications available on your machine if you hover over the All Applications category. If you left-click on an application name, this specific application will start. If you right-click on the application name, a small menu will be opened. From this menu, you can select the options “Add to panel”, “Add to desktop”, “Add to favorites”, and “Uninstall”.
Lock, Logout, and Quit
As already mentioned, on the left-hand side of the application menu we see a vertical area where you will find icons to lock, logout, or quit your system. The lock icon can be used to … well … lock your system. So if you need to go to the toilet, need to do some shopping, or do something else and you don’t want to shut down your system completely, you can safely lock it via this option and log in again when you are back.
The logout button gives you three additional options: Switch User, Cancel, and Log Out. When you have more than one user set up on your system, via Switch User you can log in as another user without closing down the current active user. With Cancel, you can close this pop-up. With Log Out you can log out of your session and log in as another user if applicable.
The Quit option gives you a pop-up with four additional options: Suspend, Restart, Cancel, and Shut Down. Suspend brings the operating system and the hardware into a sleeping state. The Restart option ends your session and reboots the complete system. With Cancel, you can close this pop-up. Shut Down ends your session and stops powering your PC.
Update Manager
As already explained, on the right side of the panel we have the system indicator area. There you will find among others the Update Manager icon, which looks a bit like a shield. This shield can have different looks, like having a red dot to indicate that there are updates available. When there are updates available you can hover over the shield icon to see how many updates are available. Click on the shield icon to open the Update Manager.
The first time you open the Update Manager you will get an introduction screen, which looks like this:
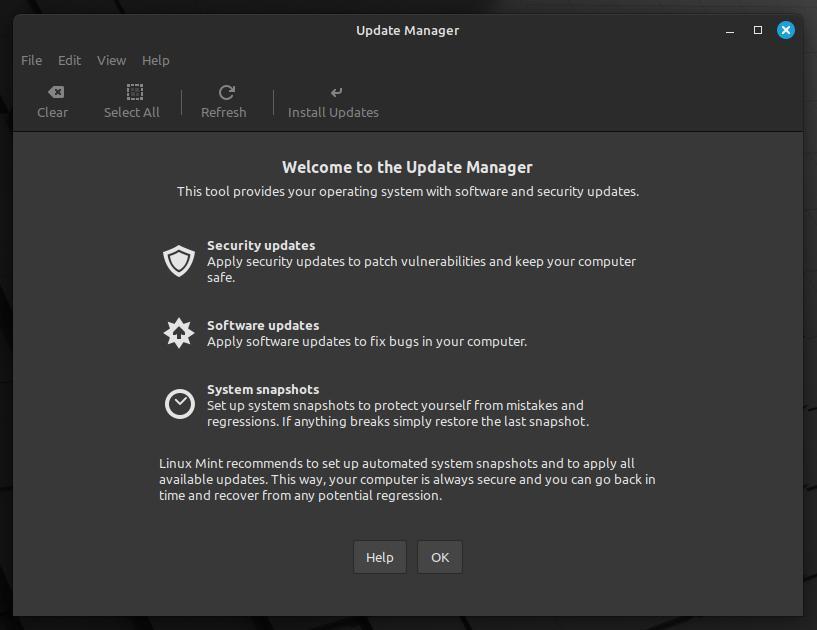
It gives you some information on what the Update Manager is responsible for, being Security updates, Software updates, and System snapshots.
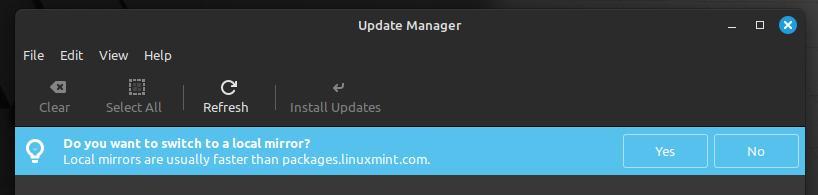
When you click on OK, you will get a message which asks you if you want to switch to a local mirror. Local mirrors are mostly faster than the standard mirror because a local mirror is closer to your physical location. You decide if you want to switch or keep things as they are.
When there are updates available and you open the Update Manager, the screen looks a bit like this:
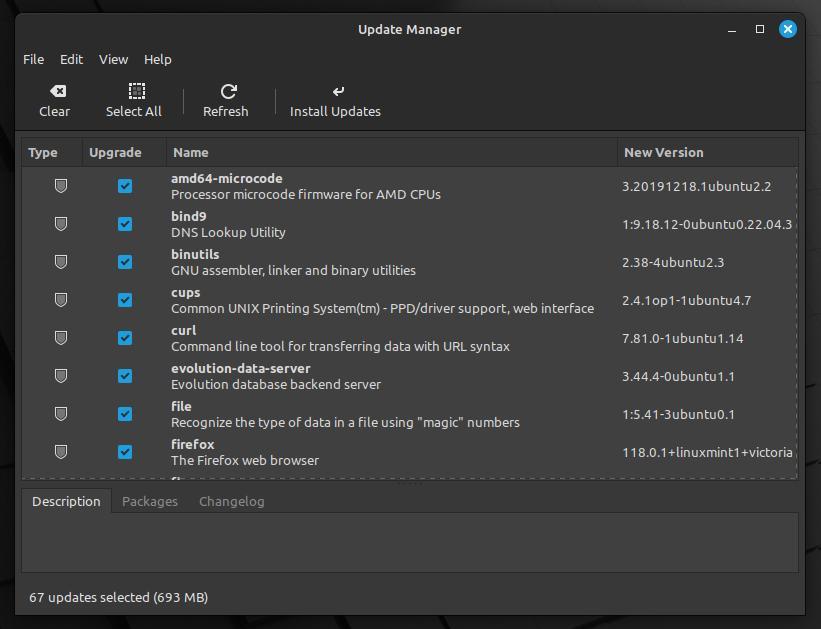
In the above example, you see that there are 67 updates available. They are already pre-selected so the only thing you need to do is to click on Install Updates. It can be that an additional pop-up will give some information on additional changes. Just click OK. The system will ask you first to authenticate by providing your password.
Now the updates will be installed in the background, and you can just continue the work or things you were doing. Updates in Linux Mint will most of the time be very fast, so it may be a bit of a surprise after coming from the Windows platform. After the update is finished you can close the update manager. Now you will see that the shield looks different, having a green “ok” marking.
System Settings
Linux Mint Cinnamon is a very flexible and customizable Operating System. There are a lot of options and functionalities that can be changed and maintained. When you open the main menu, you see the System Settings icon in the right top part of the menu. If it is not there then you can search for System Settings in the search bar on the same screen.
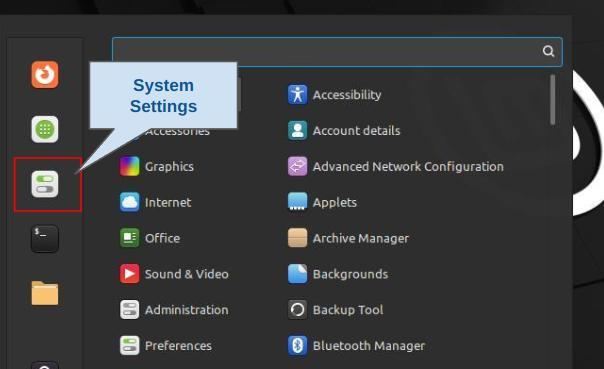
Click on the System Settings icon to open the system settings screen.
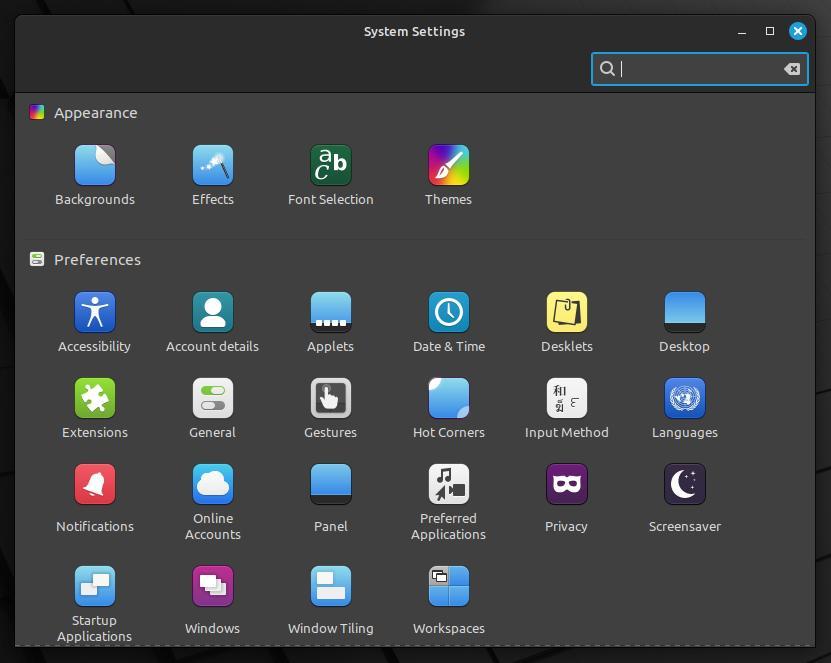
In this screen, you can find four main sections: Appearance, Preferences, Hardware, and Administration.
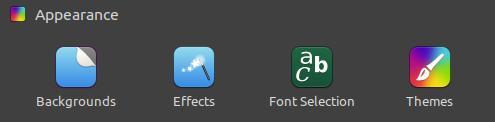
Appearance
Under Appearance, you can change your background, windows effects, menu effects, fade effects, animations, fonts, and themes, to be in control of the complete look and feel of the desktop environment.
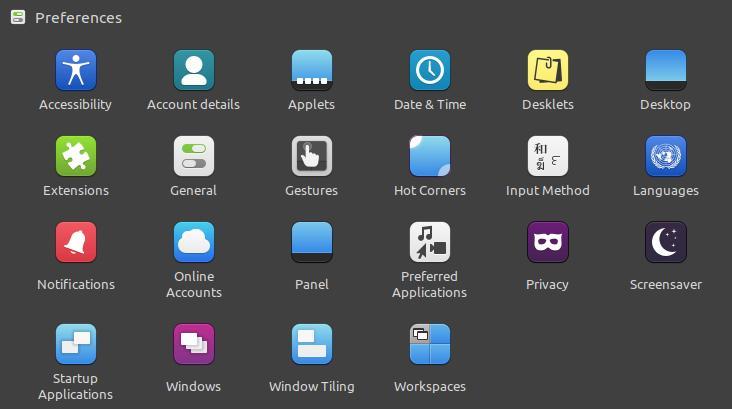
Preferences
Under Preferences, you have a lot of options that can be changed. Think about accessibility options for impaired users, settings applets and desklets, desktop icons, extensions, corner functionality, languages, notification settings, online accounts like Google, Microsoft, and Facebook, privacy settings, startup applications, and window behavior.
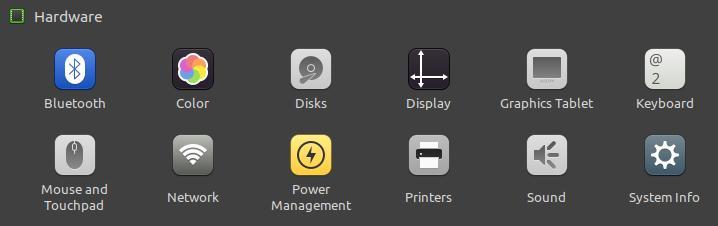
Hardware
In the hardware section, you can change settings for Bluetooth, color, display(s), input devices, network, printers, and sound. Here you also can show your system info.
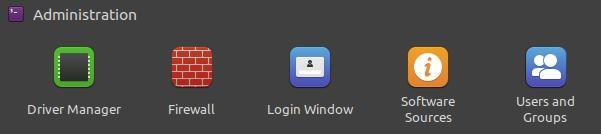
Administration
In the administration section, you can change drivers for your hardware, change the firewall settings, add users or change their options and rights, and change settings for software sources, like official repositories, PPAs (Personal Package Archives), and additional repositories.
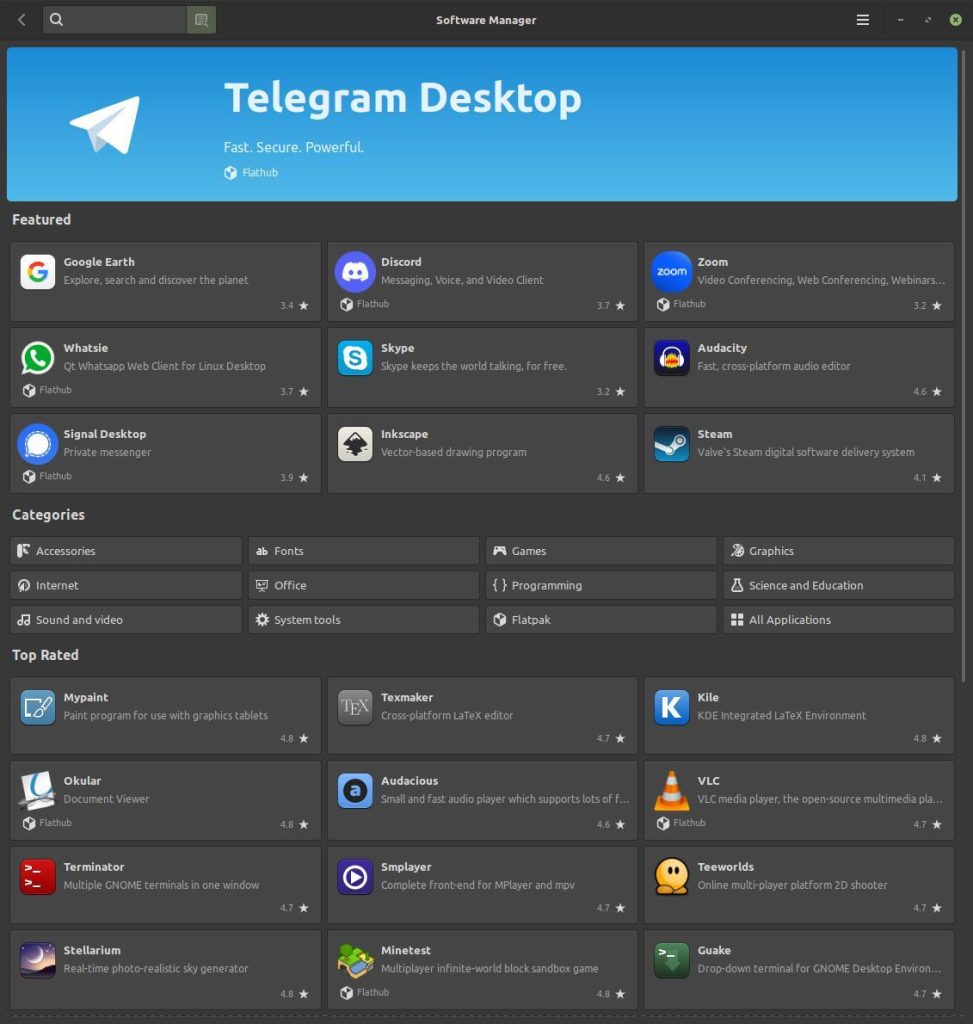
Applications and Software Manager
If you open the Linux Mint Main Menu and click on the category All Applications, you see that there are already a lot of applications pre-installed, like all the LibreOffice components, Firefox browser, and Thunderbird mail. But there are many more fantastic applications available via the Linux Mint repository but also via Flatpack, Snap, and PPA’s, which I discuss in depth in the separate tutorial “How to install applications in Linux Mint“. The most convenient way to search for additional applications is via the Software Manager, which can functionally be compared to for example the Google Play store.
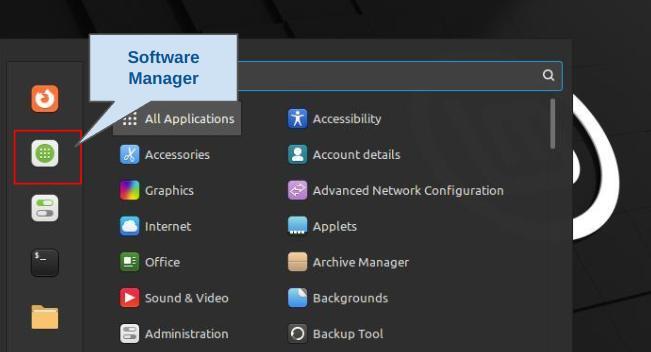
Here you can search for applications, see their descriptions and ratings and when you see something interesting, just click on install, and a couple of seconds later you can find the installed application via your Application Menu.
Final words
Based on this tutorial, you have probably enough information to be able to have some first looks at your Linux Mint distribution yourself. Just browse around and try things out. In the next tutorials (Linux Mint 21.2 Tutorial Series – an overview), I will go much deeper into all the specific functionalities of this great Linux Mint Operating System. But for now, have fun cruising around, and see you in the next tutorial.
Have a look at my latest book on Linux, in Paperback or Kindle format.
For more info on my book click here.
When you want to buy the book click on the image below.
If you appreciate what I do on this website…,