How to use Linux Mint without installing on a Mac – Linux Mint 21.2 edition
by John Been August 4, 2023 · Latest blog / Linux beginner / Start with Linux
In a previous tutorial I explained how to create a Linux bootable USB drive in macOS. I already explained that one of the many incredible features of all Linux distributions is the ability to boot a distribution directly from the USB stick you created, without the need to install Linux and affecting your hard drive and the current operating system on it. It is not necessary to perform a complete installation to use or first try out Linux. In this tutorial I will explain how to boot from the Linux USB drive you just created in a previous tutorial, so you can use Linux Mint in a live environment without the need to install it on a Mac. In a previous equivalent article I explained how to use or try Linux Mint 21.2 without installing on a PC
Content
- Introduction on running a Linux Mint 21.2 Live session
- Preparation: Disable Secure Boot on your Mac
- How to start a Linux Mint 21.2 Live session on your Mac
Article information
- Linux Mint 21.2 Cinnamon and older
Introduction on running a Linux Mint 21.2 Live session
I assume you have the Linux Mint USB drive now. If not than first go back and follow all the steps in my tutorial How to create a Linux bootable USB drive in macOS.
The nice thing of having this magical fresh Linux Mint bootable live drive is that you can try Linux Mint now on 64 bit Intel based Apple computers (see note below on ARM M1 and M2) you want, like the Intel based MacBook Pro, iMac and Mac Mini. The environment that you will start from your USB device is often called a live environment, So you don’t need much to try Linux Mint without worrying about your current setup. Well, of course, the computer needs to have a working USB slot to be able to use it, but that is basically it.
Note: Linux Mint cannot run or be installed on the new Apple M1 and m2 ARM based computers. If you have a Apple M1 or M2 based device, you have to choose another Linux distribution, like Asahi Linux. Also you can choose to run Linux Mint on an M based Apple computer via the Parallels application.
Preparation: Disable Secure Boot on your Mac
Before I start explaining how to boot the Linux Mint USB stick on an Apple Mac computer, it is important to know that the more recent Apple computers have the T2 “Security” chip that prevents you from installing “unrecognized” operating systems, if you don’t change some settings first in the devices hardware settings. This does not only reflect Linux, but also “older” Apple OSX operating systems like macOS Sierra and older. Older 64 bit macs without the T2 security chip (The Apple T2 was first released in the iMac Pro in late 2017.) can run Linux without a problem from a bootable USB stick without below preparations.
To disable Secure Boot on T2 equipped Apple computers you can do the following:
1) Press Command + R while starting up your Mac, until you see a macOS Utilities screen.
2) Click on Utilities in the menu bar and select Startup Security Utility.
3) From the provided options choose “No Security”.
4) Now Shut Down your Mac via the Apple menu item.
How to start a Linux Mint 21.2 Live session on your Mac
Now start going through the following steps:
To be able to boot into the USB drive, you’ll need to hold the option (alt) key while you boot your macBook.
1) If you have not already done so, first shut down your Mac computer.
2) Then put the Linux Mint USB stick into a free USB slot.
3) Hold the option key.
4) Start your Mac computer while holding the option key, and wait.
If everything went well you see a screen with graphical presentations of at least your internal drive and the Linux Mint USB drive (presented as EFI boot).
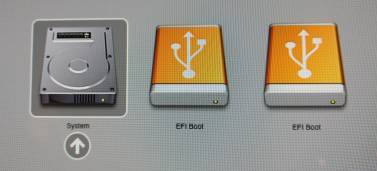
5) You can let go of your option key now.
If you don’t see the USB drive, unplug it and plug it in again while this screen is visible. Now the USB drive should pop up in this same screen.
6) Select the USB drive (EFI boot) and hit Enter.
7) Now a simple overview with some options will be presented. Choose the first option “Start Linux Mint 21.2 Cinnamon 64-bit”.
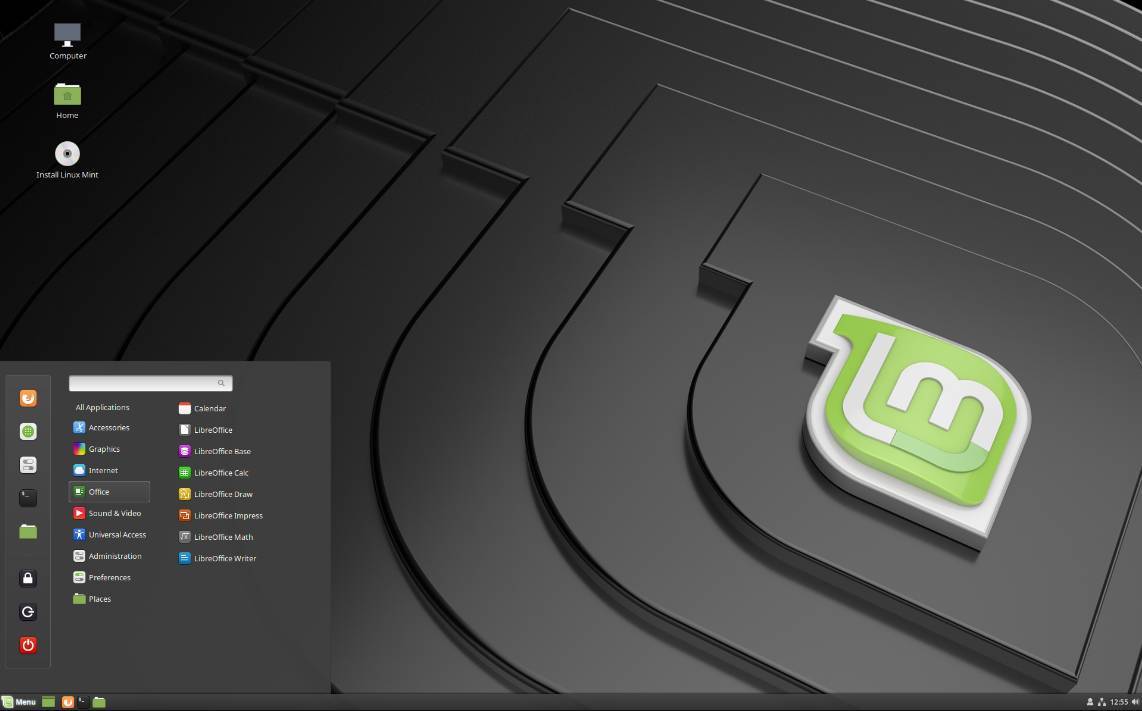
Now a live session of Linux Mint will be created, ready for you to use and test without actually wiping your hard drive.
Now that Linux Mint has been booted into a live session the real fun can begin. If everything went well you will see a desktop environment that probably looks something like the screenshot below.
Final words
Now you are being able to have some first looks at this Linux Mint distribution. Just browse around and try things out. In the next tutorials I will show you the basic elements of the Linux Mint distribution and go much more deeper in specific functionalities of this fantastic operating system. For a complete overview go to Linux Mint 21.2 Tutorial Series – an overview.
Have a look at my latest book on Linux, in Paperback or Kindle format.
For more info on my book click here.
When you want to buy the book click on the image below.
If you appreciate what I do on this website…,