One of the many powerful features of Linux is the ability to start a distribution directly from a USB stick, without affecting your hard drive and the operating system on it. It is therefore not necessary to perform a complete installation to use or try out Linux. But even if you have made the decision to install Linux individually or next to Windows or OSX, a bootable Linux USB stick is the most practical and quick solution. This article will explain how a Linux USB stick can be created from a Mac environment, from which Linux can be started without installation. In an equivalent separate article, it is explained how this can be achieved from a Windows environment.
What do we need
USB stick
A FAT32 formatted, at least 4GB, but preferably 8GB USB memory stick.
Etcher
To write the ISO file on the USB stick, we use a free and open source application called Etcher.
Linux iso file
Besides Etcher we also need a Linux distribution that we want to put on the USB stick. For this article we choose the Linux Mint Cinnamon edition, but in the end this depends entirely on your own preference and you can also choose another distribution, such as Ubuntu, KDE Neon, or Solus.
Note: There are a few extra considerations when starting up the USB stick on Apple hardware. This is because Apple’s ‘Startup Manager’, called by holding the Option / alt (⌥) button during startup, will not detect the USB stick without a specific partition table and layout. This should be dealt with in a later step.
Steps to be made
In this article we assume an approach in which we download the iso file of a Linux distribution (in this case Linux Mint 19).
Download Linux Mint
1) Go to https://linuxmint.com/download.php
2) Make a choice here for a desktop environment (eg Cinnamon).
3) Then choose a download mirror close to you for quick download.
4) The iso file is then downloaded to the standard download folder.
Download Etcher
5) Go to https://etcher.io/ and choose Etcher for macOS. The Etcher .dmg will then be found after downloading in the Downloads folder.
Create Linux USB stick
6) We start with the preparation of the USB stick. To ensure maximum compatibility with Apple hardware, we first completely empty the USB stick and reformat it using Apple’s “Disk Utility.” But this step can be skipped if you plan to use the USB stick with only generic PC hardware.
Start Disk Utility from Applications> Utilities.
Insert the USB stick and see that the new device has been added to the Disk Utility.
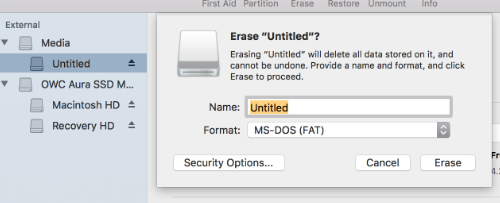
Select the USB stick and select Erase in the toolbar (or right-click).
Set the format to MS-DOS (FAT) and the schedule to GUID Partition Map. Check carefully that you have chosen the right device and click Erase.
Use Etcher
7) After you have downloaded Etcher, double click the dmg file to mount the package. Then Etcher can be run at the current location or dragged to your Applications folder.
By default, recent versions of macOS block the execution of applications from unidentified developers. To solve this problem, enable ‘App Store andaped developers’ in the ‘Security & Privacy’ screen of System Preferences. If you are still being warned about running the application, click on ‘Open Anyway’ in the same screen.

Etcher configures and writes to your USB stick in three steps, each of which must be selected sequentially:

Select Image >> Search the previously retrieved Linux iso file in the Downloads folder.
Select Drive >> Select the name of the USB stick here.
Flash! >> Activated when both the image and the drive are selected. Like Disk Utility, Etcher needs low-level access and will request your password after selection.
The USB Live stick will now be created.
That was all. The USB stick has been created. A follow-up article will explain how we can use this stick for a Linux Live session on a Mac computer.