Planify is a fantastic Todoist alternative for Linux
by John Been March 2, 2024 · Apps per category / Business / Business user / Home user / How to / Latest blog / Productivity / Student / Tools
I like tools, applications, and books that help me become more productive. For me, being more productive does not mean that I can do much more than I already do, but that I use my time in such a smart way that I need less time to achieve the same thing, or achieve what is important so that I have more time to be able to do other important things in my life as well. One of the tools to better support my productive life is a to-do application. Already in April 2020, I wrote about Planify. Well, at that time it was called Planner, but the developer, the idea behind it, and the functional purpose are still the same. In this article, I want to revisit the Planify application after all these years and see whether this application is a full-fledged solution for our task management needs as Linux users.
Note: This article contains affiliate links. At no additional cost to you, I will earn a small commission if you choose to click through and make a purchase via the linked website. For more information see the the Affiliate Disclaimer page. Please do not spend any money on these products unless you feel you need them or that they will help you achieve your goals.
Content of this article
- About my productivity system
- Task management vs project management
- What is Planify
- Planify in more detail
- Layout
- Preferences
- Adding and managing tasks and projects
- What does Planify not offer?
- Synchronize Planify with Todoist
- Migrate from Planner to Planify
- How to download and install Planify
- Final words
About my productivity system
Before we dive immediately into Planify, I want to explain something about the importance of (having) a well-thought-out productivity system. As mentioned in the introduction of this article, I like to always investigate how I can improve and better support my productive life. A few years ago I wrote my article “How I manage my productive life in Linux”, in which I focused, among other things, on my productivity system and the tools I used to support that system. That article is no longer completely up-to-date, but the basis for the way I work is still valid. In the above-mentioned article, but also in my more recent article “How BASB, GTD, and Scrum help me to manage my productive life“, I wrote that my productivity system is largely based on and inspired by the worldwide known and widely appreciated approach of David Allen, which he describes in his book “Getting Things Done” [<< Affiliate link], also abbreviated as GTD.
Creative ideas or just actions to do can pop up in your head at any moment and wherever you are. In my opinion, it is very important to directly bring over your ideas to some kind of storage or second brain, so you can forget about them for the time being, and come back to them later to organize, prioritize, and plan these ideas into actionable items. You could say that David Allen’s GTD method supports all of this by following these 5 steps: 1) Capture, 2) Clarify, 3) Organize, 4) Reflect and 5) Engage.
In the capture step, I try to store my basic thoughts, ideas, actions, etc. into some sort of an inbox, without directly thinking about organization. At the end of each day or a couple of days, I try to empty my inbox(es) and have all items processed, or as David Allen calls it, Clarified. In the Clarify step, I try to look at the value and function of the items and try to organize them into valuable actionable items and valuable non-actionable items. In the Organize step, I put things where they belong. In the Review step, I try to take a virtual step back and look analytically at where I am now, what my expectations are if the world around me has changed and influenced what I do, and if the things I have accomplished have given me new insights concerning the things I still need to do. In the Engage step, I do the real work.
In the rest of this article, I will use the above approach as a reference, to see how Planify fits into this productivity methodology.
Task management vs project management
There is a difference between managing tasks and managing projects. A lot can be written about these differences, but for this article, it is important to make the distinction between single activities versus a set of multiple related activities. Taking out the trash is a task, but writing a blog post is a project, because of the multiple related tasks required for a successful result. Replying to an email is a task, but setting up an automated filtering system to reach inbox zero is a project. Projects do not always have to be large or last months but are primarily distinguished from single tasks by their more complex nature and the multiple related tasks required to complete the project. The applications to support tasks or projects are often focused on that distinction. But that distinction does not always have to be so hard and clear, because project-related supporting technologies can also be valuable in task management and vice versa. Consider Kanban functionality where you use a visual presentation to provide insight into your progress. Or the ability to add subtasks to your tasks. There are more and more tools that support all these options and thus operate at the interface between task management and project management.
In the rest of this article, I will use the above approach as a reference, to see how Planify fits into this view on task management and project management.
Let’s now see what Planify has to offer.
What is Planify
Planify is primarily a task manager. According to the developer, Alain, Planify was developed by him out of necessity, because there were no really good task management applications available for Linux that suited his own needs.
“I created it as a necessity when trying to find a task manager for Linux that was up to the task, had a nice design and good functionalities.”
Source: quote from interview – https://console.substack.com/p/console-193
Planify is an open-source task manager that is rich in features, so it offers a very complete package of functionalities, and is easy to use, but also offers a nice user experience and user interface.
According to the developer, popular alternatives were carefully looked at as inspiration for Planify.
“Planify is inspired by several popular task managers such as Things 3, Todoist, Planny, Tasks. From which we have taken a bit of each, both in design and functionality.“
Source: quote from interview – https://console.substack.com/p/console-193
Planify offers an inbox for the direct capturing of tasks, without having to immediately think about task organization (remember the Capture step above from David Allen). Planify offers a Today view, which gives you an overview of all tasks assigned to today. Planify offers sub-tasks, priorities, direct positioning of new tasks, simple reordering of tasks, pins, and a pin board. It offers labels, scheduling, list view, board view, sections, different ways of ordering your tasks, reminders, Nextcloud integration, and not the least, synchronization with the immensely popular Todoist application, so you can use the Todoist app and backend when you are on the go and not having Planify on your computer in front of you. And Planify also offers the option to create different projects, to create and maintain a clear grouping of related tasks.
Planify in more detail
Now that you have a general idea of what Planify is and can do, let’s walk through the different capabilities this application has to offer.
Layout
When we open Planify for the first time we see the following layout:
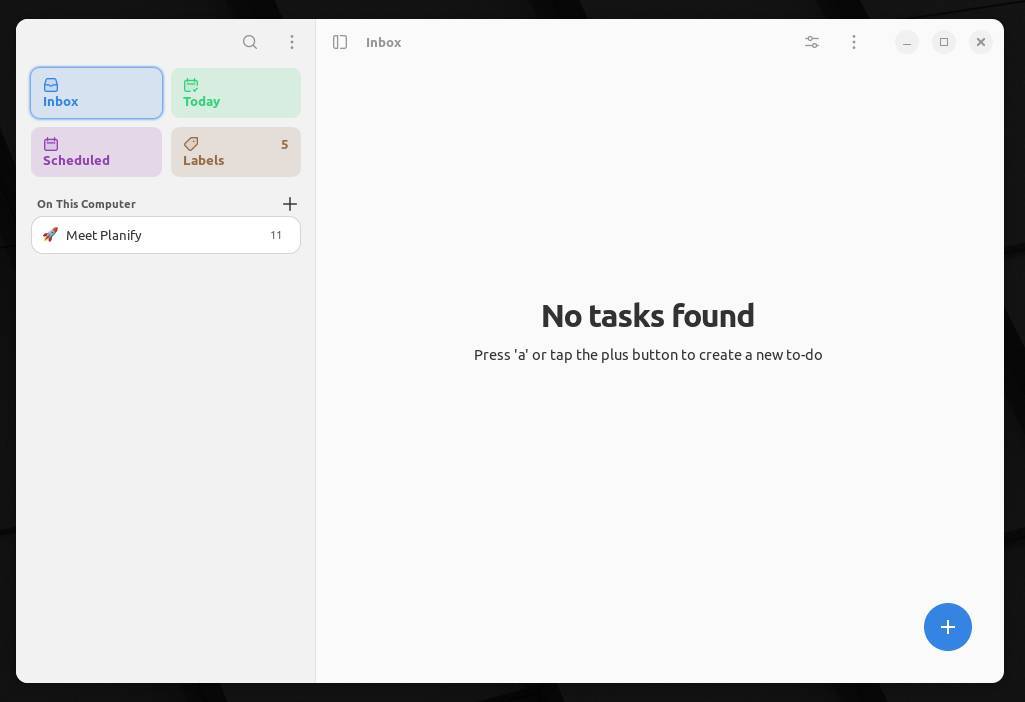
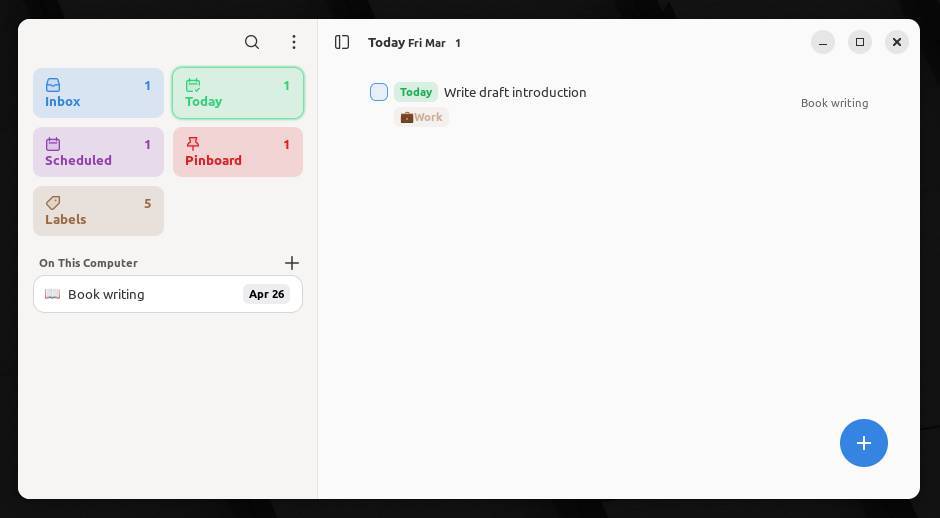
In the left section, which we call the sidebar, we see four, clarified by different use of color, clickable sections, namely Inbox, Today, Scheduled, and Labels, which function as filters on your tasks. Later we will see that this can be extended even further. These sections show the number of tasks in the specific scope, if applicable.
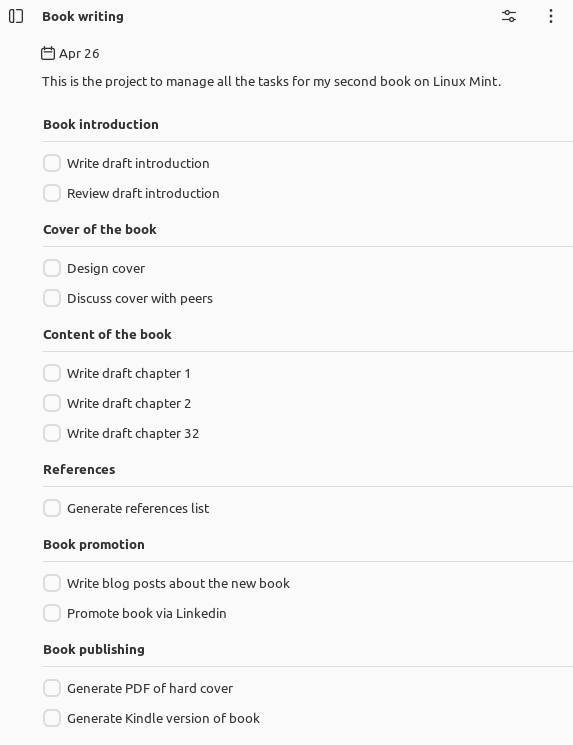
Under these sections, you will see “On this computer”, a plus sign, and a set of example tasks to explain Planify. When you click on this plus sign, you have the option to define a new project. Think of a project within Planify as a placeholder or a collection for related tasks, such as vacation, moving, wedding, renovation, or book writing.
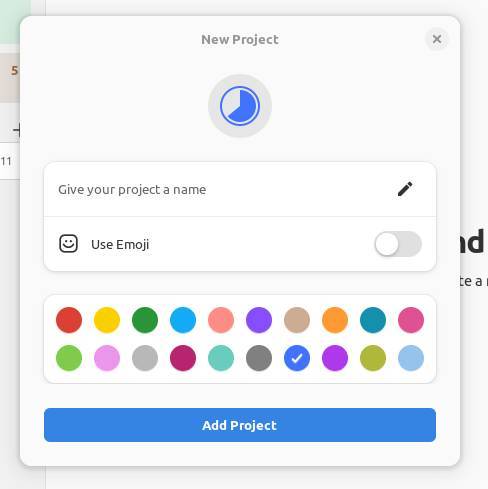
Give your project a name, and decide if you want to add an emoji, or to select a color.
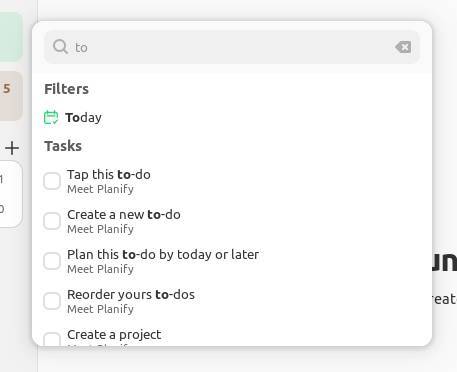
In this same left section, we see at the top a search option and a menu. Via the search or quick find option, you can do a wide search on everything in the Planify database, like projects, tasks, and filters.
When we click on the menu icon, we see the options Preferences, What’s new, Keyboard shortcuts, and About Planify. Later more about the preferences.
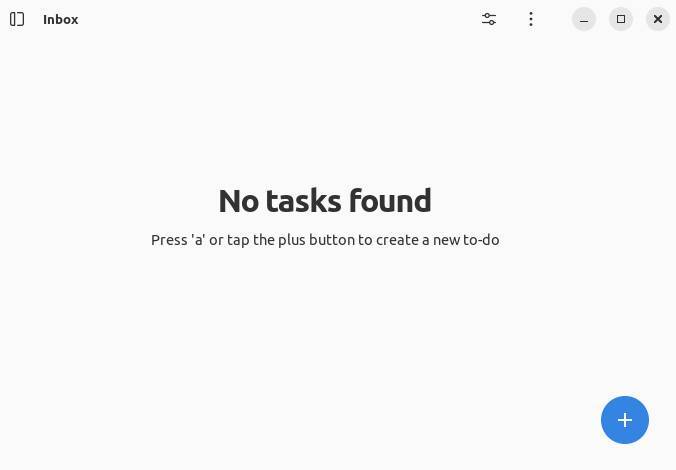
Now let’s have a look at the right side of the application screen. Here we are for example in the Inbox view, which is indicating there are no tasks found. It also mentions that you can type ‘a’ or click the plus button in the bottom right corner to create a new task.
In the top area of this section, we see an icon at the left of the scope indicator (like Inbox, Today, etc) to hide the left pane of the app so you have a maximized view of your tasks. More at the right you see icons for view menu options and more project actions.
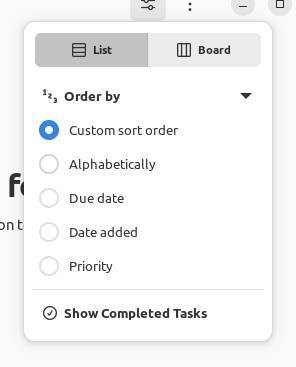
When you select View option menu, you can choose between List view and Board view. Further, you have different options to order your tasks. When you prefer to still see the tasks that are already completed, you can opt for that here as well.
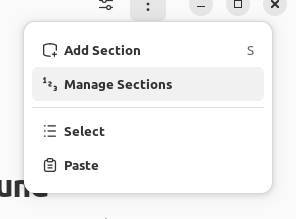
One icon to the right you find a menu for more project actions. Here you have options to add a section, manage sections, select, and paste. We come to that later when we are actually adding and managing tasks.
Preferences
Now let’s first go back to the Preferences. When you select Preferences via the main menu, you see the following options:
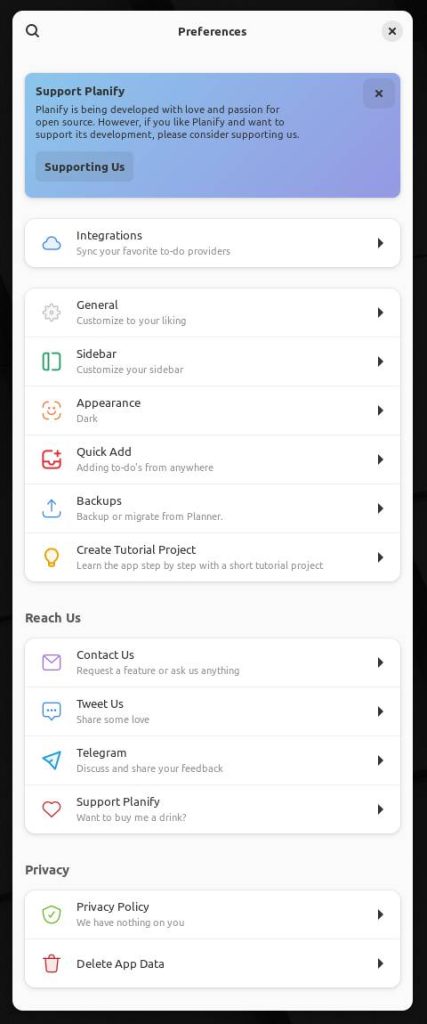
Integrations
Via Integrations, you can set up synchronization with Todoist and CalDAV. Later in this article, I will explain how to set up synchronization with Todoist.
General
Via General, you have options to select your preferred default home page when you start Planify, like Inbox, or Today. You can choose how to sort and order your projects. You can change the behavior concerning the desktop environment integration, like running in the background, notifications, how to behave on startup, and calendar events. Further, you can change the date and time settings. Finally, you can change task-related settings, like behavior for completing, default priority, underlining completed tasks, the position of a new task, and if you want to see completed sub-tasks.
Sidebar
Via the Sidebar option, you can choose if you want to see the task count, and you can change the width of the sidebar. Here you can also select which scopes you want to have in your sidebar and in which order by dragging and dropping. Here you see the extra Pinboard option that you can enable.
Appearance
Here you can set that the Planify app should follow the system settings for light or dark mode. Or you can set the theme manually.
Quick Add
Via Quick Add you can configure the system so you can create to-dos from anywhere on your desktop, so you don’t even have to be in Planify to add new tasks. Further you can set the behavior for which project is being used when adding tasks.
Backups
Via Backups you can create or import backups, and you have the option to migrate from the older Planner, the predecessor of Planify.
Create Tutorial Project
When you open Planify for the first time, you will notice that there is already a tutorial project, called Meet Planify. When you don’t see that project with its content, or you deleted it and now you want to have this example project back again, you can select this option.
Other
Further, you have different options to reach and support the Planify developer, the privacy policy, and the option to delete app data.
Adding and managing tasks and projects
Now that you have an idea of all the available components in Planify, let’s add some projects and tasks, and try to manage them.
On the main screen click on the Add task button, the blue circle with the white plus sign.
Pro tip: When you already have some to-do’s in your list, you can drag and drop the blue circle to the location where you want to create a new to-do.
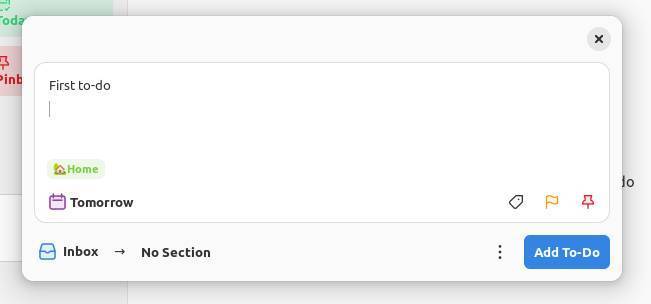
Now a pop-up screen will be visible in which you can add a name for the to-do, a description, schedule your to-do, give it a label, add a priority, and pin it for more convenient access. Here you can also decide on where to move the task. Further, you have the option to directly create more tasks after creating the current one.

After you have created the to-do, you can select it in the overview to add sub-tasks via the new plus sign. Now you can also add reminders to the task and you can decide to set a repeater for this task, so it will be back on your task list when you finished the previous one.
Now let’s create a project and add some new tasks. So, click on the plus sign in the left panel to create the new project.
Now that you have a new project, you can add a description of the project, just below the project name in the task area.

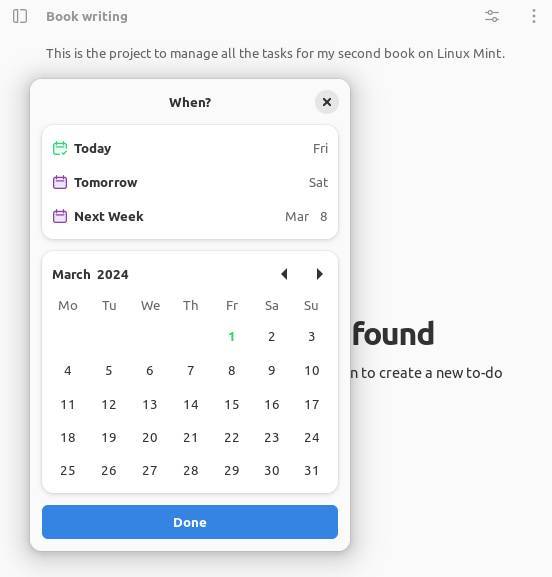
In the menu, you have now an option to edit the project. You also see the when option, so you can plan an end date for the entire project.
In the same menu, you have the option to add sections to the project.
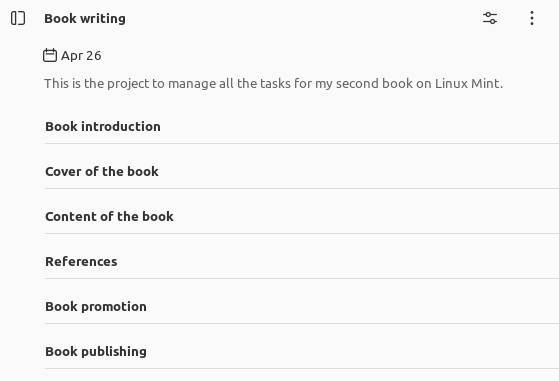
Now we can add to-do items to the different sections in the current project.
Above you see your project, sections, and to-do’s in a list view. You can also select via the View option menu, to show your tasks in a Kanban presentation, so in columns. In this Kanban board view, you can drag and drop the task cards between columns.
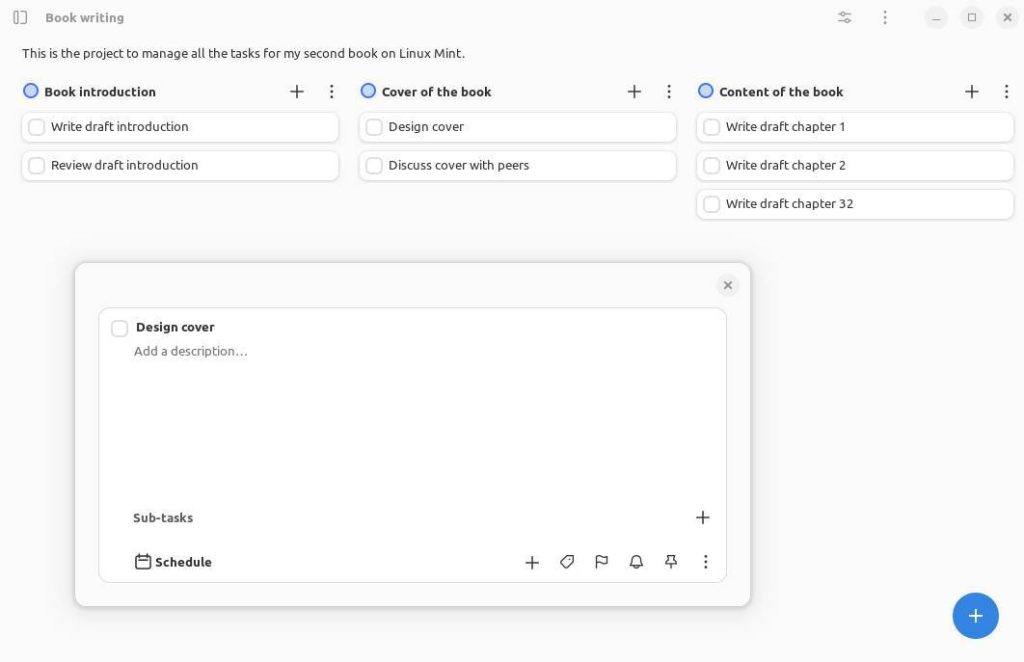
The columns in the Kanban view are based on the sections you created.
Now that we created a project, sections, and tasks, we have set priorities, have assigned labels, and maybe pinned some tasks to be found more easily, we can now have a look again at the interactive views in the left sidebar.
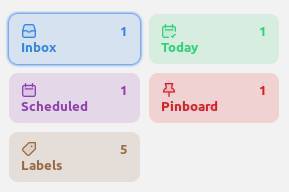
Here we have some very smart and convenient options to find and see directly what we need to do today, what we scheduled for the near future, what we still need to organize from our inbox, what we have pinned as actions that need to be directly accessible, and to find tasks based on their labels. In the colored areas, you see the number of tasks assigned to that scope. Just click on them to directly get the overview of that specific filter.
I think with the above information, you can set up your personal task management system with Planify.
What does Planify not offer?
As you have read, Planify is quite an extensive task management application with the ability to easily manage and visualize projects. However, Planify is not a full-blown project management application. For this reason, it lacks more specific options such as collaboration with other project members, task dependencies, time tracking, effort management, reporting, logging of activities, Gantt chart, etc. If you want this kind of functionality, you may have to look further at solutions such as Asana. Clickup, Monday, and Zenkit Projects.
But we cannot blame Planify for the lack of the above features, since Planify is not set up to function as a full-blown project management collaboration tool. Planify is a tool to support an individual’s productivity workflow, easily capture new tasks, provide insight into outstanding tasks, and, where necessary, group tasks into simple project structures and specify tasks into sub-tasks. And Planify does that in a great way.
But what I would love to see in a future version, is that you can choose what characteristic you want to use for the columns in the Board view. For example, when you create new labels like Backlog, To do, In progress, and Done, this would give a nice progress-based Kanban view if the columns could also be based on labels. So switching between labels, priority, and sections would be a nice addition.
Synchronize Planify with Todoist
When, as a developer, you do not (yet) provide mobile app support, and when you don’t offer a cloud-based backend to synchronize the data of your app, then it is a smart move to find an existing mobile and synchronization solution. And Todoist is that solution for Planify. Todoist offers a great free tier option, so by using the Todoist API we as users of Planify have a free option to sync with Todoist, so we can create and manage tasks on the go, and when we are behind our Linux desktop or laptop computer again, we can continue our task management in Planify. This solution also allows you to interact with Todoist in offline mode, because everything that you did offline will be synchronized when you are back in online mode.
To set up synchronization with Todoist, first go to the sign up page of Todoist, to create a user account. Next, go to Preferences in Planify and select Integrations. Here enable Todoist and log in with your Todoist credentials. Now the synchronization process will automatically start.
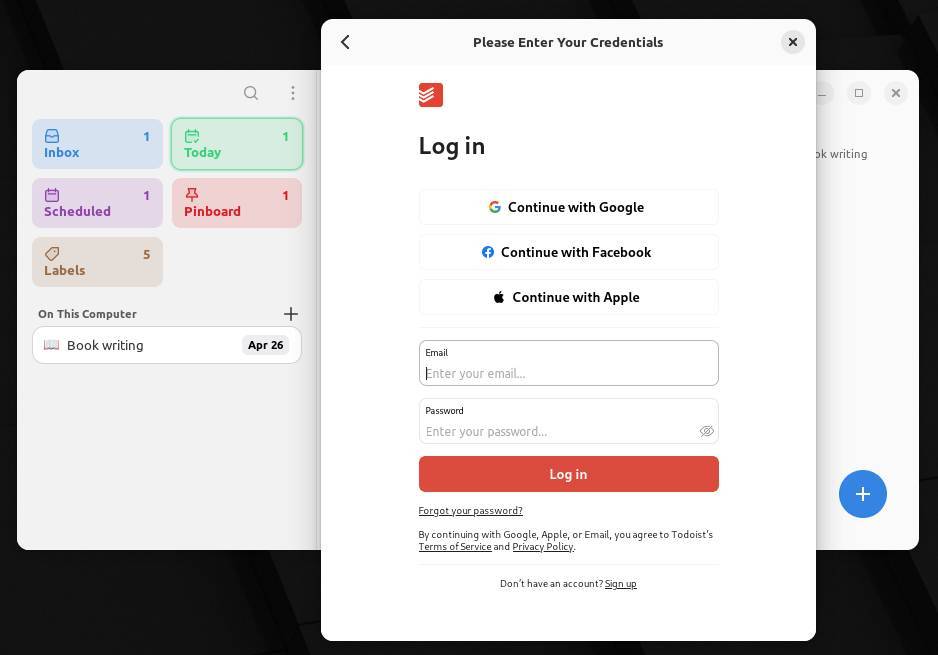
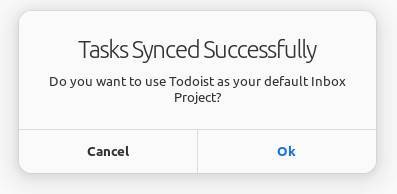
Now you have decide if you want to use Todoist as your default Inbox project.
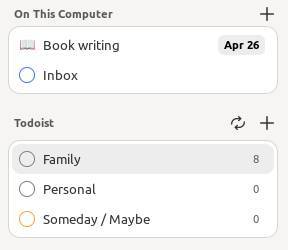
Now you can see what is stored locally and what is managed via Todoist.
Migrate from Planner to Planify
you can migrate from the old Planner application to the completely new Planify via the Backup option in the preferences section.
How to download and install Planify
Finding and installing Planify for Linux is easy. Planify is available as Flatpak via Flathub.org or Flatpak-supported software managers: fdkjghdfg
Final words
In my opinion, Planify is one of the most beautifully designed task management applications for Linux and strikes a good balance between simplicity and powerful functionality. Planify is one of those applications that can be an example of how software for Linux can also be visually attractive, and not only functional, which was often complained about in the past with other applications designed for Linux. We see more and more applications reconsidering their visual design, because a visually well-designed user interface can be an important motivation for choosing an application, can be an important foundation for a visibly logical workflow, and can therefore also be an important functional enhancer.
But next to the strong visual design, the functional design is also of great importance, and in that respect, Planify is an application that does what is expected of it. Of course, there are other task managers available, for example for macOS, that may have more to offer in certain areas, but because applications are increasingly offered as web-based applications or via technologies such as Electron, they can also be used under Linux. But because of the logical way in which Planify supports your task management, the smart drag and drop support, progress indication, the online and offline integration with Todoist, the List or Kanban view, the Today view that ensures that you only have to focus based on what you have scheduled for the day, and the ability to organize your tasks project-wise where necessary, makes Planify one of the best task managers for me that has been specifically developed for Linux.
Have a look at my latest book on Linux, in Paperback or Kindle format.
For more info on my book click here.
When you want to buy the book click on the image below.

If you appreciate what I do on this website…,