Shutter is the best screenshot tool for Linux
by John Been November 17, 2018 · Apps per category / Business user / How to / Latest blog / Productivity / Student / Tools
As a blogger for my website www.reallinuxuser.com, but also as a writer for my book in progress, I use a lot of screenshots to support my texts in a visual way. I once learned in my distant Windows history, long ago, that you could make screenshots of applications by pressing the PrtScr key and then cutting out the part you needed using a graphical application. That time is long gone and we now have many beautiful and convenient solutions at our disposal to make perfect screenshots in a simple way. And in my opinion Shutter is the best screenshot tool for Linux. So let’s take a look at what this simple but versatile application has to offer.
What is Shutter
There are many solutions, both open and closed source, available for Linux to make beautiful screenshots of components on your computer desktop. Some of these applications focus purely on static screenshots, such as Gnome Screenshot, Flameshot, Lightscreen, ScreenCloud, Collabshot and Smartshot. Other applications are more multi-functional tools which can be used for desktop video capturing and taking screenshots, like Kazam. All these tools make it possible to make beautiful screenshots, but if you are a writer of technical manuals, writer of courses, or blogger about technology, and you need a tool that can capture parts of screens or complete windows fast and easily and in high volume, but also enables simple edits directly on the captured result, in my opinion Shutter is the best choice for those needs.
Why Shutter is the best screenshot tool for Linux
I am in the middle of the process of writing a book with the working title “Linux for Humans” and of course I also regularly write blogs for this website. For these purposes I make a lot of screenshots of application screens. Even though words are important, an image often says more than 1000 words. The images that I need to support my texts are sometimes partial images of a specific item in an application, but very often also images of a complete window. In addition, I want to have control over the storage file type, I want to be able to make annotations quickly and sometimes I need postponed screenshots, Shutter offers powerful functions to support this process. Let us look at some important features.
Focussed capture
Shutter has options to capture your entire screen, one out of multiple workspaces, a name selectable window or just a portion of the screen in a very convenient way. But it is also possible to only capture the tooltip.
Inclusion of cursor
You can include or exclude the mouse pointer in your screenshot.
Plugin based editing
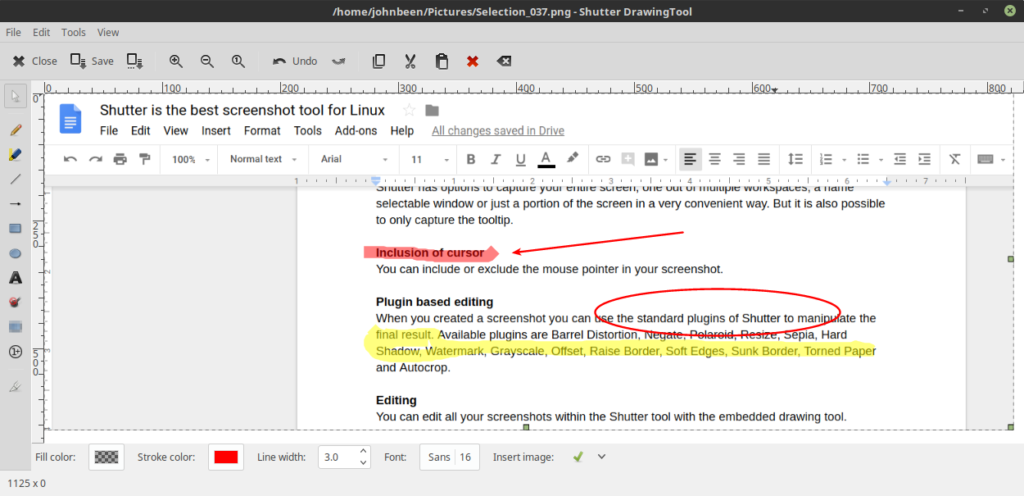
When you created a screenshot you can use the standard plugins of Shutter to manipulate the final result. Available plugins are Barrel Distortion, Negate, Polaroid, Resize, Sepia, Hard Shadow, Watermark, Grayscale, Offset, Raise Border, Soft Edges, Sunk Border, Torned Paper and Autocrop.
Editing
You can edit all your screenshots within the Shutter tool with the embedded drawing tool.
(Note: When you start Shutter the first time you probably will see that the Edit option has been greyed out. We need to do some additional steps to enable this Edit functionality, as Shutter requires the libgoo-canvas-perl library which is not standard available in the Ubuntu and Linux Mint software archives. The installation process will be described later in this article).
Timed screenshots
It is possible to make delayed screenshots. Sometimes it is necessary to prepare a screenshot and have the shot taken a couple of seconds later, for example to show menus, notifications and tooltips.
Save options
It is possible to set a standard file location, image format, compression ratio, file name convention. You can automatically upload your screenshots to external image hosters and share screenshots with others. You can save to pdf format.
Selection options
You can set a standard start size and location of a selection area. You can include or exclude window decoration in the capture.
How to install Shutter
In Linux Mint it is very easy to install Shutter.
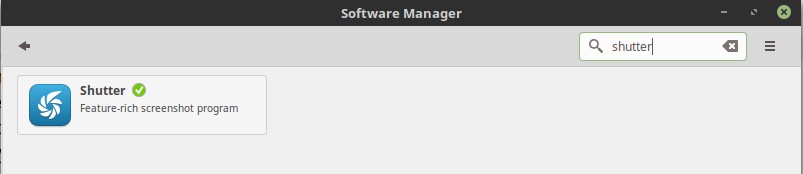
1) Open your Application Menu and search for “Software Manager”.
2) Start Software Manager.
3) Search for “Shutter”.
4) Click on Install.
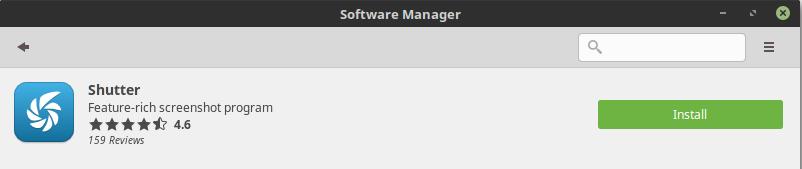
The application will be installed now. You can start the application by searching for “Shutter” in your Application Menu.
Enable edit option in Shutter in Ubuntu 18.04 and Mint 19
When you start Shutter you will see that the Edit option has been greyed out. We need to do some additional steps to enable this Edit functionality, as Shutter requires the libgoo-canvas-perl library which is not standard available in the Ubuntu and Linux Mint software archives.
1) Download the libgoocanvas-common package by clicking the following link.
https://launchpad.net/ubuntu/+archive/primary/+files/libgoocanvas-common_1.0.0-1_all.deb
2) When download has been finished double click the file for installation.
3) Download the libgoocanvas3 package by clicking the following link.
https://launchpad.net/ubuntu/+archive/primary/+files/libgoocanvas3_1.0.0-1_amd64.deb
4) When download has been finished double click the file for installation.
5) Download the libgoo-canvas-perl package by clicking the following link.
https://launchpad.net/ubuntu/+archive/primary/+files/libgoo-canvas-perl_0.06-2ubuntu3_amd64.deb
6) When download has been finished double click the file for installation.
Now restart your system to effectuate these dependencies. The Edit option will be available now.
Enable edit option in Shutter in Linux Mint 17 and 18
When you start Shutter you will see that the Edit option has been greyed out. We need to do some additional steps to enable this Edit functionality, as Shutter requires the libgoo-canvas-perl library which is not standard available in the Ubuntu and Linux Mint software archives.
1) Open a terminal with Ctrl + Alt + T.
2) Type “sudo apt-get install libgoo-canvas-perl” and hit enter.
Now restart your system to effectuate these dependencies. The Edit option will be available now.
With thanks to https://itsfoss.com/shutter-edit-button-disabled/ for the procedure to enable the Edit functionality.
You can find more information on the Shutter homepage.