How to automatically switch between dark mode and light mode in Linux with AutomaThemely
by John Been May 31, 2019 · Apps per category / How to / Latest blog / Tools / Tweaker
For years nobody was concerned and suddenly everyone is writing or vlogging about it, discussing it and all developers of mobile apps, desktop applications and operating systems are working on it: dark modes and dark themes. In itself not very strange, because a dark theme of an operating system or a dark mode of an individual app has a lot of potential advantages. On mobile devices, a dark theme could considerably reduce energy consumption and, in addition, a dark theme is much less bad for your eyes than a light theme, especially in the evenings. But not everyone always wants to use only a dark theme and does not want to keep going to the settings to switch between themes manually each day. But under Linux we have a nice and simple solution in the form of AutomaThemely. In this article I am going to explain how to install, setup and automatically switch between dark mode and light mode in Linux with AutomaThemely.
What is AutomaThemely
For people who sit behind the screen of their computer for a long time, it is important to be aware of this and to think about solutions that are good or at least less harmful to their health. Consider aspects such as your sitting position, physical exercise, the effect of ambient light, the intensity of your screen, adjusting your screen to the warm part of the color spectrum in the evening and eye rest and training.
In an earlier article, “How to change default color temperature values of Redshift at startup“, I have already paid attention to the consequences of too much blue light in a relatively dark environment and how to handle that on a linux system with Redshift.
In another recent article, “How to reduce eye strain and body strain with SafeEyes for Linux“, I wrote about the simple but effective SafeEyes application for Linux which is an application that reminds and forces you to have a break once in a while to give your eyes and body some rest.
And now I want to focus on AutomaThemely which is a simple solution for Linux to setup two different themes whereby the application can be set in such a way that these themes automatically switch from one to the other depending on the time of day. And it has quite a few options so that you can set it to your own taste and insight. The application’s main focus is on the theme for the complete operating system, but there are some nice dedicated features for Atom and VSCode as well. And you don’t have to set the time to switch manually, as it gets the correct time based on sunrise and sunset of your location automatically from the internet. But you can override this if you want.
So let’s install AutomaThemely and see what it can do for us Linux lovers.
How to install AutomaThemely
The release page of AutomaThemely offers a lot of different installable options for this application, but as this website mainly focuses on Ubuntu and Ubuntu based distributions like Linux Mint and tries to help people with the most simple options, in this article I only describe the installation process for Ubuntu 18.04 and Ubuntu 16.04 based solutions. So if you use a distribution like Ubuntu 16.04 and higher or Linux Mint 18 or higher you will be fine with the following procedures.
For Ubuntu 16.04 based distributions
You first need to manually install all the python dependencies with pip3 and after that install the python 3.5 package without included dependencies.
Python dependencies with pip3:
1) Open the terminal with keyboard combination Ctrl + Alt + T
2) Type the following command and give Enter
sudo apt install python3-pip
3) Type the following command and give Enter
python3 -m pip install –user requests astral pytz tzlocal schedule
Python 3.5 .deb package without included dependencies:
4) Go in your web browser to https://github.com/C2N14/AutomaThemely/releases
5) Click on python3.5-no_deps-automathemely_1.3_all.deb
6) When the download is finished double click on the .deb file
7) In the Package Installer click on Install Package.
For Ubuntu 18.04 based distributions
1) Go in your web browser to https://github.com/C2N14/AutomaThemely/releases
2) Click on python3.6-automathemely_1.3_all.deb which contains all dependencies
3) When the download is finished double click on the .deb file
4) In the Package Installer click on Install Package.
That’s it!
Note: In my case on a Linux Mint 19.1 Cinnamon installation I needed to restart my machine to be able to setup and use AutomThemely.
How to setup and use AutomaThemely
Now that we installed AutomaThemely we can setup and use the application. On Linux Mint Cinnamon do the following:
1) Open you Linux Mint main application menu and search for AutomaThemely.
2) Click AutomaThemely to start the application.
Now we are in the Settings screen.
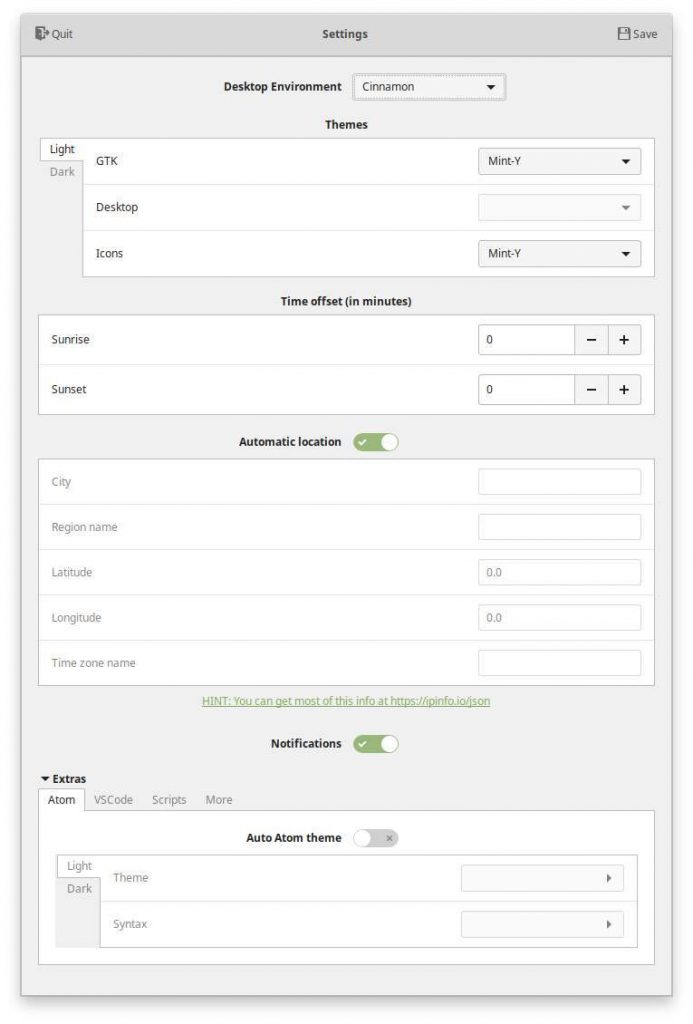
In the Settings screen we can choose our Desktop Environment, with the options GNOME, KDE, XFCE, Cinnamon and Other/Custom. Next we have a section where we can set the theme specific settings for both the light and dark situation. We can further set our location manually or automatically and the offset override for sunrise and sunset. If you want to set your location details manually you can go for example to https://ipinfo.io/json. There you see most of your specific details in JSON format:
{
“ip”: “xx.xx.xx.xx”,
“hostname”: “xxxxxxxxxxxxxxxxxxxxxxx”,
“city”: “xxxxxxxx”,
“region”: “xxxxxxxxx”,
“country”: “xxxxxxxx”,
“loc”: “xx.xx,xx.xx”,
“postal”: “xxxxx”,
“org”: “xxxxxxxxxx”
}
And finally in the Extras section we can set options for Atom, VSCode, Scripts and More.
Let’s go back to the Light and Dark section. As already said we can choose our Desktop Environment, with the options GNOME, KDE, XFCE, Cinnamon and Other/Custom. We have the following possible settings:
- GNOME: GTK, Icons, Shell
- KDE: Look and Feel, GTK
- XFCE: GTK, Icons
- Cinnamon: GTK, Desktop, Icons
- Other/Custom: No options
Let’s use Cinnamon as an example. Here we can set values for GTK, Desktop and Icons. The problem here is that we can’t see the effect of our settings, so we have to look elsewhere to see what each value does.
1) Open you Linux Mint main application menu and search for System Settings.
2) Click System Settings to open the Settings.
3) In the Appearance section select Themes.
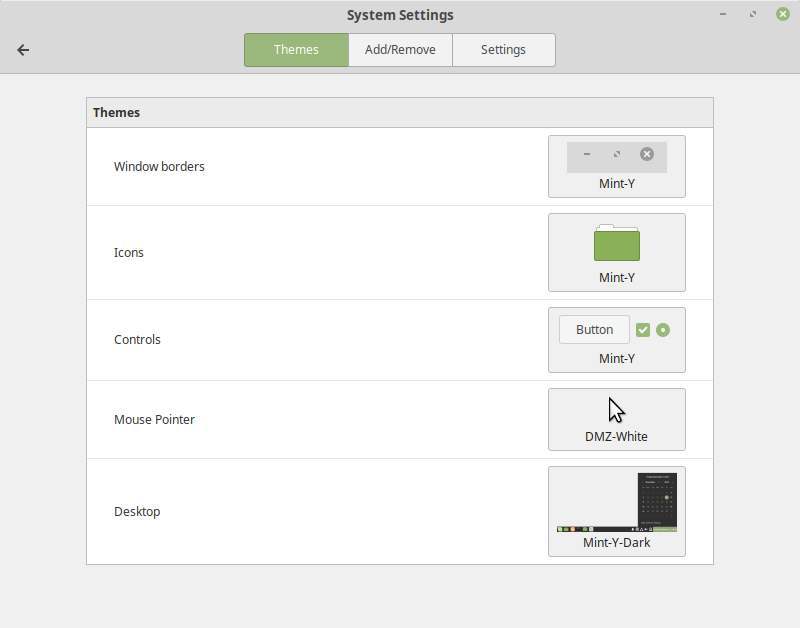
Here you can look at the values in Controls, Desktop and Icons as examples to create your preferred Light mode and Dark Mode.
Note: In my installation I was not able to change settings for the option Desktop. I am still not sure why so if someone has the answer please let me know via https://www.reallinuxuser.com/contact/.
Final words
For people who sit behind the screen of their computer for a long time and frequently, it is important to take into account your health. Applications for Linux like Redshift, SafeEyes and AutomaThemely can help. AutomaThemely is simple but effective. The only thing I miss, which I like in macOS, is to adapt the desktop background in Light and Dark mode as well. But who knows for a future release of AutomaThemely.