When we consider the availability of good photo management and photo editing applications for Linux, then we as Linux enthusiasts have little to complain. For both the holiday photographers with less specific requirements as well as the avid hobby photographers and even professionals, there are several photo solutions available for Linux to support their different editing requirements. For serious photo work, darktable is probably the best known. But recently a special photo application came to my attention that looks at the digital photo editing process in a different and special way, which is directly derived from a special classic photo development technique from the wet darkroom. In this article, let’s see how Filmulator brings back traditional film processing in your Linux digital darkroom.
About Filmulator and Stand Development
Filmulator (https://filmulator.org/) brings back traditional film processing in your Linux digital darkroom by using a completely different way of “developing” your digital photo files compared to other editing applications. Filmulator has its foundation based on what we call Stand Development. This type of photo development was also in the analogue film darkroom era a differentiating technique from regular development with unique resulting characteristics. Stand Development was a developing process for black and white film. I will not go too much into detail here but the basic difference between the regular development process and the Stand Development process is the way you handle the developer fluid during the development process.
In the “old” days when you were developing your film in the darkroom you were using developer fluid, a stop bath fluid and a fixing fluid. Normally when you were developing, you were what is called “agitating” the developing chemicals, which means that during the process, the bottle holding the fluid and the film was repeatedly rotated for a couple of seconds each couple of minutes to spread the fluid evenly over the film material. With Stand development you don’t rotate the bottle holding the fluid, which had a different effect on the final results. In a normal developing process, the highlights of the exposed film were treated differently by the developer than the shadows. In the Stand Development process there is a different development balance between them, resulting in optically finer grain, a very specific balance between shadows and highlights, and the perceived effect of more sharpness than there actually is.
Filmulator is based on this very specific Stand Development technique. Well, we are not actually using digital chemicals of course, but we can use different digital sliders that use behind the scenes the Stand Development characteristics. To do this the application is designed to simulate 3 steps in the photographic process: 1) Exposure of the (digital) film, Development of the (digital) film, and Exposure of the print.
According to the creator of Fimulator, their approach has the following benefits, not only for black and white, but for color images as well (source: https://filmulator.org/about/):
- Large bright regions become darker, compressing the output dynamic range.
- Small bright regions make their surroundings darker, enhancing local contrast.
- In bright regions, saturation is enhanced, helping retain color in bright skies, brighter skin tones, and sunsets.
- In extremely saturated regions, the brightness is attenuated, helping retain detail e.g., in flowers.
Let’s have a look at Filmulator
Filmulator is different because it doesn’t try to simulate the classic techniques to create prints from photographic film, like dodging and burning, which is done after the development process of the film, but is simulating the preparation and the development process of the film itself. With this Stand Development based process in Filmulator, it ensures that you don’t get the halo effects like with over-using the traditional HDR applications, but giving you natural looking gradients without the strange and harsh looking edges and get the maximum out of the dynamic range of your digital camera.
Carlo Vaccari, the developer of Filmulator says:
“Filmulator is not the typical “film effect filter” that merely copies the outward characteristics of film. Instead of adding the flaws from film into a digital photo, Filmulator gets to the root of what makes film so appealing: the development process. … It quite literally simulates film: from “exposure” of film, to the growth of “silver crystals” within each pixel, to the diffusion of “developer” both between neighboring pixels and with the bulk developer in the tank.”
(source: https://github.com/CarVac/filmulator-gui/wiki)
Now let’s start up Filmulator to see how it looks and what it can do.
The user interface
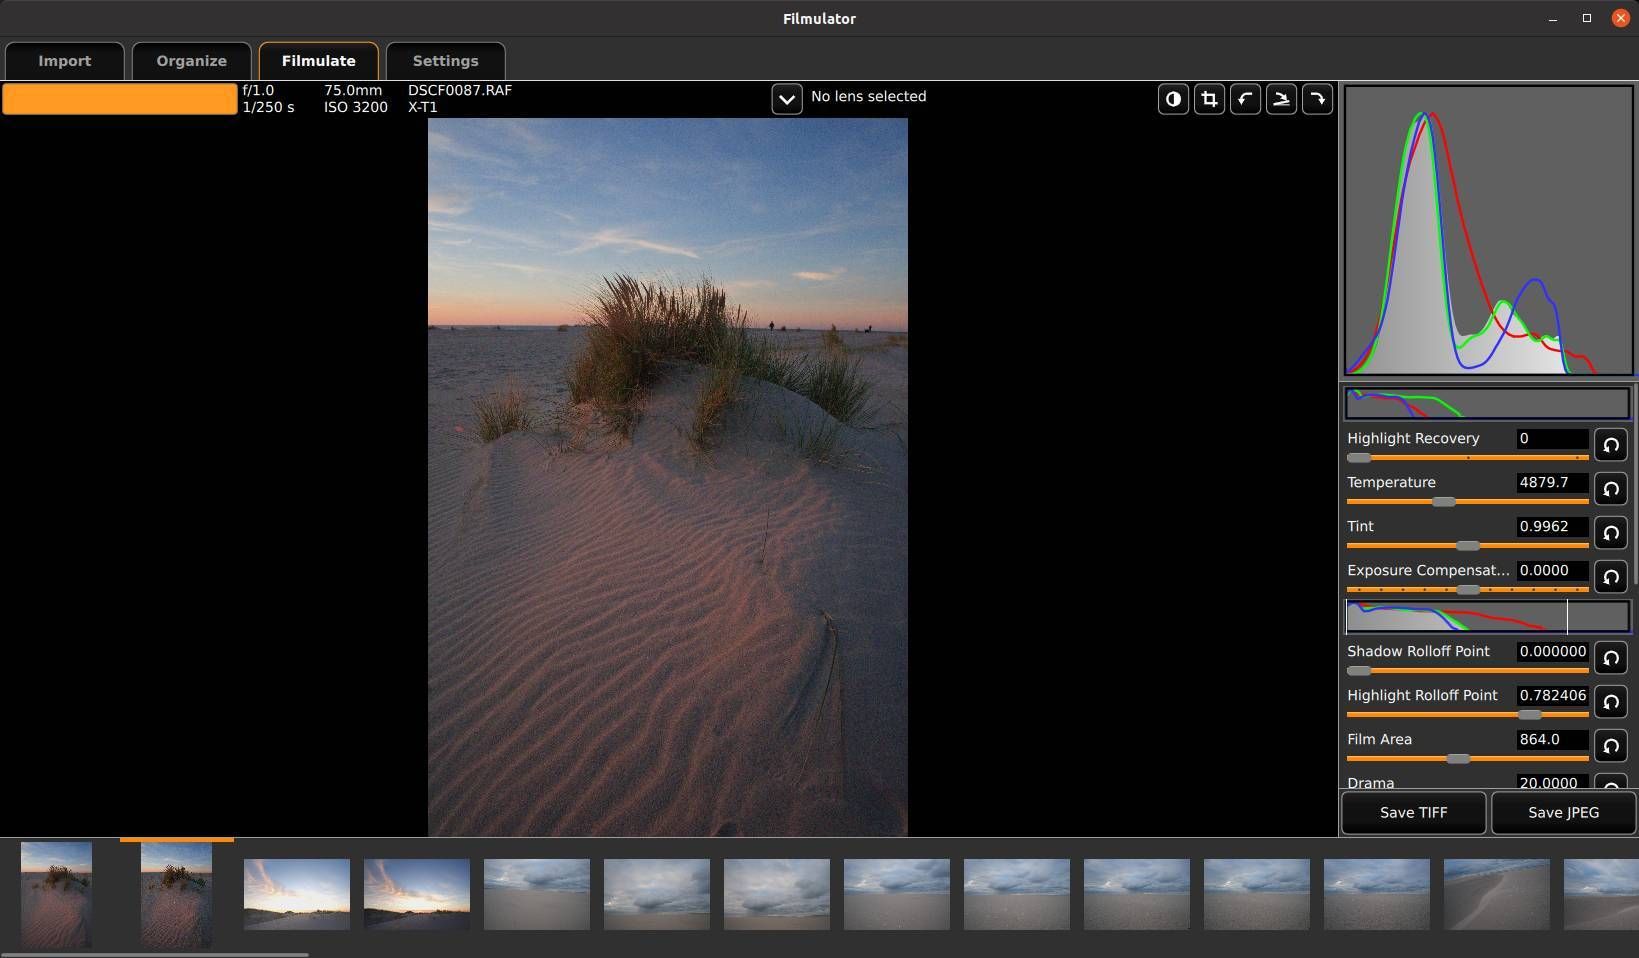
When we start the application and switch to the Filmulator mode (more about that later) we see the following interface:
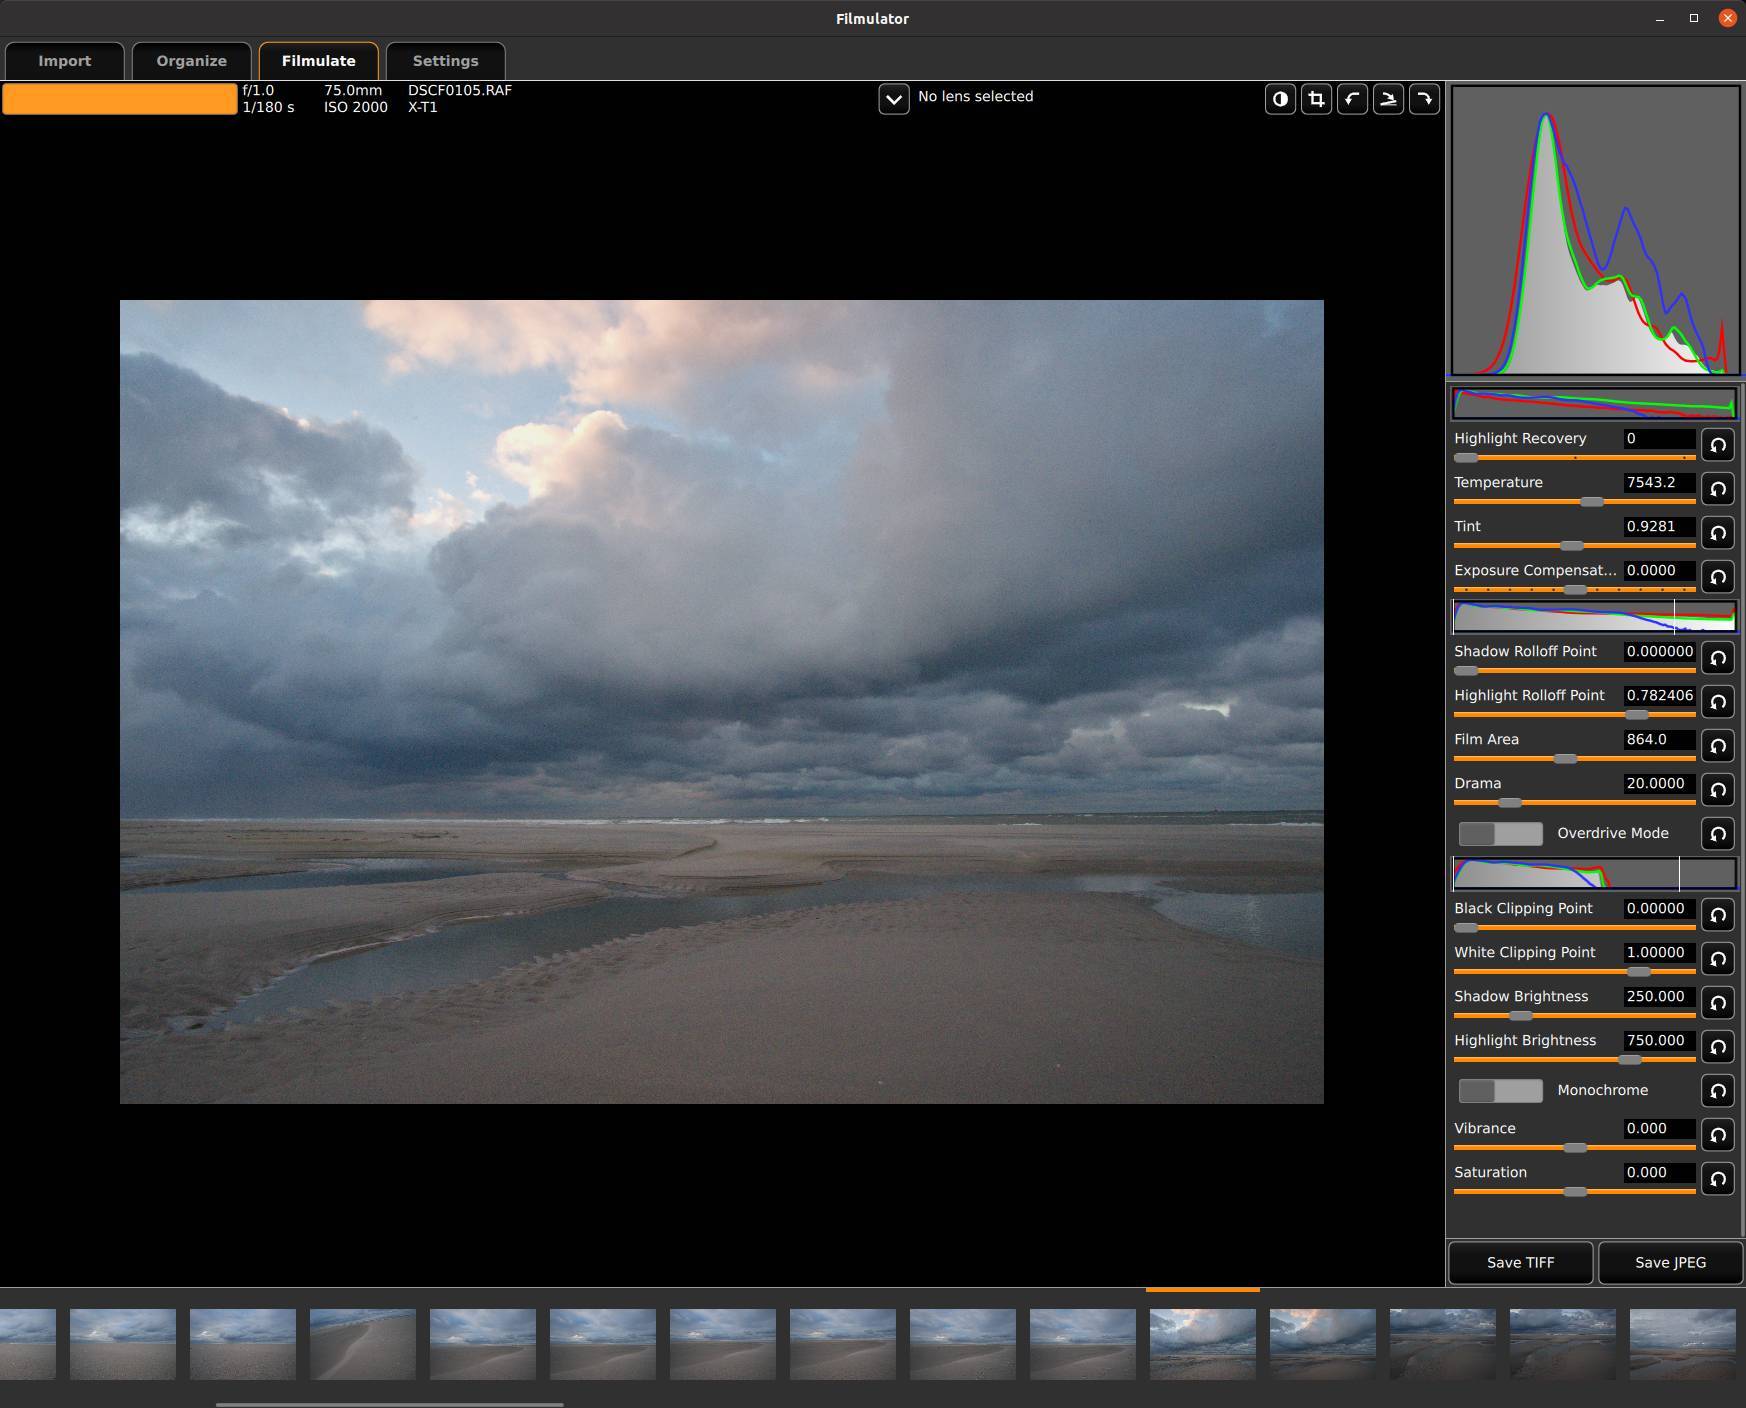
In this interface we see some basic sections. At the top you see different tabs for Import, Organize, Filmulate and Settings. At the right we have the slider section or tool section, via which we will edit our photo in the order of the available sliders. At the bottom we see a film strip with all photos in scope of our selection, which is called the Queue. In the middle we have the main area to show the photo we want to edit. Above the photo at the top of this main area we can find first a processing progress indicator, some metadata, like aperture, shutter speed, iso, lens information, file name and camera type. Further we see at the right-hand side a background switcher, a crop tool, two rotation buttons and a leveling button.
Let’s go through the different user interface components.
Import
In the Import scope we see the following options:
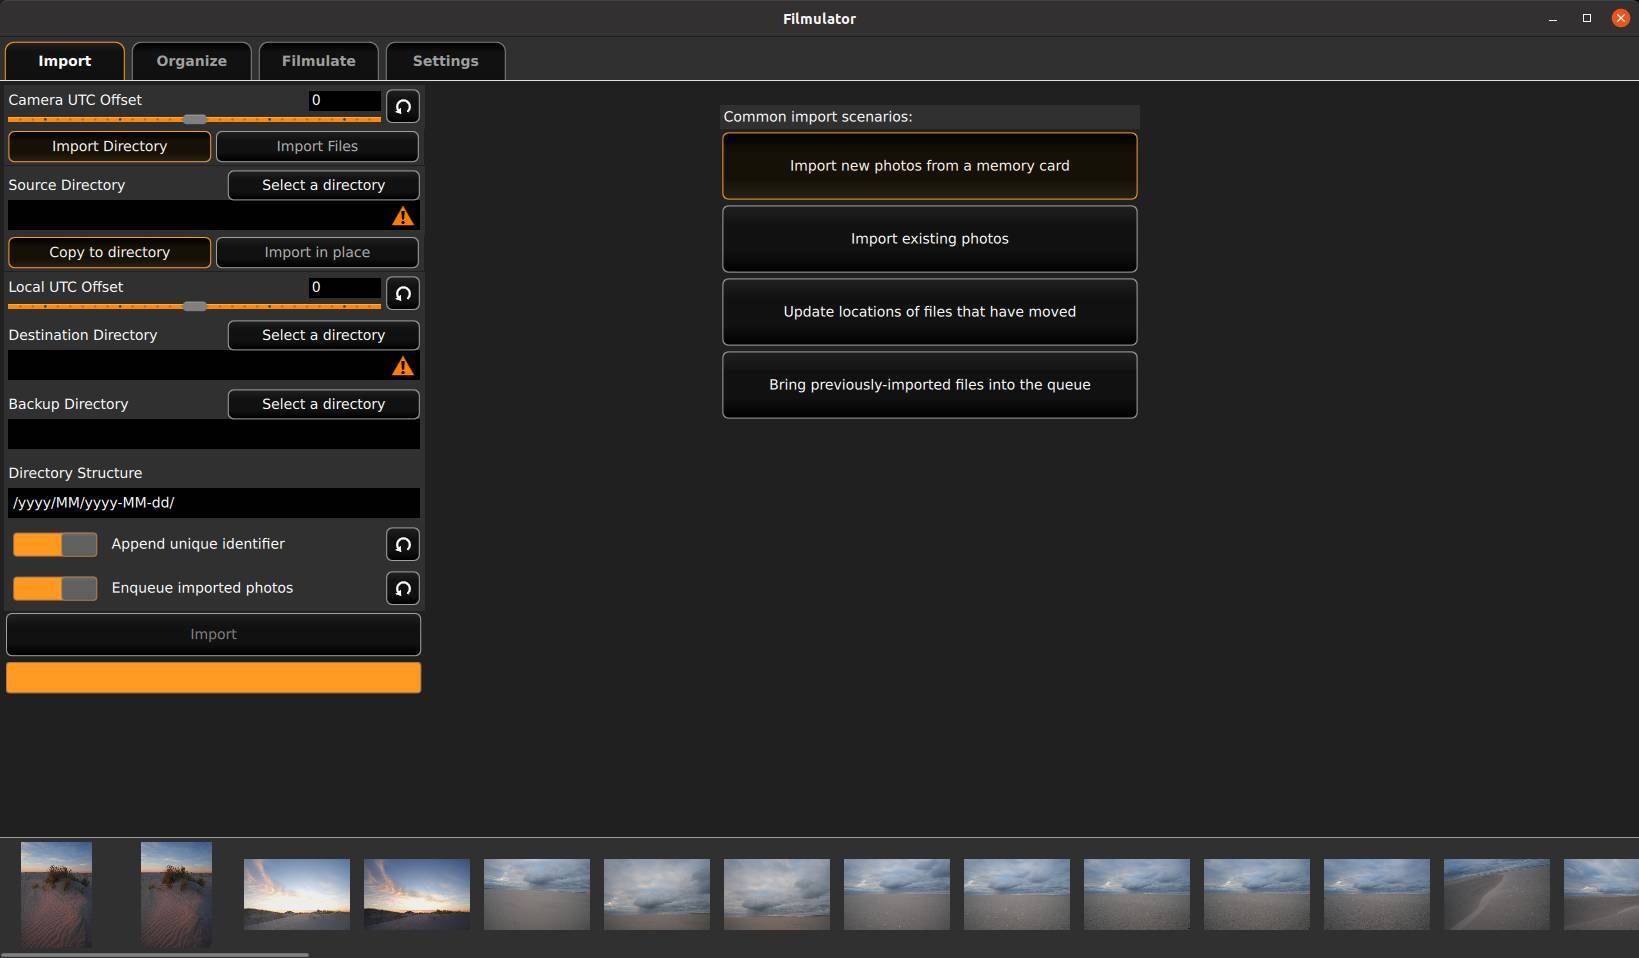
At the right we see some presets, which are import scenarios:
- Import new photos from a memory card
- Import existing photos
- Update locations of files that have moved
- Bring previously-imported files into the queue
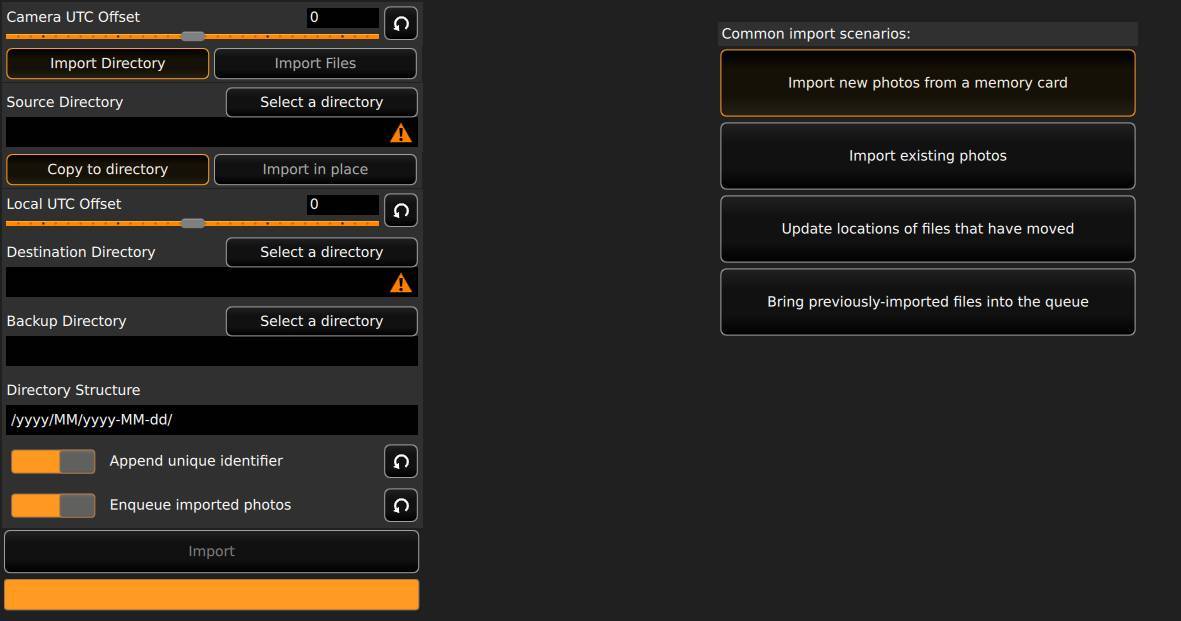
By selecting one of these scenarios the options at the right will slightly change.
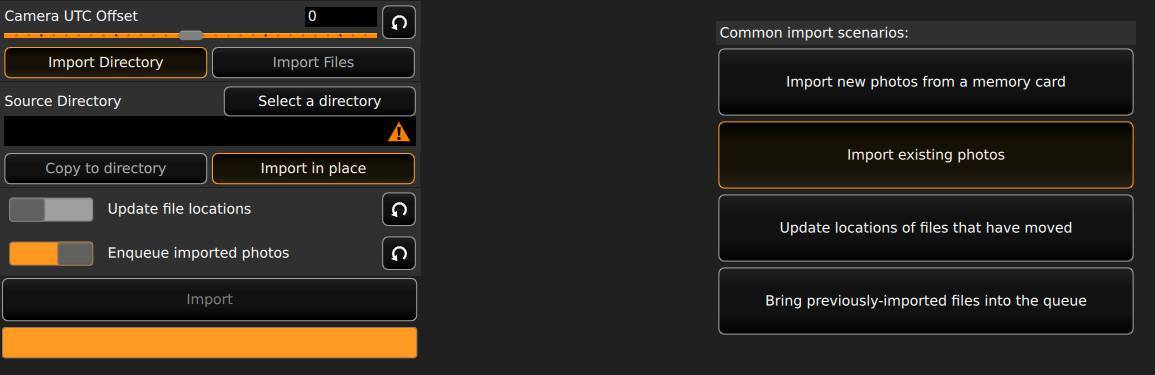
Import new photos from a memory card:
Import existing photos:
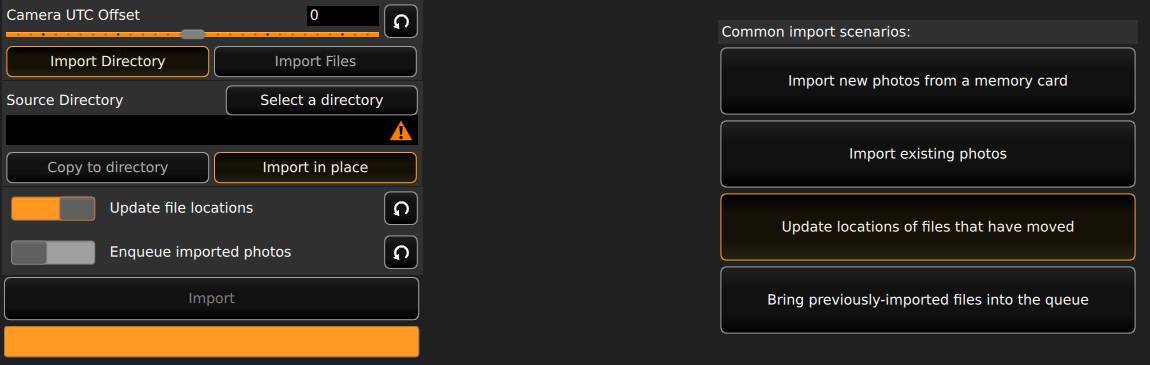
Update locations of files that have moved:
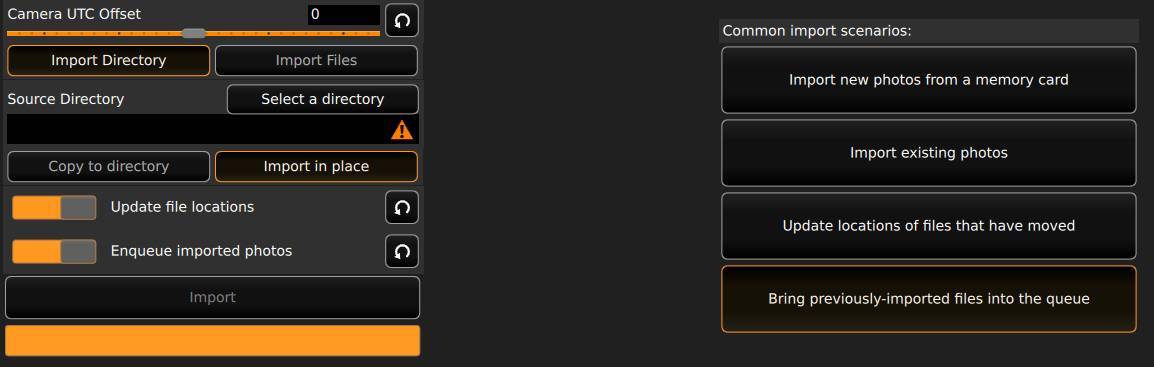
Bring previously-imported files into the queue:
- Camera UTC Offset: Here you can set the time zone equal to the settings of your camera.
- Import Directory / Import Files: Here you can choose between just selecting one or a couple of image files or a complete directory when you import your source files.
- Source Directory: When you selected Import Directory, type here the complete path to the directory you want to import or simply click on the “Select a directory” button to find the directory where your image files are located.
- Source Directory: When you selected Import Files, type here one or more file names and their file paths you want to import or simply click on the “Select files” button to find the files you want to import.
- Copy to directory / Import in place: Here you can choose if you want to copy your files to a specific location or just want to keep the files where they currently are.
- When you select Copy to directory, you can change the local UTC Offset (“This only affects what year/month/day filesystem folders the images are sorted into, in case you ever are accessing the photos using a normal file browser outside of Filmulator.”), type a target directory and type a target backup directory, or just select these directories via the select buttons. You also can customize the directory structure.
- When you select Import in place, all above import options are not applicable so won’t be shown, but you will get the option to Update file location, which will analyze the selected files and update if required their file location as recorded in the Filmulator database.
- Append unique identifier: This function helps to distinguish your photo files after import when you use multiple cameras with maybe conflicting file names.
- Enqueue imported photos: Here you can determine if you want to bring each photo directly in the queue when being imported. When you choose to not to enqueue, then you can bring your own selection of photos later in the work queue yourself.
- Import: Click on the Import button to start the import process, based on the choices you made in the above-mentioned settings. The progress bar below this button will show you how the import progresses.
Organize
In the Organize scope we see the following components:
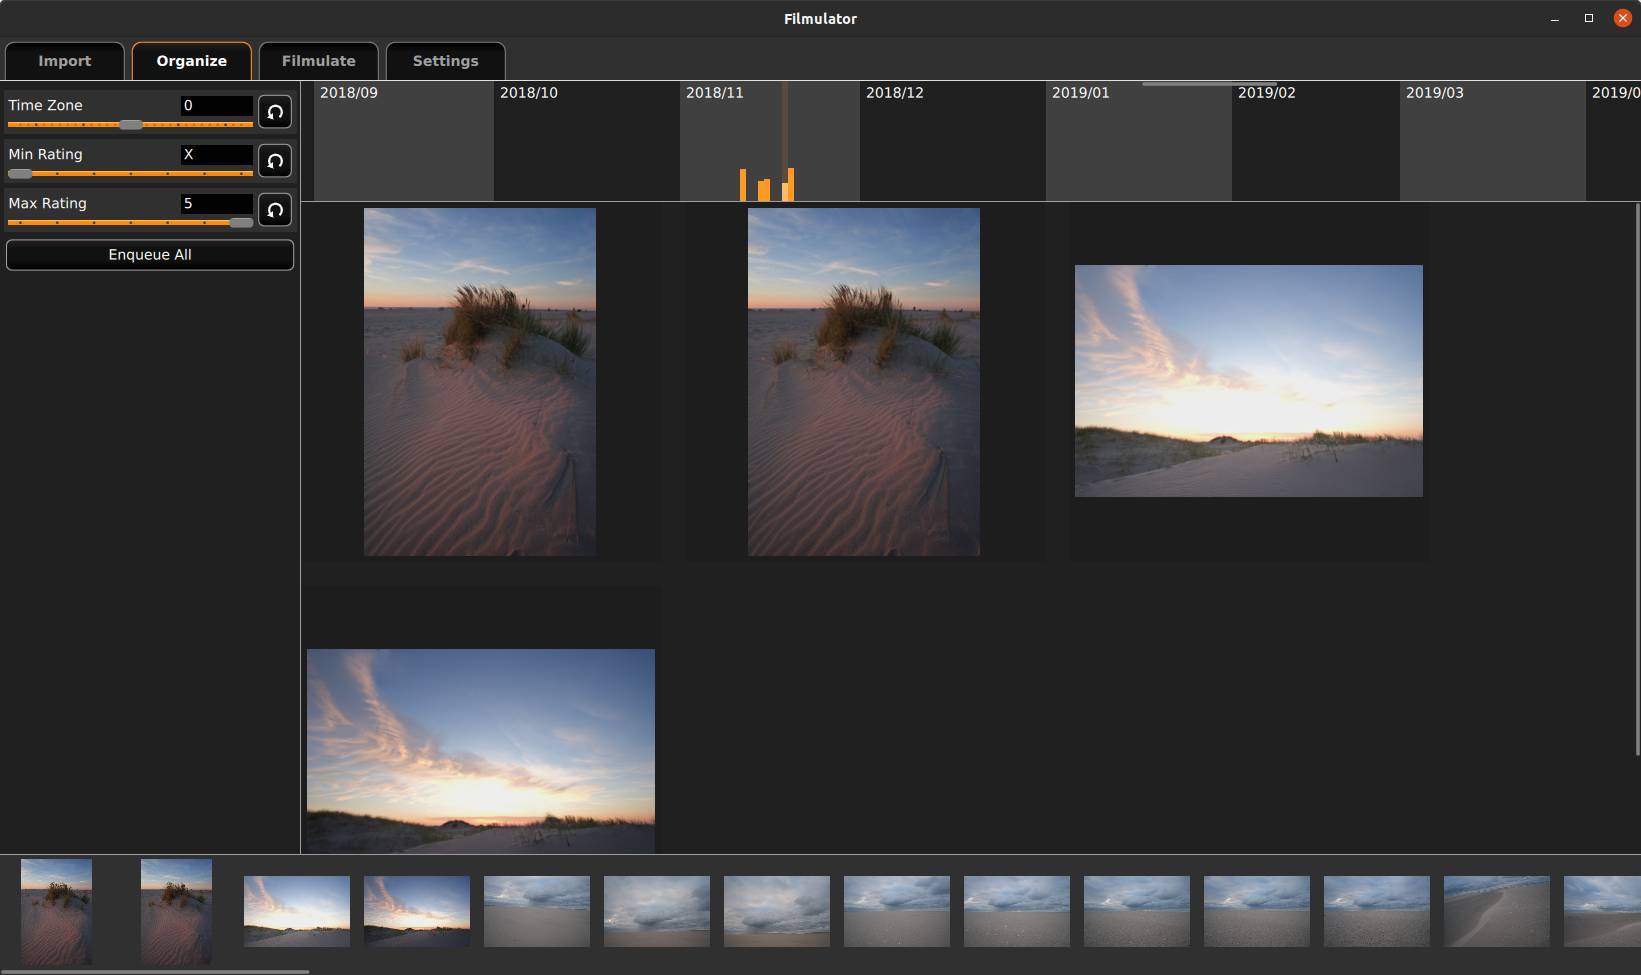
In this Organize scope you have a nice view on the history of the photos you shot. All the photos you have taken can be found via the timeline and the height of each orange bar in the timeline represents the number of photos you have taken on that specific day. When you hover over a bar you see the date and the number of photos. When you double click a bar the photos of that day will be shown in the main area.
At the left side of the Organize screen we have the options Time Zone, Min Rating and Max rating. The time zone slider “controls when midnight is for dividing the photos between different days”. With Min Rating and Max rating you have a convenient way to change the filter to specify exactly which photos with specific ratings you want to see. When you hit the Enqueue all button, all photos that fit in the filter values will be added to the queue.
When you click on a photo in the main organization section and next move your mouse over the top part of this photo holder, you can easily give the photo a rating between 1 and 5.
When you right click on a photo in the queue in the bottom part of the screen you can Forget marked photos, Clear entire queue, Remove from queue, Copy all settings and Paste all settings. You can also give a star rating here.
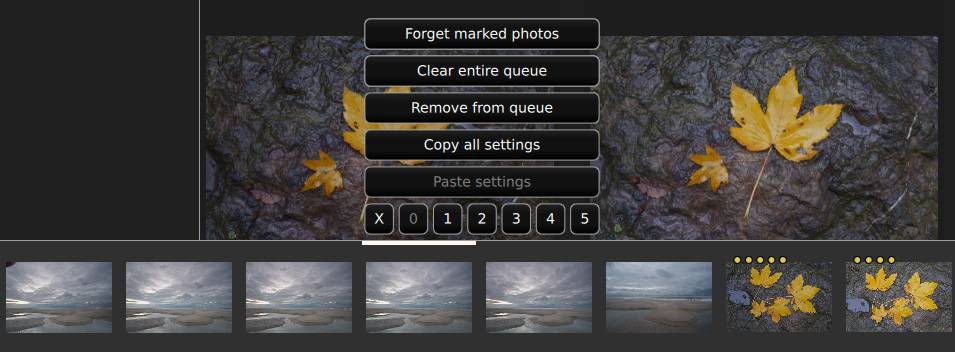
Via Copy all settings and Paste all settings you can copy all editing choices from one image to other images.
Filmulate
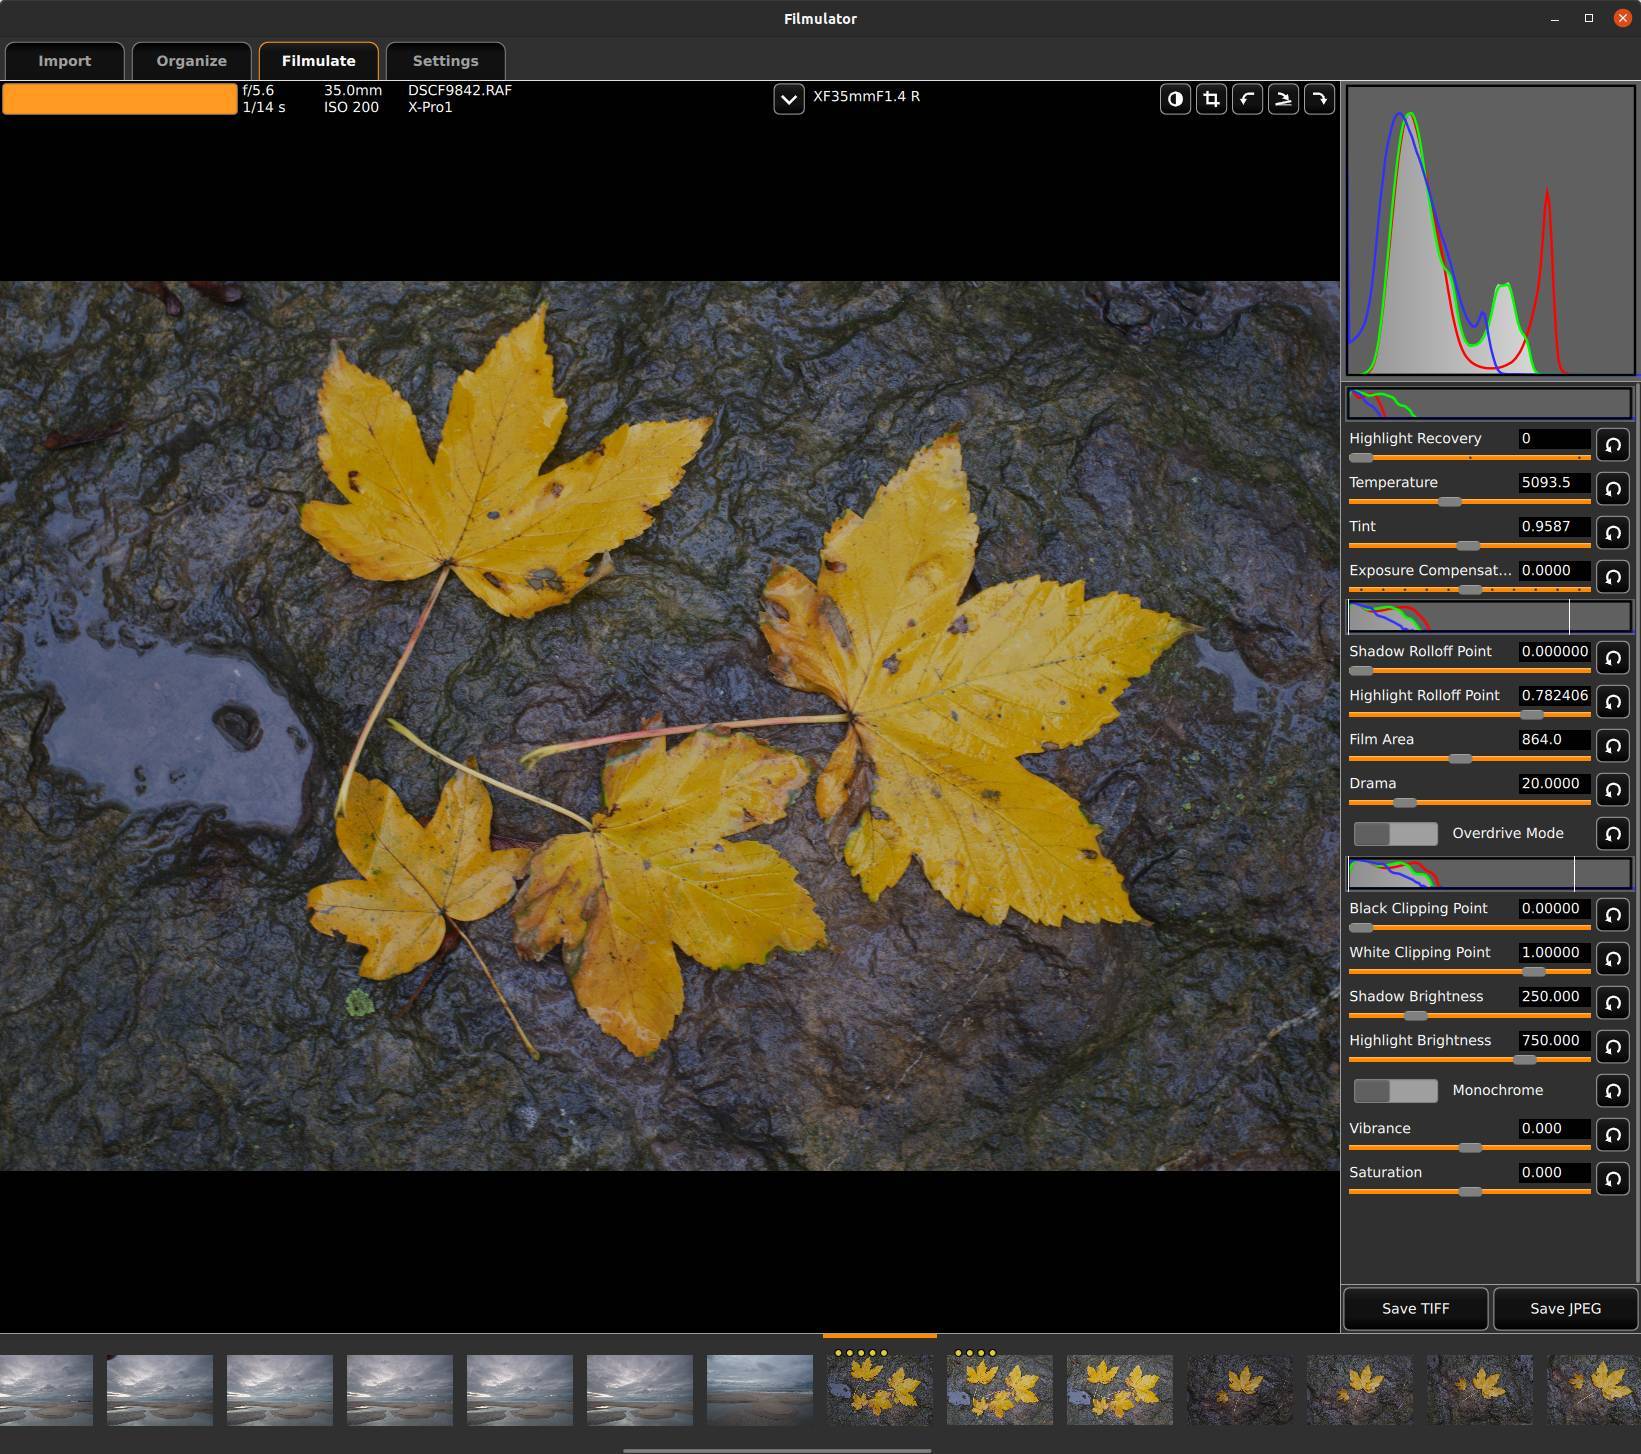
In the Filmulate scope we see the following components:
The Filmulate scope is of course the most important part of the application, because all the editing magic happens here.
At the right we have the slider section or tool section, via which we will edit our photo in the order of the available sliders. In the middle we have the main area to show the photo we want to edit. Above the photo at the top of this main area we can find first a processing progress indicator, some metadata, like aperture, shutter speed, iso, lens information, file name and camera type. Further we see at the right-hand side a background switcher, a crop tool, two rotation buttons and a leveling button.
Later in this article I will go into more detail about the possibilities of the different sliders and the way in which a photo should be edited.
Settings
In the Settings scope we see the following components:
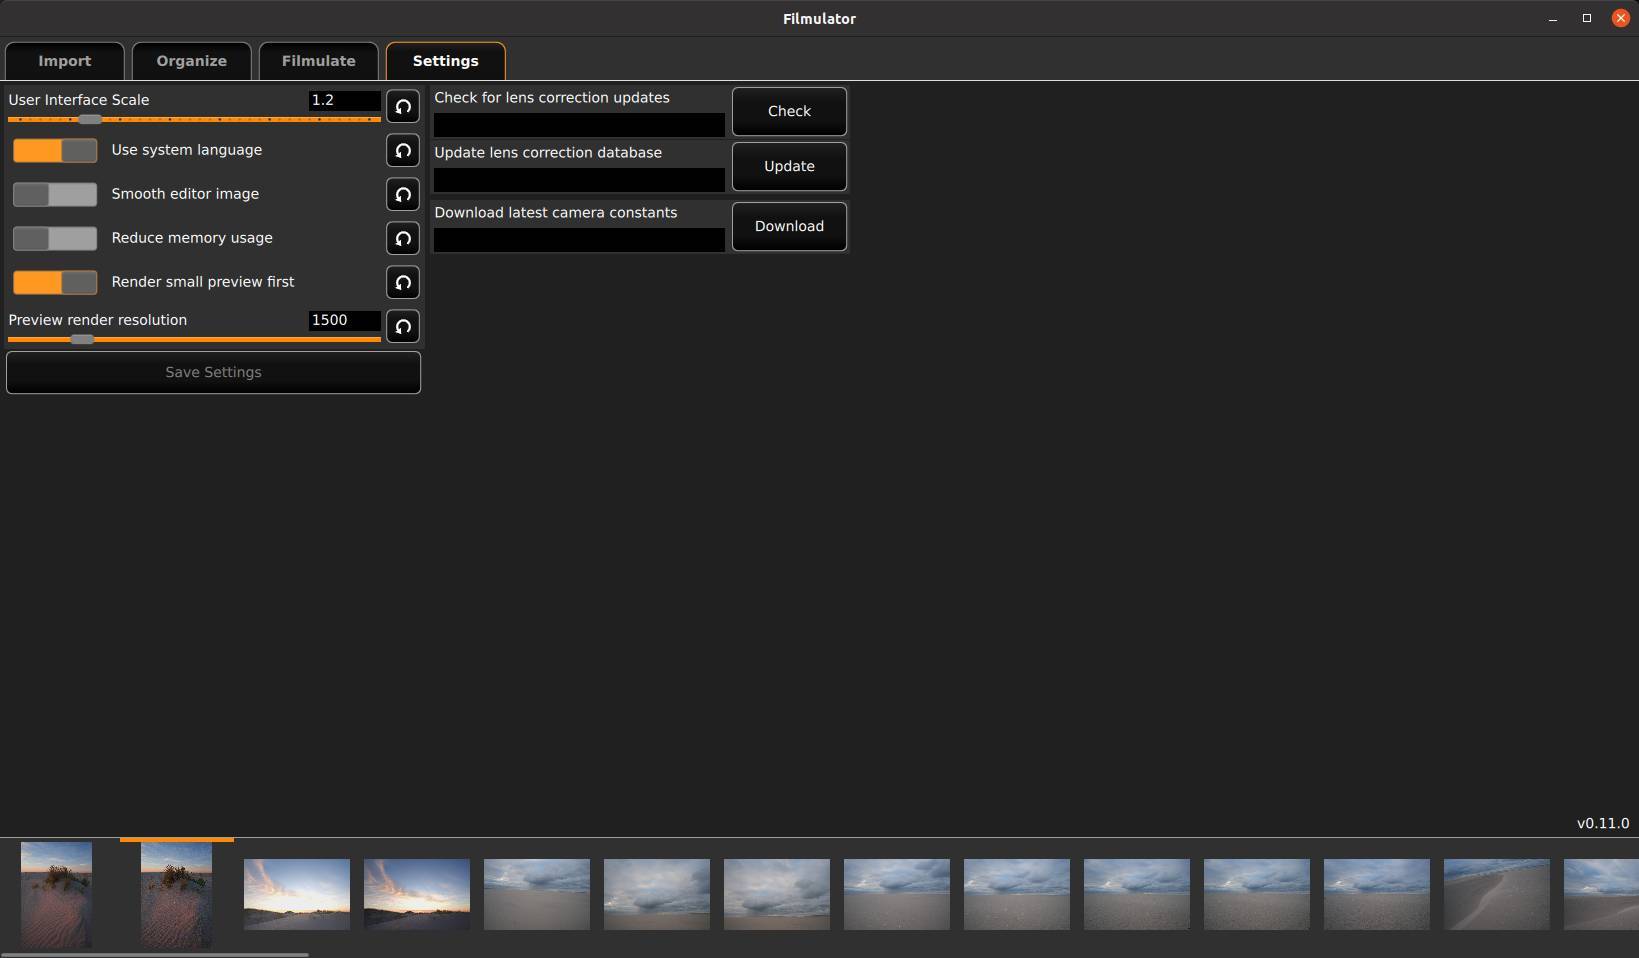
Here you can change the scaling of the user interface, which makes me happy because I use a 32 inch 4K screen which often results in almost unreadable text in some apps, but here you can scale it exactly to your liking. Further you can choose to use or not your system language, select if you want to set smoothing of the editor image (in some situations you want to enable this because of moiré issues), manage memory usage, and the rendering settings of low resolution previews. Further you can Check for lens correction updates, Update lens correction database, and Download latest camera constants.
The basic editing process
When we look at an application like darktable, you have a large number of modules available that you can use in whatever order you think is best or not use at all, and you can even use different modules to get the same end result. So, every photographer has probably a different approach that in theory could lead to the same result. In Filmulator you can also choose which sliders you want to use and in which order, but that is not the expected way to do things. The sliders are organized in such a way that you are actually expected to start with the top slider and then work through all the underlying sliders one by one, making it a very straightforward and repeatable editing process. And even if you choose to do things in a different order, behind the scenes the changes still are applied in the order of the available sliders. So, let’s have a look at the different sliders and what they can do.
Filmulator is designed to simulate 3 steps in the photographic process: 1) Exposure of the (digital) film, Development of the (digital) film, and Exposure of the (digital) print.
In the slider section we first see the main output histogram. Directly below you see the RAW histogram, which won’t change when you do your edits as it is a representation of you staring point, the RAW file and how it is captured, and gives you, if you know how to read it, important information on how to edit your photo. Below these two histograms we can find 3 main parts. The creator of Filmulator calls these 3 parts very logically Pre-Filmulation, Filmulation and Post-Filmulation. The two other histograms represent the input to the film simulation (Filmulation) and the output from the film simulation. On his page “Basic guide to Photo Processing” he gives a very clear and detailed explanation of the complete process, so I won’t repeat everything in the same level of detail, but I will try to give a more compressed version of the basic editing tools in relation to the overall process.
Pre-Filmulation
In the Pre-Filmulation phase everything is focused on the optimization of the exposure of your digital film, or source material, before starting with the actual development of your digital files in the Filmulation step.
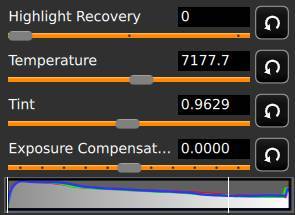
Here you can improve / optimize your digital exposures as an extension of the characteristics of your camera via Highlight Recovery, Temperature, Tint and Exposure Compensation. These tools will help you to improve the exposure of the digital film as a preparation for the actual Filmulation, or development of the digital film.
Filmulation
In the Filmulation phase you pick up your exposed digital files from the Pre-Filmulation or exposure optimization step and start with developing your digital files, like with real film in developing fluid. Here we come back to the earlier mentioned Stand Development. In this type of developing process, the highlights of the exposed film were treated differently by the developer fluid than the shadow areas. The lightest parts of the exposed film interact the most active with the development fluid which will cause the fluid to exhaust quickly in these areas, while the development process just continues in the shadow areas. This boosts the shadow areas while the highlights will keep their details and won’t be overexposed.
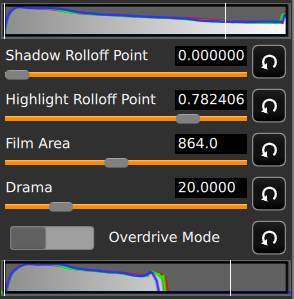
The slider tools available in the Filmulation section will support this delicate balance between highlights and shadows. Shadow Rolloff Point controls the way the shadows are saturated or desaturated. Highlight Rolloff Point controls the way the highlights are saturated or desaturated. With Film Area, you can control whether you want to emphasize large overall regions, or finer details. Drama brings down the highlight areas to have more control on the details in these (too) bright areas, while keeping lesser bright areas as they are. Overdrive makes it possible to make this effect even more pronounced.
Post-Filmulation
In the last stage, the Post-Filmulation phase, we are focusing on the printing process (not digital printing on paper, but simulating the traditional darkroom process of exposing a print).
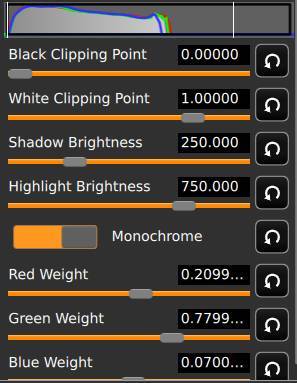
According to the creator of Filmulator, with the White Clipping Point you mimic the exposure of the print, by making it brighter or darker. The Black Clipping Point is used to cut off shadow noise and fog/haze. With the Shadow Brightness slider, you can control both the shadows and the midtones and with the Highlight Brightness you can control the highlighted areas of your print.
From here we can choose between a Color or Monochrome exposure of the print, which gives us different controls. When working from color perspective we have the Vibrance and Saturation sliders available to control the intensity in both the les-intense areas as well as in the intensely colored areas. When choosing the Monochrome option you will be presented with sliders for Red Weight, Green Weight and Blue Weight to control the effect of the underlying colors on your monochrome output.
Output
And when you are finished with Pre-Filmulation, Filmulation and Post-Filmulation, it is time to store your results by saving it as TIFF or JPEG.
How to install Filmulator
Installing Filmulator is very straightforward.
1) Click on the below link to download the AppImage file format of Filmulator:
2) Go to your Downloads folder and right click on the downloaded file.
3) Click in the pop up on Properties.
4) Select the Permissions tab.
5) Activate “Execute: Allow executing file as program” and close the pop up.
6) Double click the file to start Filmulator.
Final Words
If you feel that an application like darktable is too much for your way of working with your photos, but something like Shotwell is too simple or too limited, but you still want some powerful editing tools in a simple to follow workflow, that at the end gives great results with respect to your digital photo files, you should really have a look at Filmulator. I think Filmulator is really well designed, works according to a very clear standard approach, is built on classic proven development concepts, and gives really great results. Filmulator is in my opinion a unique photo application and a great choice for photographers on the Linux platform.