darktable tutorial – 001 An introduction to darktable for Linux
by John Been April 26, 2020 · Apps per category / darktable tutorial series / How to / Latest blog / Persona / Photographer / Photography
Before I came into contact with Linux, as a lifelong passionate landscape, and later portrait and wedding photographer, I had been using Adobe Lightroom on an Apple based system already for a long time. Adobe’s Lightroom has been the de facto standard for professional and serious RAW processing for Windows and macOS for years. And I still think that Lightroom is a great and robust software solution to organize and edit RAW photo files on your macOS or Windows system, next to products like Capture One Pro or ON1 Photo RAW. But as lovers of Linux and open source software, we do not have Lightroom. But we do have similar needs when it comes to serious editing of RAW photo files and associated workflow support. And in my opinion the fulfillment of those needs is offered to us in the form of the powerful open source solution darktable. In this first article in hopefully an extensive series, I will give a first introduction into darktable, as a general background and guidance for all upcoming more in-depth articles about specific darktable functionalities.
Content
- Why this new tutorial series on darktable
- About RAW
- About darktable
- Nondestructive editing
- The workflow
- The editing modules
- What’s next
Why this new tutorial series on darktable
This article is the start of my new tutorial series on darktable. My goal is to regularly come up with new in depth darktable tutorials on specific concepts and functionalities and slowly work towards an accessible, but quality reference on darktable. My plan for this website is to get more and more focussed on timeless, in-depth Linux related articles and series of articles that can help people to use their Linux system more productively.
Before I made a full switch to Linux a few years ago, I used Adobe Lightroom on the macOS operating system to process my RAW files for both my personal photography and my professional photo work. However, when my interest in Linux was sparked, I started to look for usable open source alternatives to process my RAW photo files. A surprisingly large number of high-quality RAW editors are available for Linux, such as RawTherapee, GTKRawgallery, Lightzone and of course also darktable. I have tried all these applications to determine which software best fits my way of working and my specific requirements. For me personally, darktable surpasses the other software solutions because of the flexibility, adjustability, customizability, the enormous amount of selectable but also concealable high-quality editing modules and the many precision options for editing locally. It offers a great photo platform for both serious enthusiasts and professionals.
More and more I get questions or comments from readers about darktable for Linux and that is why I believe that many users who want to use their Linux system productively, would like to read about the possibilities of darktable on this website. Hence the start of this new tutorial series. I don’t know yet how many articles I will be devoting to this series, but I expect that I will focus on many editing modules, and in addition, new functionalities will be added regularly by the developers, so this will hopefully be a continuously growing series.
About RAW
Before we go deeper into darktable itself, it is good to first understand what the RAW file format means and what the advantages are compared to shooting in JPEG format. Technically, every digital camera always first captures a picture in RAW format. RAW is a file format in which all image data that a camera sensor registers is actually stored in a … well … raw format. The core problem is that a camera sensor actually can’t see color. It only can see differences in light intensity. So it is basically a black and white sensor and without additional technologies we would get a grayscale picture. To solve this problem, a method has been devised to place individual color filters over every single pixel on the sensor. These miniscule color filters, being a red, green or blue filter, are placed in a specific pattern.
One of the most commonly used patterns is called the Bayer pattern, but there are other patterns as well. For example Fujifilm uses, for specific reasons which I won’t discuss here, its own pattern called X-Trans. The Bayer pattern is based on a distribution of 50% green, 25% red and 25% blue filters over the surface of a camera sensor.
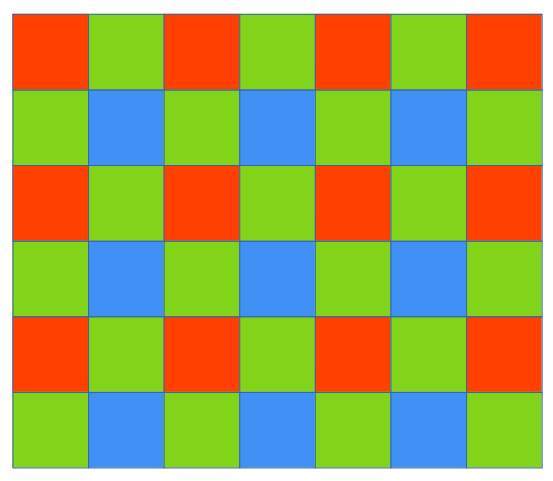
Image based on https://en.wikipedia.org/wiki/Bayer_filter
For example, if a specific pixel has been assigned a red filter, this filter blocks the colors green and blue. This is the information that is actually the foundation for the RAW file. So per pixel the RAW file contains the intensity of the light that was registered and because of the individual color filters on each pixel it contains the light intensity of a specific color per pixel.
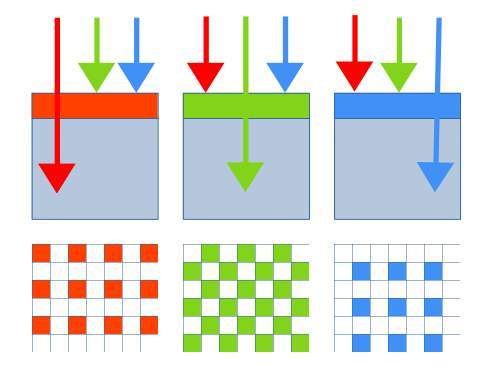
Image based on https://en.wikipedia.org/wiki/Bayer_filter
So you will probably think, how can every pixel on a sensor capture all the colors if each pixel is assigned a specific color filter and can only register the intensity of one of these three basic colors? So how is it handling the two missing colors?
When you don’t choose to create your photos in RAW format but directly create image files in the JPEG format, the processor in your camera first tries to guess the missing color values, then uses the settings in your camera, such as sharpening, noise reduction, contrast and white balance, and next also a compression algorithm is executed on the image information to reduce the file size. Based on these processing steps the JPEG file is being stored. So the difference is that with JPEG the camera itself performs the image processing and when you choose to store it in RAW you have to do all the post-processing yourself on your own workstation. That is why a RAW file is also often called a digital negative.
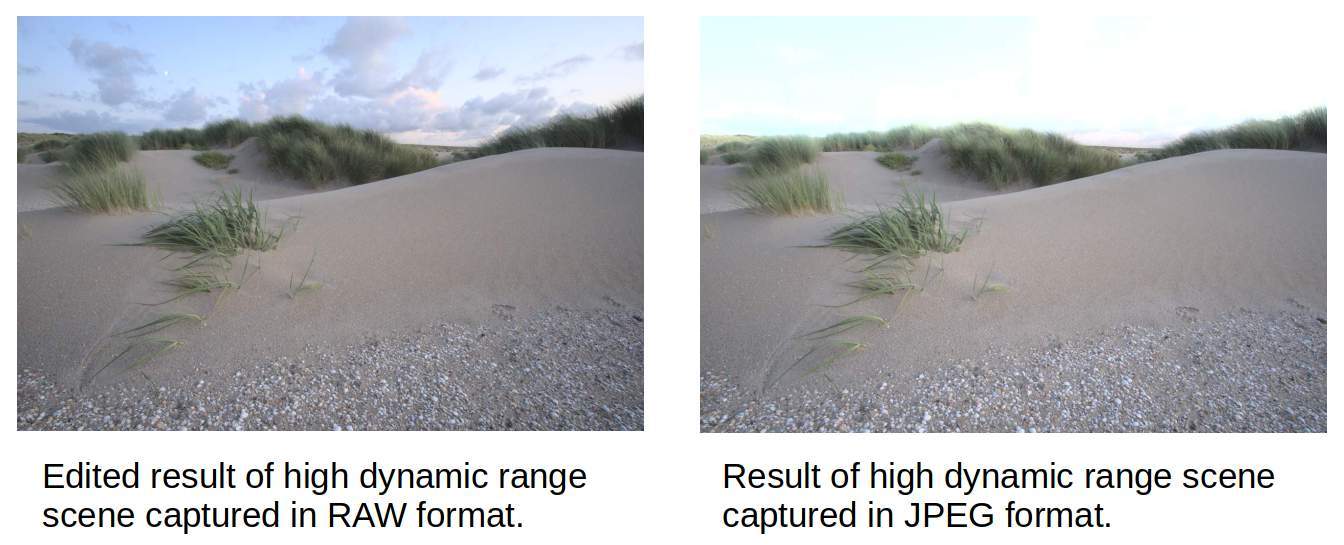
The greater flexibility within a RAW file compared to a JPEG file, should be seen in the availability of tonal or brightness levels, where JPEG can only distinguish 256 (8-bit) brightness levels between black and white, while with RAW there are at least 4,096 (12-bit) levels, making the tonal transition from dark to light much more gradual. Further you can select which color space you want to use in a later stage, you can do far better sharpening and as said before, the RAW file is uncompressed, so no data loss due to JPEG compression. RAW also has a greater dynamic range, so that much more is possible when it comes to (without negative side effects) pulling up underexposed (parts of) photos in case of high contrast scenes. For example a scene with rocks in a shadowy foreground and the sun shining bright on the reflecting mountains in the background will demand a larger dynamic range than the same scene on an overcast day.
But incorrectly recorded white balance information can also be adjusted without problems at RAW, to a certain extent. And as already mentioned, when the RAW file was stored by the camera, no image compression has been done with the RAW format, so unlike JPEG, you still have all the original pixel information available for post-processing.
For simple snapshots that you want to share quickly with others, it may seem a bit too much to have to do all the editing yourself, and then it is probably more practical to have this done in and by the camera’s processor. But for serious post-processing, where image quality is of great importance, the enormous editing flexibility that RAW offers makes self-editing on the RAW file highly preferable.
There is much more to tell about the RAW format, but the foundation has been laid to go deeper into darktable.
About darktable
When Apple’s Aperture, once the first serious workflow solution for RAW editing, died out years ago, Adobe’s Lightroom was the choice for professional and serious RAW editing. But anyone with an interest in digital photography has recently been able to read frequently about the sharp increase in complaints about this application, including the sharply declining performance at larger photo libraries, but also because of the subscription model introduced by Adobe that one tries to push through existing and new users. This allows professionals and serious amateurs to switch en masse to alternatives, including open source. We as lovers of Linux and open source software don’t have much to do with Lightroom, which is not native to Linux. But that does not alter the fact that we do have very similar functional needs. And that is what the team behind darktable listened to very carefully and in response to that comes up with a powerful and robust solution.
When it comes to image editing under Linux, we are not disappointed. A surprisingly large number of high-quality RAW editors are available for Linux, such as RAWTherapee, GTKRAWgallery and Lightzone. But if you value a clear and professional workflow for importing, valuing, editing, synchronizing, presenting, printing and exporting and you see the enormous range of high-quality editing modules, you can hardly ignore darktable.
The team behind darktable has clearly been inspired by Adobe’s Lightroom and that is certainly not a wrong choice. It offers a clear interface that fits in with workflow thinking, although it is probably a bit of a chore for the novice image editor in the beginning. It therefore offers the possibility to select from the wide range of editing modules only the one you use most as a favorite, so that it meets your own needs.
In addition, darktable is what is called a fully “color managed” application, making it an optimal fit in a workflow where color management from conception to print plays a crucial role. For example, darktable supports automatic detection of display profiles, including built-in ICC profile support for sRGB, Adobe RGB and linear RGB color spaces.
darktable also offers the possibility to work “tethered”, whereby a camera is directly connected to the PC and the images are shown directly in the darktable. This is especially important for portrait and product photographers working in a studio situation.
And in terms of performance, we are served our every need. If you have a relatively powerful GPU, the option is offered to use OpenCL when editing the photo files, which gives a very noticeable boost in performance.
Nondestructive editing
An important feature of a RAW application such as darktable is the non-destructive way in which adjustments are made to photo files. Each photo file is opened as a read-only image. Adjustments in contrast, color, gradient and sharpness are not processed directly in the pixels, but are recorded as metadata in a sidecar file. Actually, the set values that are mutated via sliders and graphs, are recorded separately and each time you open and look at the same photo, these mutation values are executed again, which means that you can copy these same settings to other files as well and have them edited in the same way without extra work. In addition, darktable stores all image-related data in its own database for improved performance and security. Pixels are only mutated when you export the photo you edited to, for example, a JPEG or TIFF file. And even then you always keep the original file intact. An export is always a new copy.
The workflow
As already indicated, there are several open source alternatives for RAW editing available, but darktable tries to bridge the gap between RAW conversion and image management. It provides a workflow to make it easier for the photographer to quickly make and edit selections from large groups of photos. Consider, for example, a wedding photographer who may take hundreds of photos per report. Then a tool is desired that makes it possible to efficiently assess photos, select them via a good rating system and ultimately be able to automatically adjust multiple photos in batch, based on a reference operation. You can use darktable to automatically apply the previous changes made to a specific photo to a group of equally exposed photo files, so that you no longer have to edit each photo individually.
The editing modules
darktable distinguishes itself from other applications by the enormous amount of very powerful editing modules. At the time of writing, more than 60 modules are available.
The favorites functionality allows modules to be combined into a list of preferred modules, so that you don’t always have to maneuver through the entire list of available editing modules. A number of important groups of functions can be distinguished: Basic, Tone, Color, Correction and Effect. For example, you will find the modules contrast, brightness, saturation, shadows and highlights and highlight reconstruction within Basis. The Correction group includes the modules liquify, perspective correction and the new module haze removal.
Many of the modules offered have powerful blending options available and the adjustments can be done on the complete image, or via mask options that affect only parts of a photo. And all of this is possible in a non-destructive manner and with a powerful history functionality, whereby implemented actions can be compared and undone as desired.
What’s next
As already mentioned, this article is a first introduction into darktable and thus the impetus for hopefully many more articles that will form a series. In the following articles I will pay attention to downloading and installing darktable under Linux, the basic settings before we start, the more specialist settings, and from there I move to topics such as the user interface, importing photo files, giving ratings, using filters to easily find photos, and exporting the photos. But most articles will likely cover all specific editing modules. More than 60 modules are available and many of these modules are relatively complex and deserve their own article to properly understand what they have to offer. In any case, I am very much looking forward to writing these articles and hope you enjoy reading them. Keep an eye on the darktable series main page to see if there is something new to read.
Note: Many articles use the name “Darktable”. This application is formally called “darktable”, so without a capital d.