How to setup WiFi in Linux Mint
by John Been July 1, 2020 · How to / Latest blog / Linux beginner / Persona / Start with Linux
Setting up WiFi in Linux Mint is pretty easy, but of course you need to setup your WiFi adapter first, which in Linux can be everything between very easy and almost impossible. In the previous chapter of this Linux Mint beginner course I explained how to install WiFi drivers in Linux Mint. It all depends on which hardware components or which laptop you have. For my Dell Latitude E7450 it was a no brainer to have a working WiFi adapter, as it was recognized by Linux Mint out of the box. This is often the case for a lot of A-class laptops, like the Lenovo ThinkPad, HP Stream, Dell XPS and Dell Latitude. But on my custom build i7 workstation it was much more difficult to come up with a working solution for several usb WiFi adapters, so that one is wired. So now it is time to setup the WiFi connection itself.
How to connect to your wireless network
I assume you have a working WiFi adapter (based on the explanation in the previous chapter How to install WiFi drivers in Linux Mint), so it is time now to setup the WiFi connection itself. When you have your Linux Mint desktop in front of you and you didn’t yet connect to your wireless network you will see the following icon on the right hand side of your panel in what we call the system indicator area. This “two arrows with a small x” icon tells you that the wireless connection is not active yet.

If the wireless connection is active then you will see the WiFi indicator. There are embedded four levels in this icon that will give you information on the strength of your received signal. In this example the strength of your signal is approximately 75%.

But let’s assume this is the first time we try to activate a WiFi connection. Start by left-clicking on the “two arrows with a small x” icon and the following screen will pop-up.
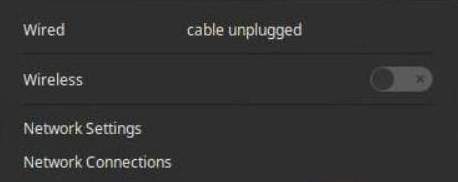
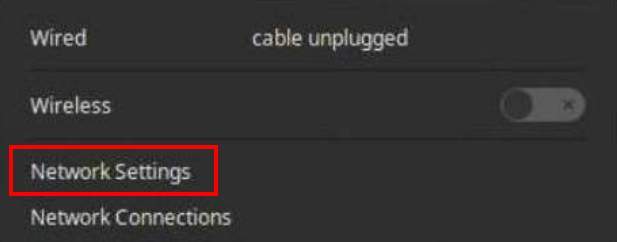
In this screen you see that both the wired and the wireless connections are not active. So click on the on/off switch on the right of the Wireless section.
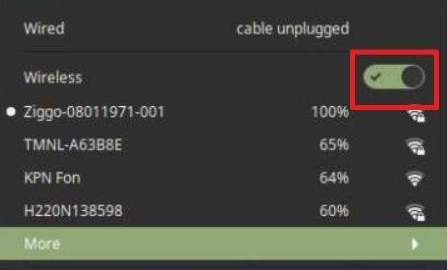
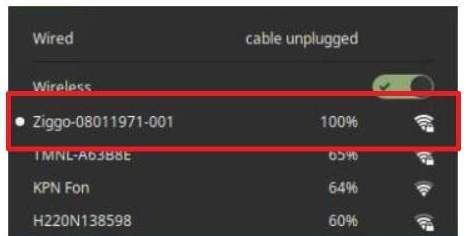
Now the activation switch will change to activated and one or more available WiFi networks will hopefully be shown with their strength levels. Here you can select your own wireless network.
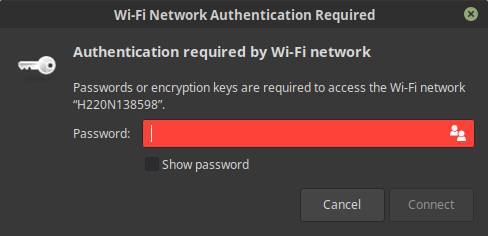
When you selected your preferred wireless network, a WiFi Network Authentication pop-up will be presented to you. Give your administrator password here and click Connect.
If everything goes as expected you are now connected to your wireless network and you can start surfing the web.
Use your Linux machine as hotspot
With respect to wireless connectivity Linux Mint has an additional trick under its sleeve. It is possible to use your workstation or laptop installed with a Linux Mint distribution as a wireless hotspot for other wireless devices like laptops, tablets and mobile phones. The only catch is that this Linux hotspot computer must be connected by wire to your internet router. When wireless connected your computer can’t be used as a wireless hotspot.
So to setup a wireless hotspot, first make sure your computer has a wired connection. Now left-click on the network icon in the system indicator area on the right hand side of the panel.
![]()
Click on Network Settings.
Now the Network settings screen will be opened. Here you find the button “Use as hotspot”.

So click on it to open the hotspot settings.

In the above screenshot you see that a Network Name has been created together with a Password. Now you simply search in the network settings of your mobile phone or tablet or another laptop for this network name and type the provided password to log in this wireless network. That’s all.