Linux Command Line for Beginners – How to simply find and install applications
by John Been October 5, 2019 · command line tutorial series / How to / Latest blog / Linux beginner / Persona
This website is primarily aimed at Linux users who just want to use their system in a productive way, who want to minimize the burden of understanding all underlying technology and mainly want to focus on the available software and what they can do and create with it. I keep emphasizing in my blog posts that I try to avoid the terminal commands as much as possible, because I like to use the available graphical options and alternatives whenever I can. My main motivation is that I believe that lots of new people potentially interested in Linux get scared due to the often too technically oriented articles they find on the internet and walk away before actually experiencing all the great aspects this platform has to offer. Many people have become more and more visually oriented, among other things because of their mobile phones and tablets and the graphical interface they use on it, so people prefer icons and buttons and graphical software centers as opposed to typing and remembering commands. So to make Linux successful developers should listen to these kind of signals and work together with designers to come with great graphical interfaces. But it is undeniable that there are many things in Linux that can actually be executed very simply through the Linux command line and sometimes much simpler and faster than via a graphical solution. In this article I will explain in a simple way how to search for and install applications via Linux Terminal commands.
Applications under Linux
Linux distinguishes itself from other operating systems through a clear layered structure, which fits together as Lego building blocks. Most Linux distributions consist roughly of the Linux kernel, a desktop environment and software packages.
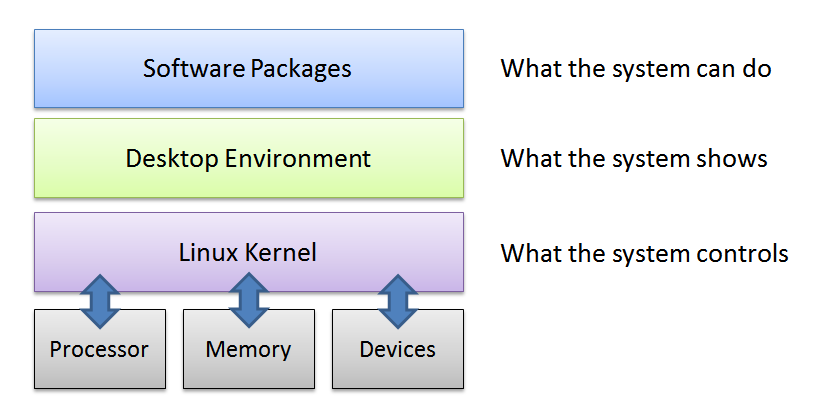
From the software layer, which we call a software repository, which is a collection of distribution specific software packages, the software desired by the user can be simply installed, both from the Terminal as well as via the Software Center, without the need to visit all kinds of potentially unreliable websites. The software packages available for example in the Linux Mint repository are secure and tested and available in a format comparable to app stores like those from Apple and Google.
A single Linux distribution can contain tens of thousands of software packages, and when you install a distribution like Linux Mint or Elementary OS, a lot of mostly good applications are already installed by default and ready to use. But of course you want to install some additional applications specific to your needs as well.
Different installation formats
There are several ways to install applications under Linux. You may be wondering why there isn’t just one way. In a world where software is not developed for commercial reasons but from an open source community perspective, there are many people involved with many opinions that can often lead to many different approaches and different solutions. This can be a good thing, but it can also lead to confusion and decision-stress for a beginning Linux user.. The good thing is that there are multiple levels of convenience, simplicity and safety, but the question is what approach is the best for you. Some users just need stable software that they can install in a simple and graphical way, similar to a Google Play store or an Apple App store. Other users feel the need to always install the latest bleeding edge versions of software, perhaps those even still under development, and find it less important that software is stable. That is why there are different approaches and formats for different users available.
In this article I want to focus on how to install applications via the command line on a Ubuntu based Linux installation like Linux Mint, Elementary OS or Zorin OS. I will specifically focus on the following topics and try to do that as simple as possible:
- Update repository
- Upgrade repository
- Search for applications
- Install applications
- Remove installed applications
- Install applications from a PPA
How to update your software repository via the Terminal
Before searching for and installing applications it is wise to update your software repositories first, so you have the most recent and up to date content as a base for your installation process. To do this do the following:
1) Open your Terminal via the keyboard combination Ctrl + Alt + T.
2) Type “sudo apt-get update” and hit Enter.
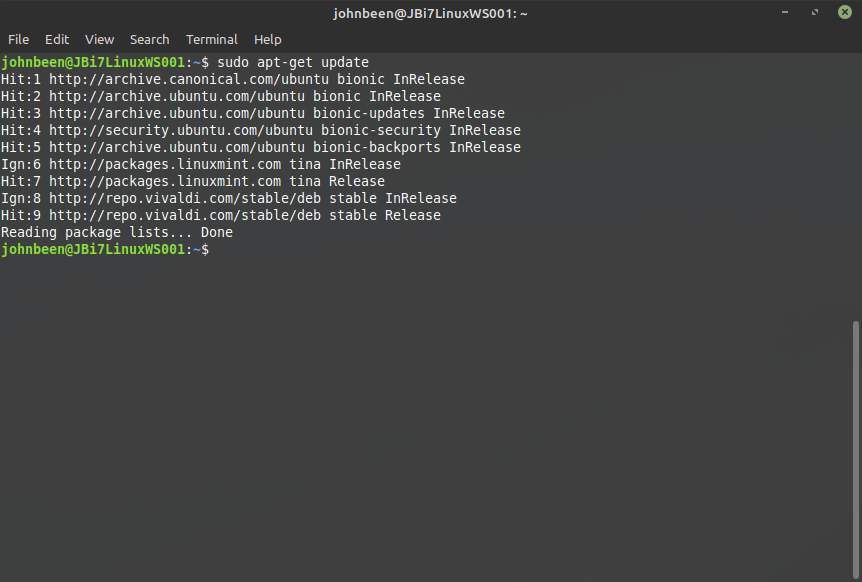
The above command starts with “sudo” which is short for “super user do”. Via sudo you have elevated root privileges to do things a normal user can’t do (which is a good thing), like installing software and updating the repository (but also remove stuff and mess up things unexpectedly). That’s why the root password will be requested to be sure you are the administrator on your system. The word “apt” is short for Advanced Package Tool, which is a user interface to handle actions with respect to packages. By using the “update” command you make sure that the repository contains a complete set of applications.
Next we are going to upgrade the repository.
How to upgrade the applications in your software repository via the Terminal
Now that we have updated the repository to make it complete, the next step is to upgrade all the applications in the repository that have a possible upgrade available.
1) Open your Terminal via the keyboard combination Ctrl + Alt + T.
2) Type “sudo apt-get upgrade” and hit Enter.
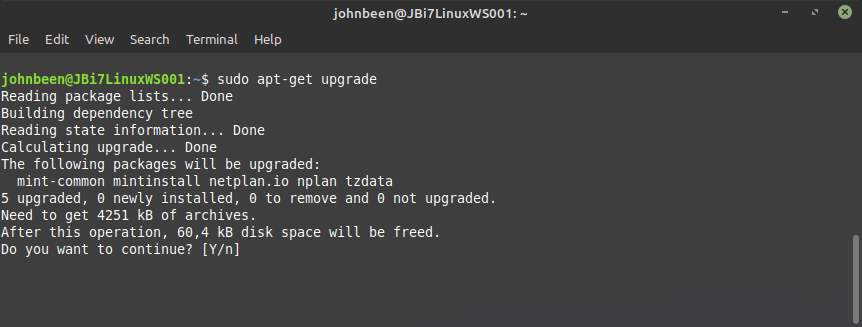
3) On the question “Do you want to continue?” you type “Y” and hit Enter.
That’s it, so now it is time to search for applications via the Terminal.
How to search for applications in the software repository via the Terminal
It is important to know that you don’t need to look first in the graphical Software Center of your distribution or on the internet to find out what the specific name is of a Linux application you want to install. If you already know the exact name that is great, but you can do a search in a simple way via the command line as well.
1) Open your Terminal via the keyboard combination Ctrl + Alt + T.
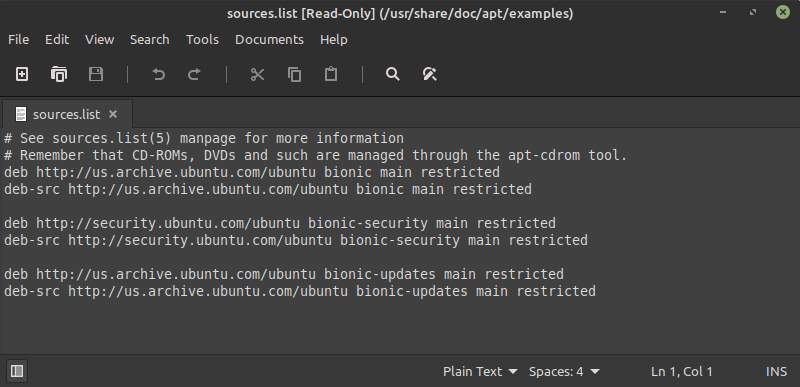
Now we are going to use the command “sudo apt-cache search [application name or type]” to find the name of a specific application that we want to install. The apt-cache command is available to show the information stored in the repositories. The way this information is gathered is via a kind of a cache or temporary memory as it is a temporary combination of the content of different software sources. These sources can be found for example in Linux Mint via the Software Sources front end…

…or it can be found in the “sources.list” files.
In the following example we will search for an email application.
2) Type the command “sudo apt-cache search ’email client’ ” (use single quotes if you want to search for a combination of words) and hit Enter.
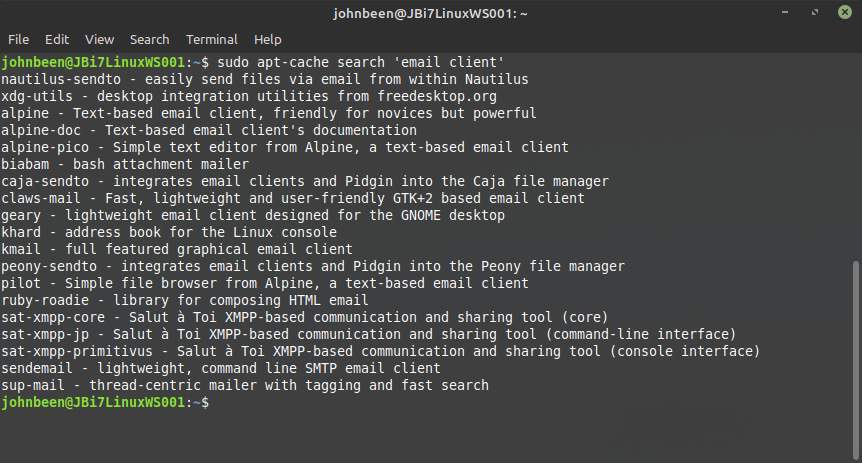
As you can see in the example of my system above a list of available applications will be presented with “email client” in the name or in the description. In the following step we are going to install the email application Geary via the Terminal.
How to install applications from the software repository via the Terminal
Now that we found the exact name of a specific email client application, we can install the app via the command “sudo apt-get install [application name]”:
1) Open your Terminal via the keyboard combination Ctrl + Alt + T.
2) Type “sudo apt-get install geary” and hit Enter.

That’s it. Geary has been installed.
How to remove installed applications via the Terminal
If you have tried an application or found a better alternative you may want to remove the application. We can do this off course via the Terminal as well via the command “sudo apt-get remove [application name]”. If you don’t know the exact application name, you can type the first letters of the name and find the application by using the Tab key on your keyboard, to show all applications that start with these characters.
1) Open your Terminal via the keyboard combination Ctrl + Alt + T.
2) Type “sudo apt-get remove geary” and hit Enter to remove the application (or type “sudo apt-get remove gea” and hit the Tab button to complete the name).
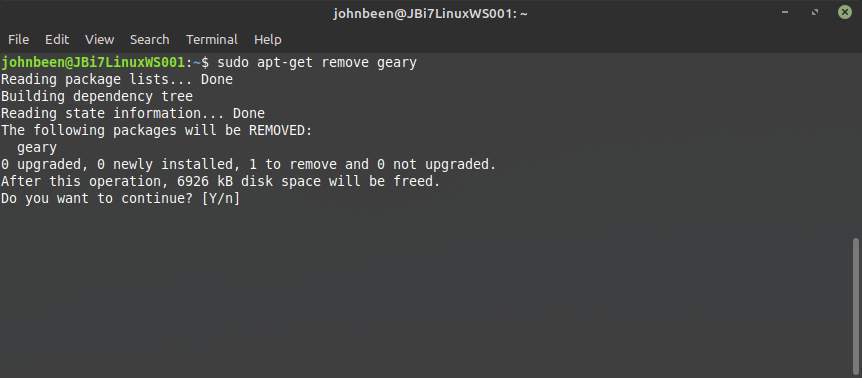
3) On the question “Do you want to continue?” you type “Y” and hit Enter.
Now the application has been removed. Very simple.
How to install applications from a PPA via the Terminal
If a specific application is not available in the standard repositories of your Ubuntu based distribution, a PPA or Personal Package Archive is another easy way to install additional software on Linux. Many developers want to offer the latest version of their software directly to the end users. In that case, a PPA, being a private repository, can be used as an addition to the Ubuntu official software repository.
As an example, let’s have a look at the great video editing application Olive, which you can’t find in the Linux Mint repository.
1) Go to https://www.olivevideoeditor.org/ in your web browser
2) Click on the top menu on Downloads or go to https://www.olivevideoeditor.org/download.php.
3) Click on the Linux icon or go to https://www.olivevideoeditor.org/linux.php.
Here in the section “Ubuntu 18.04/Linux Mint 19 and later” it is explained that you can use the following commands to add a PPA and install the software:
sudo add-apt-repository ppa:olive-editor/olive-editor
sudo apt-get update
sudo apt-get install olive-editor
So do the following:
4) Open the terminal via Ctrl + Alt + T.
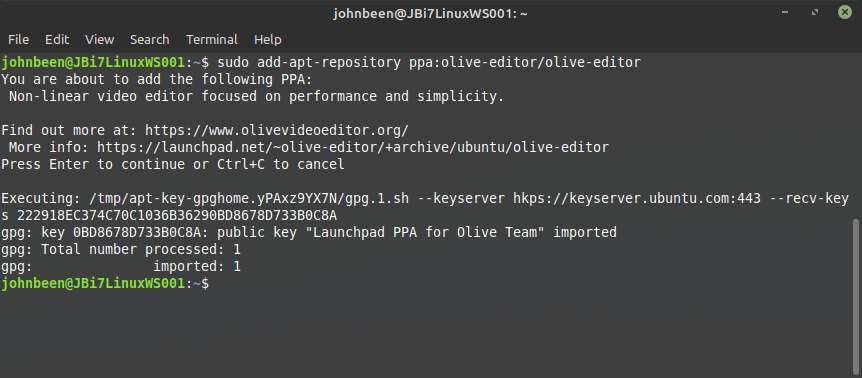
5) Type the following command to add the PPA to your system:
sudo add-apt-repository ppa:olive-editor/olive-editor
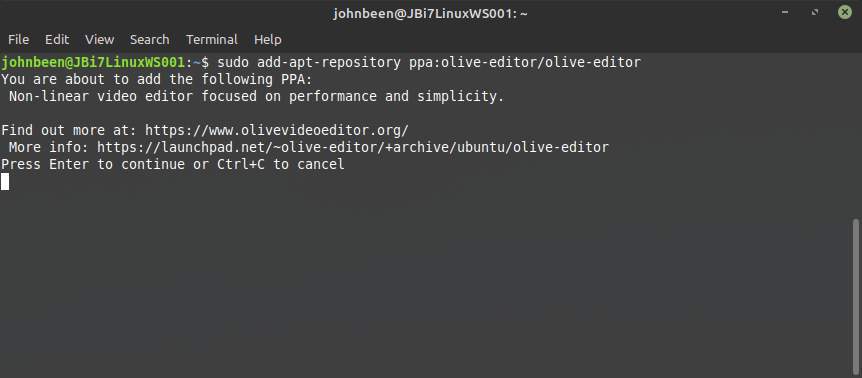
6) Hit Enter to continue.
7) Type the following command to update the package lists for packages that need upgrading, as well as for new packages that recently have been added to the repositories:
sudo apt-get update
8) Type the following command to install the Olive editor:
sudo apt-get install olive-editor
The Olive video editor now has been installed based on a dedicated PPA.
Well, that’s it for now. In future posts I will discuss other Terminal related topics from a beginner’s perspective.
To be continued…