How to mount a hard drive automatically in Linux Mint on start up using the GUI
by John Been August 25, 2018 · How to / Latest blog
Linux Mint is a wonderful Linux distribution and it offers a fantastic user experience for beginners who just switch from other operating systems, as well as advanced users who mainly focus on the tasks and not the underlying technology. Linux Mint is stable, easy to use and offers a tremendous out-of-the-box experience. But as with everything in life, it is not always heaven. Linux Mint has some issues too, like automatically mounting hard drives.
Not all drives automatically mount at start up
The strange thing about Linux Mint is that it is rather illogical in the automatic mounting of all internal hard disks or partitions. I have a system with my internal SSD for the operating system and the applications, three internal hard disks, two external hard disks and a Network Attached storage device. Without the right adjustments, only my external drives and my NAS can always be used immediately after startup. My internal drives, on the other hand, are visible in my file manager but are not accessible. So I have to select them first before they are actually mounting and I can really use them.

That is very annoying in case you have a regular backup process that refers to all these disks. It will not make a backup without actively mounting it. The strange thing is that in distributions such as Ubuntu, Kubuntu, KDE and Budgie, all works immediately without intervention. Why, Linux Mint, why?
Mount a hard drive automatically in Linux Mint on start up
But do not worry, because there is a relatively simple solution available, in which we only have to implement a few settings (not scared, just via the graphical user interface, no command line nonsense). To do this, complete the following steps in Linux Mint:
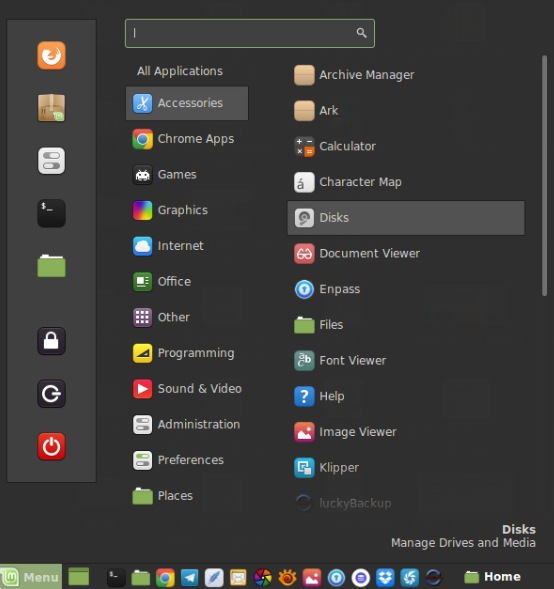
1) Go to Disks via accessories via the Mint menu.
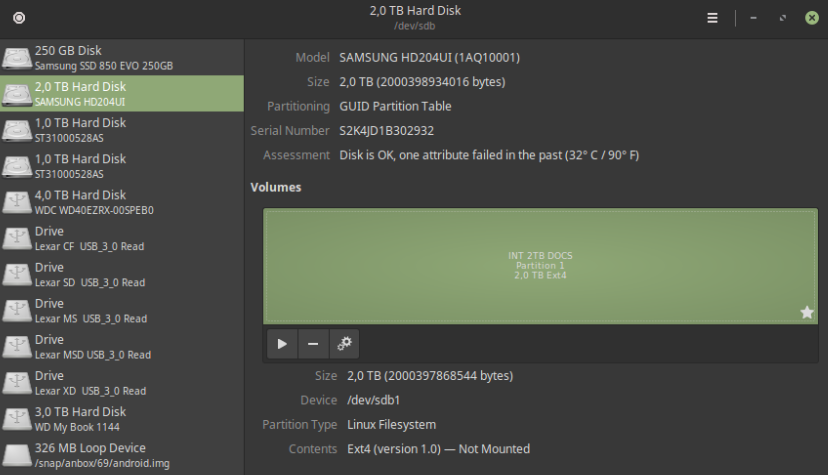
2) In the Disks screen, select the relevant disk on the left that should normally be manually mounted.
3) Select the right partition in the right part and then press the radar icon (additional partition options).
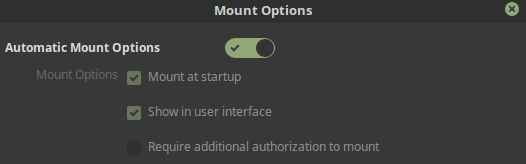
4) Select the option Edit mount options …
The strange thing is that probably the option Mount at startup is already selected, while this really does not work properly.
5) Deselect the Automatic mount options option.
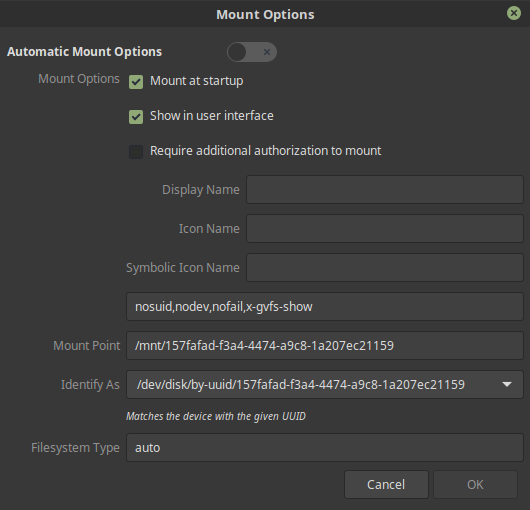
6) If Mount at startup was already selected, then you just leave it like this. If it has not been selected yet, then do so.
7) Select Show in user interface.
8) Choose in Identify as LABEL = [name of your drive]

9) Click OK and then exit the Disks application.
If you have multiple disks or partitions with this problem, repeat the above steps.
10) Now restart your computer.
You will now see that all disks are now automatically mounted.
Good luck!


