
Joplin is an open‑source note‑taking application that has steadily grown into a respected name in the productivity world. While it was once viewed mainly as a free, open‑source alternative to the Evernote app and some other popular note‑taking tools, it has long since proven itself to be a mature and capable solution in its own right. Joplin offers an impressive range of features and plenty of power, but it remains approachable and easy to work with. Even though Joplin provides a solid set of functionalities out of the box, one area where it can feel a little less intuitive, especially when compared to more visually driven note‑taking apps, is table management and editing. Fortunately, one of Joplin’s greatest strengths is its rich ecosystem of plugins, which helps you to adapt the application to match your way of working. One of these plugins is Better Tables, which offers a much smoother, more user‑friendly way to edit tables. In this article, as part of my Joplin Basics tutorial series, I will show you how to get started with the Better Tables plugin and how it can enhance your daily note‑taking experience.
Content of the article
- What is Joplin
- About Better Tables
- How to use Better Tables in Joplin
- How to add Better Tables to Joplin
- Final words
What is Joplin
If the topic is new to you, Joplin is a powerful, open‑source note‑taking and note‑making application that runs on all major operating systems as well as on mobile devices. Joplin is completely free to use, and you can sync your notes through a variety of (some free, some paid) cloud services, including Nextcloud, Dropbox, OneDrive, WebDAV, or even your own local file system. Whatever type of information you want to capture, Joplin offers an impressive range of features to support it. Joplin offers tools like a web clipper for Firefox and Chrome, note history with full revision tracking, support for notes and to‑dos, tags, and notebooks, and the ability to sort your content in several ways, such as by title or last updated time. Joplin also fully embraces Markdown, making it easy to create clean, structured notes. And if you prefer working with multimedia, you can add images, videos, PDFs, and audio files. Collaboration options are available as well, making it a flexible tool for both personal and shared workflows.
One of the things I really appreciate about Joplin is that it is fully open source, and your notes are stored in an open, accessible format. That means your information is always yours. You are never locked into a closed ecosystem or dependent on a single vendor, as is the case with some other popular note‑taking platforms. On top of that, Joplin supports end‑to‑end encryption, which ensures that your notes remain private and readable only by you. Even if you choose to use Joplin Cloud, your data is handled with care. The service is hosted in France, which means it falls under the strict privacy protections of European Union law, and thanks to the aforementioned strong end‑to‑end encryption, not even the Joplin team can access the contents of your notes.
If you’d like to explore everything Joplin has to offer or download it for your system, visit:
For installation instructions, go directly to:
https://joplinapp.org/help/install
If you’re interested in more of my Joplin‑related articles, you might enjoy:
- Joplin Basics – How to use simple Markdown in the Joplin note taking app
- Joplin Basics – How to add Kanban functionality to the Joplin note taking app
- Joplin Basics – How to set up and use Joplin as a Zettelkasten application
- Joplin Basics – How to capture your visual thoughts in Joplin with Freehand Drawing
About Better Tables
Joplin is a wonderful and very capable note‑taking application, but if you regularly work with structured information, you have probably experienced that Joplin’s default way of handling tables can feel a bit limited. Out of the box, Joplin relies on plain Markdown syntax for creating and editing tables. While this approach is clean and lightweight, it can quickly become cumbersome for users who gather, organize, or update larger sets of data, or who are just not used to working with Markdown and are more visually oriented. Manually adjusting pipes and dashes is fine for simple layouts, but it doesn’t take long before you start wishing for something a little more intuitive.
And that is exactly where the Better Tables plugin steps in. This plugin adds a far more user‑friendly and flexible way to build and manage tables, making it much easier to keep your information structured without breaking your workflow. What I appreciate is how naturally it integrates with Joplin’s Markdown‑first philosophy while still giving you the kind of visual clarity and editing comfort that you expect from more polished, GUI‑driven note‑taking tools.
As you edit, the Better Tables plugin automatically formats and tidies up the underlying Markdown, keeping everything readable and consistent. It also supports custom styles and themes, whether defined in code or CSS, so your tables can match the look and feel of your broader Joplin setup. Better Tables also handles multi‑line cells nicely, something that can be cumbersome in standard Markdown. It keeps tables neatly separated from surrounding text by automatically correcting line breaks as you edit. The plugin integrates seamlessly with Joplin’s native undo history and search functions. Even on your mobile device, the plugin offers touch‑friendly controls that make editing tables easy. When you paste a table into a note, it intelligently inserts the necessary spacing to keep everything on its own lines, and it automatically escapes pipe characters inside cells so your layout stays intact.
Let’s have a look at how to use Better Tables in Joplin.
How to use Better Tables in Joplin
Better tables is, in my opinion, an important extension to the already great Joplin application. Let’s have a look together at what this plugin has to offer and what we can do with it in our note-taking workflow.
Auto completion
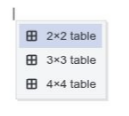
Instead of using markdown commands to create your table from scratch, with better Tables, you can simply type a pipe symbol, “|”, to create a new table. When typing the “|” symbol in the markdown editor mode, an auto-complete menu for creating tables pops up with options 2X2, 3X3, and 4X4:
Navigation
Now that we have created a table, the first thing is to see how you can navigate inside this table. You can move through the cells of your table by using the arrow keys on your keyboard with up, down, left, or right, much like navigating through a spreadsheet. When you want to jump to the next cell in the row, pressing Tab moves you forward, while Shift+Tab takes you back to the previous cell. Pressing Enter moves you directly to the cell below.
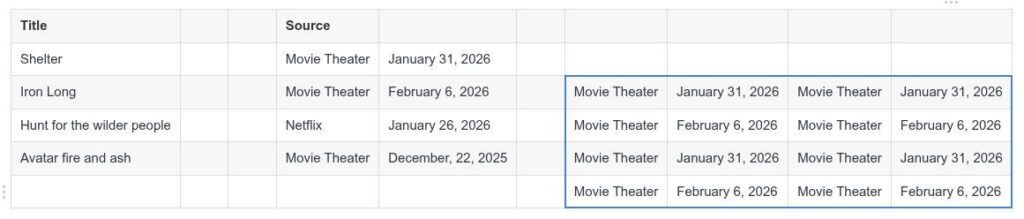
Execute actions on a row and column
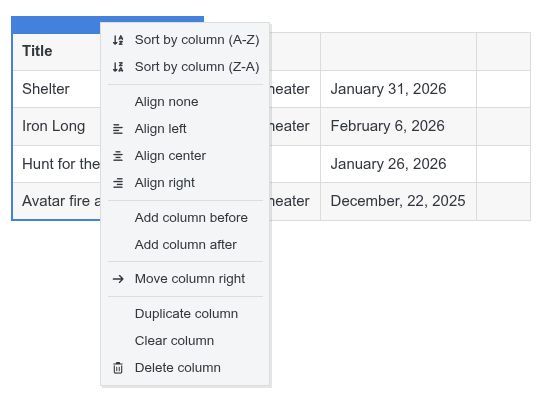
Each row or column has its own menu, which you can open by hovering and clicking with your mouse pointer just above a column or next to a row. From there, you can sort the table by a column, change the alignment of a column’s content, or remove alignment if you prefer a neutral layout. You can also add new rows or columns, move them, duplicate them, clear their contents, or delete them entirely. It is very convenient to be able to do this all from the same menu.
Type multi-line text
If you need multiple lines within the same cell in your table, simply use Shift + Enter to create a new line below the existing text.
Create new rows
Adding new rows while you work happens almost automatically. When you reach the final cell of the table and press Tab, the editor creates a new row beneath the last one so you can continue typing without interruption. The same works in reverse. If you move backward with Shift + Tab from the first cell in your table, a new row appears above the existing first row.
You can also use the previously mentioned pop-up menu. Each row has its own menu, by hovering and clicking with your mouse pointer just left of a row. In the menu, choose “add row above” or “add row below”. You can also use “duplicate row” if you want to add a new row with the same data that you can conveniently change after duplication.
But that is not all. Adding a new row or even many rows at once can be done directly via the border between two rows. Move your mouse pointer on the border between two cells of a column or on the border at the end of a column until you see an arrow symbol. Now left-click to insert a new row, or left-click and drag downward or upward to create multiple new rows.
Clicking a row border inserts a new row, and dragging downward from that border lets you insert several at once. The same applies to columns: click a column border to insert one, or drag to the right to add multiple in one motion.
And finally, you can go to the end of a column with your mouse pointer until you see a horizontally stretched button. Click it to add a new row.
Create new columns
You can also use the previously mentioned pop-up menu to add a column. Each column has its own menu, by hovering and clicking with your mouse pointer just next to a row. In the menu, choose “add column before” or “add column after”. You can also use “duplicate column” if you want to add a new column with the same data that you can conveniently change after duplication.
Further, adding a new column or even many columns at once can be done directly via the border between two columns. Move your mouse pointer on the border between two cells of a row or on the border at the end of a row until you see an arrow symbol. Now left-click to insert a new column, or left-click and drag to the left or to the right to create multiple new columns.
And finally, you can go to the end of a row with your mouse pointer until you see a vertical stretched button. Click it to add a new column.
Append multiple rows and columns at once
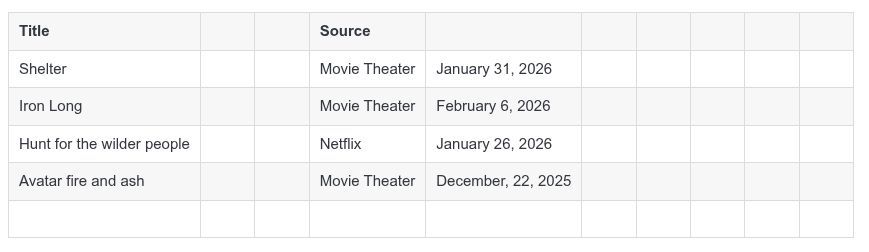
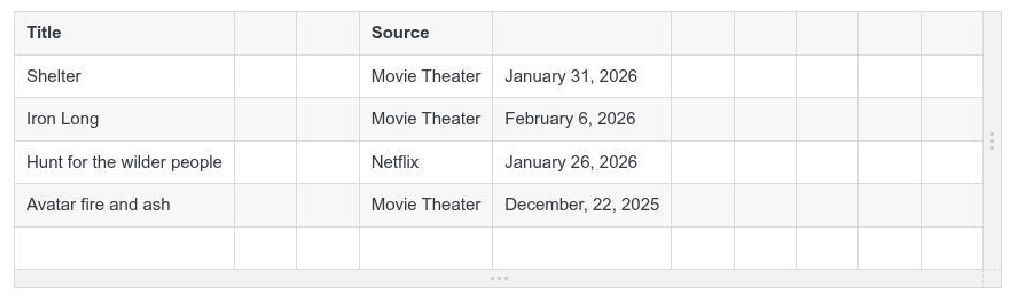
As mentioned before, when you need to extend your table, you can append new rows or columns using the buttons at the bottom and right edges of the table. Clicking the bottom button adds a new row, and dragging downward adds several. The right-side button works the same way for columns. But there is something extra. There’s also a bottom‑right button that lets you append both a row and a column at once, and dragging diagonally from that button adds multiple rows and columns in one smooth gesture.
Select cells
Working with cells begins with selecting the area you want to work on. You can simply click and drag your mouse across the table to highlight a group of cells. When you reach the edge of the editor, keep dragging, and the table will automatically scroll so you can continue your selection beyond what’s currently visible. If you want to adjust the size of your selection afterward, hold Shift while clicking and dragging to expand or shrink the highlighted area. You can also use Shift together with the arrow keys to resize the selection step by step.
Clear cells
Once you’ve selected the cells you want to empty, clearing them is straightforward. Pressing Backspace or Delete removes the contents immediately. If the selected rows or columns are already empty, using the same keys will remove those empty rows or columns entirely.
Copy and paste cells
Copying and pasting works mostly like you would expect, but with a helpful extra. When you copy (Ctrl + C) or cut (Ctrl + X) a selection, it will be automatically converted into a Markdown table. Pasting (Ctrl + V) brings that Markdown table right back into the selected cells. If your selection is larger than the pasted table, the editor will duplicate the pasted content across the extra cells, making it easy to fill larger areas quickly.
Rearrange a row/column
Reorganizing your table layout is simple. Just grab the area just next to the row or above the column you want to move. Click and drag it to its new position. If you drag beyond the visible area, the table scrolls automatically so you can reposition it anywhere you need.
Trim empty rows and columns
To tidy up your table, you can trim away space at the edges. Dragging upward from the bottom button removes empty rows, while dragging left from the right button removes empty columns. Using the bottom‑right button and dragging up‑left trims both rows and columns at the same time.
Delete empty rows and columns
If you want to remove unused space, you can delete empty rows or columns by clicking their borders and dragging upward (for rows) or leftward (for columns). This removes one or more empty lines in a single action.
How to add Better Tables to Joplin
Now that we know more about what Better Tables for Joplin is and how we can use it, of course, the next step is to set it up in Joplin.
1) In Joplin, go to the menu bar and select Tools / Options.
2) In the left panel, select Plugins.
3) In the plugins search area, type “Better Tables”.
4) In the Better Tables plugin tile, click on Install.
5) After a short while, you see a message that you need to restart Joplin for these changes to take effect. So, click on restart in this same message.
Now Better Tables is available to use in your Joplin application.
Final words
In my humble opinion, Joplin is one of the most impressive note‑taking applications available today. It is free, open‑source, highly extensible, and continues to evolve at a steady pace. The fact that Joplin runs on virtually every platform, both desktop and mobile, and that it offers reliable synchronization options, makes this app an incredibly good choice for anyone who wants full control over their notes. And with its growing collection of plugins, Joplin becomes even more powerful, allowing you to tailor the app to your particular way of working. For users who rely heavily on table‑based information, the Better Tables plugin is one of those additions that quickly becomes indispensable. It improves and simplifies editing of tables beyond the basic Markdown experience and turns Joplin into a much more capable tool for organizing structured data. If tables play an important role in your productivity and knowledge management workflow, the Better Tables plugin is a must. It is really great.
Have a look at my latest book on Linux, in Paperback or Kindle format.
For more info on my book click here.
When you want to buy the book click on the image below.
If you appreciate what I do on this website…,