Windows 10 is ending – How to switch from Windows 10 to Zorin OS in 10 easy steps
by John Been January 14, 2026 · Editors Choice / Latest blog
In one of my recent articles, “Windows 10 is ending – Making the move to Linux”, I already gave you, as a current Windows 10 user, information and a lot of reasons to help you consider switching from Windows to one of the available Linux distributions and keep your hardware running for more years to come. This is because Windows 10 is soon coming to an end. In October 2025, Microsoft will stop formal support and technical assistance for the Windows 10 operating system. In another article, I provided a simple, step-by-step walkthrough to help you make the switch from Windows 10 to the popular Linux Mint on your machine. Now, in this new article, I want to do the same, but by focusing on a switch from Windows 10 to the incredible Linux distribution Zorin OS. I believe that Linux can provide a fantastic alternative to the operating system experience. In my opinion, Zorin OS is even friendlier and, in some ways, more powerful to use than Windows itself. I am confident that the walkthrough in this article will help you make the transition from Windows 10 to Zorin OS in a seamless manner.
Note: This article contains affiliate links. At no additional cost to you, I will earn a small commission if you choose to click through and make a purchase via the linked website. For more information, see the Affiliate Disclaimer.
Content
- Introduction
- Zorin OS explained
- 10 easy steps to switch from Windows 10 to Zorin OS
- Final words
Introduction
I already gave you some statistics in one of my previous articles, “Windows 10 is ending – Making the move to Linux“, but I want to briefly mention them again to clarify what will happen in a few months when Microsoft stops supporting existing Windows 10 computers on October 14, 2025. At the time of writing this article, the share of Windows 10 users in the total number of Windows users (Win XP + Win 7 + Win8 + Win 8.1 + Win10 + Win 11 combined) is approximately 54% (source: https://gs.statcounter.com/windows-version-market-share/desktop/worldwide/). Although the newer Windows 11 has been the most up-to-date Microsoft operating system for some time now, 54% of Windows users are still using Windows 10. Even worse, the share of Windows 11 is 42.66%, which means that 57.34% are working with an older version and that more than 3% is still using even older Windows versions, such as Windows XP, 7, 8, or 8.1. It is estimated that there are currently 1.6 billion active Windows devices (https://bytegain.com/how-many-windows-users-are-there-in-the-world/). With a 54% share for Windows 10, this would mean that there are 1,600,000,000 x 0.54 = 864,000,000 devices for which a decision needs to be made in the coming months: throwing away your working hardware and moving to Windows 11, or moving to a Linux variant like Zorin OS.
The relatively younger Windows 10 devices may be able to run Windows 11 because they possibly have the required technology (TPM 2.0, UEFI, and Secure Boot). But all those devices that don’t meet the technical requirements set by Microsoft should simply be replaced with a newer device, on the advice of Microsoft. With this, Microsoft is essentially saying that all these “older legacy” computers, even if they still work fine technically, should go to the electronic waste bin. This is, of course, terrible advice.
In my article “Windows 10 is ending – Making the move to Linux“, my goal was to make as many current Windows 10 users as possible aware of what Linux has to offer and to what extent the purchase of a new computer is not necessary when migrating to Linux. In this follow-up article, my goal is to make as many current Windows 10 users as possible aware of how simple it is to make the switch to Linux, in this case to Zorin OS.
Zorin OS explained
As mentioned, in this article, I want to explain how to switch from Windows to Linux in 10 simple steps. For this purpose, I focus on your transition to the, in my opinion and based on years of using it myself, robust, beautiful, simple, and powerful Zorin OS distribution with a beautiful and flexible desktop environment.
If you are new to the world of Linux, you are probably wondering what a distribution is. Unlike in the world of Microsoft or Apple, there is not just one Linux operating system. There are hundreds of different variants available that the “Linux experts” call distributions.
Linux distinguishes itself through a layered structure. Most distributions consist roughly of the Linux kernel, a desktop environment, and software packages. And with these different building blocks, different variants are being built in the Linux community.
But why are there different Linux distributions? In the first place, many individuals and teams are creating their own distribution because they can. Sometimes things do not exist out of necessity, but because it is a nice challenge to build something yourself from scratch. The question is whether all such initiatives are viable in the longer term and serve any purpose. But there are still quite a few Linux distributions that have existed for a longer time, have a proven track record, are backed by a development team that can actually deliver the promised support, and have an active user community that users can fall back on. And even from that perspective, there are still a lot of Linux distributions that serve a specific goal or need. Think of Linux dedicated distributions for education, science, music creation, photography, design, coding, hacking, and gaming. But there are also some general-purpose Linux distributions out there. One of these Linux distributions is Zorin OS.
Zorin OS is, in my opinion, a fantastic platform that simplifies the transition from Windows 10. And, if you were not aware yet, the Core version is free of charge. Many Linux users, including myself, find Zorin OS one of the most accessible yet high-quality Linux distributions for beginners, but many advanced users also remain stuck because of its ease of use, stability, and reliability.
Zorin OS offers a clean interface, a flawless out-of-the-box user experience, is backed by the enormous software base of the underlying Ubuntu technology, and has a very large and responsive community, as Zorin OS is based on one of the most widely used Ubuntu distributions. Due to the offering of different user-selectable desktop environments, among others, a relatively classic Windows-like user interface, Zorin OS is for many the perfect alternative for former Windows users. And you will be surprised by the performance improvement after switching from Windows 10 to Zorin OS.
Unlike many other distributions, the Zorin OS developers focus on absolute reliability and stability and consciously choose not to be a leader in all bleeding-edge Linux developments. To do that, Zorin OS is always based on what is called an LTS, or Long Term Support, release. More specifically, it is based on an LTS version of the well-known Ubuntu distribution. A new LTS version is issued every two years and receives support and updates for five years. It is the robustness, stability, and long-term support that explains a bit why the Zorin OS Team uses the LTS version of Ubuntu as their base.
But, after Canonical releases a new LTS version of Ubuntu, Zorin OS will not use it immediately as a new foundation. Since the Zorin OS team is relatively small and always needs some extra time after the availability of a new Ubuntu LTS release for their own developments and test work, it will take some time before Zorin OS is based on the latest Ubuntu LTS base. But this isn’t a big deal because Ubuntu gives support for the previous LTS version till April 2027.
And having an older base is not a bad thing, because you have a system in which all teething problems are solved and therefore stand as a house. And Zorin OS itself also comes with interim updates (point releases), in which the latest 17.3 is based on the same kernel as Ubuntu 24.04. And because both Flatpak and Snap support (package formats for Linux applications) are built in, your apps are always up to date with all the latest changes and improvements. And HWE (Hardware Enablement Stack) makes sure the Ubuntu base of Zorin OS is always updated to support the newest hardware.
Different versions for different needs
The Zorin OS team provides different versions for different needs: Core, Professional, and Education. Zorin OS Core is the free version with a great set of usable software pre-installed and 4 desktop layouts included that can be activated and switched between easily. This is the version I use myself on my devices. Next, the Zorin OS Professional version offers the same as the Core version, but includes a more extensive set of apps, 8 desktop layouts instead of 4, and installation support, for the price of 47.99 Euros. When choosing the paid Professional version instead of the free Core version, you also support the continuation of the work of the small team behind Zorin OS. And finally, we have Zorin OS Education, which is designed for schools and students and comes with additional educational apps.
Zorin OS Core
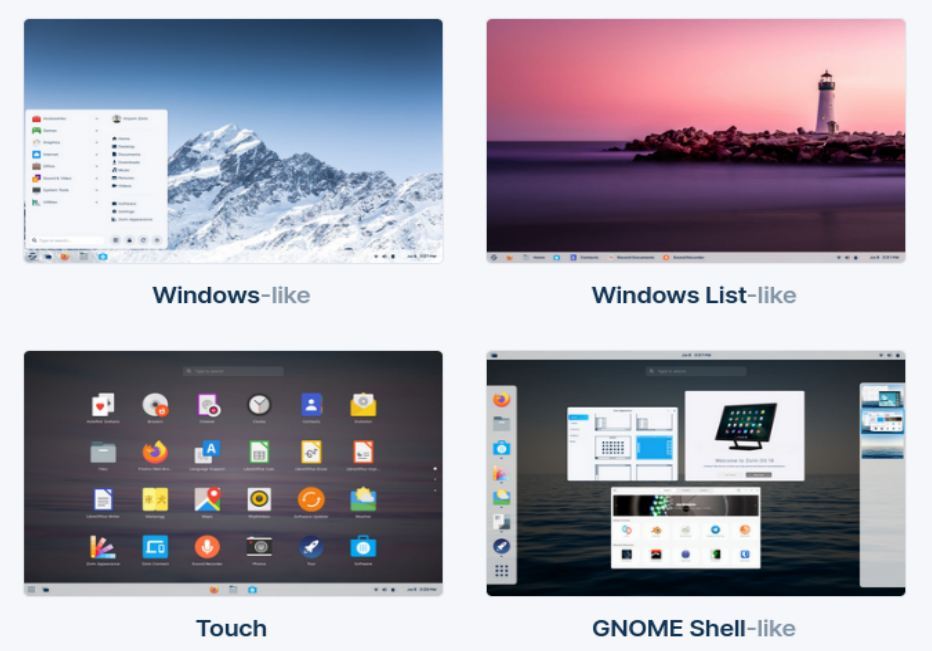
Zorin OS Core is probably the version that most Zorin OS enthusiasts will initially choose. It’s the standard version that is free to download and use, offers everything you need to have a good Linux experience, and even runs well on relatively older hardware. Zorin OS Core offers out-of-the-box four standard desktop experiences, which can be easily changed via Zorin Appearance, namely Windows-like, Windows List-like, Touch, and GNOME Shell-like. These desktop experiences can be further personalized by many underlying settings.
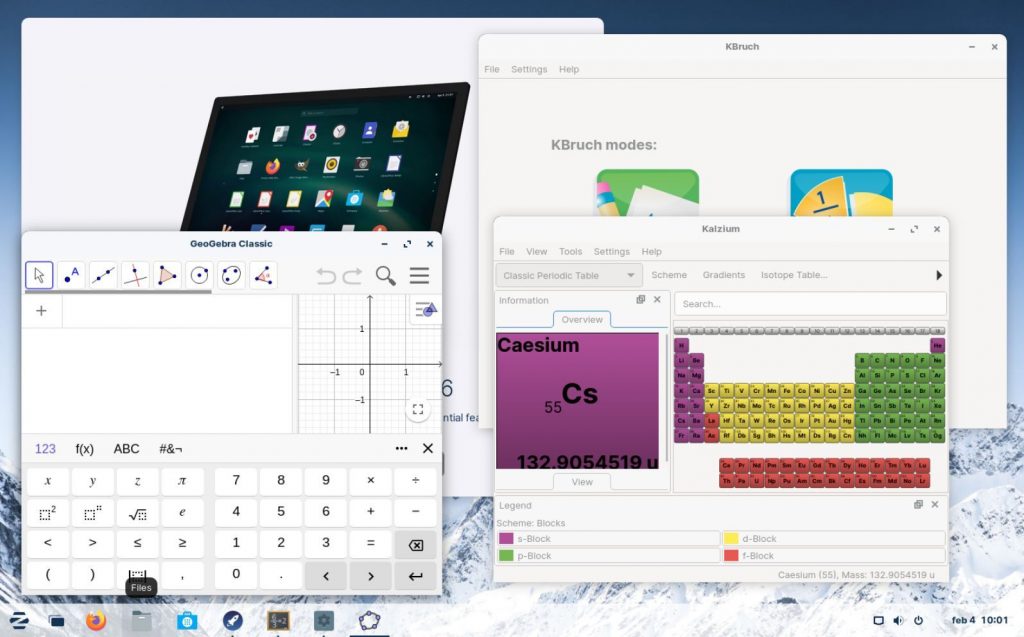
Zorin OS comes out-of-the-box with a set of important, powerful applications for web browsing, email management, word processing, creating spreadsheets and presentations, contacts, calendar, and image manipulation. In addition, it offers fantastic support for the integration of your Android mobile phone via the Zorin Connect app.
Zorin OS Core includes a built-in Software Store with the widest range of applications you’ll find on Linux distributions, because of out-of-the-box support for .deb, Flatpak, and Snap package formats. This gives you a choice within the Store from tens of thousands of applications, many of which will be automatically updated when new versions are released. Furthermore, Zorin OS Core offers very good support for running a lot of Windows applications.
Zorin OS Education
Zorin OS is also offered in an Education variant. The importance of this is that such a Linux distribution is good for people and groups of people who normally do not have access to good educational solutions, such as in underdeveloped countries. But of course, it can be implemented for all other situations and user groups as well. Everyone has the right to and should have access to good education, and Zorin OS Education is a big deal in bringing digital educational solutions closer to everyone and everywhere.
For teachers, it provides tools like the built-in Kolibri, which opens up an enormous library of educational content, and OpenBoard to offer interactive whiteboard functionality. For students, a huge library of educational apps and educational games is available in Zorin OS Education. The offered Interactive applications bring education to students more excitingly and engagingly than non-interactive traditional means.
Zorin OS Professional
Zorin OS Professional is the most comprehensive edition that the Zorin OS team offers, but it is not free. The Professional version can be purchased for 47.99 euros ex VAT, or a comparable price in other currencies. Here, you pay for the convenience and the support you will get from the Zorin team, and the financial support you will give back to the team. The Zorin team is small, so they have to put in a lot of time and effort to bring us this great, stable, and powerful Linux distribution. So if you can, consider buying the Professional version.
Zorin OS Professional offers everything the Core version offers, but adds on top of that a lot more applications and layouts. Keep in mind that during the installation procedure, you can select Minimal Installation, so you get only the minimum set of applications, but keep the extended set of layouts.
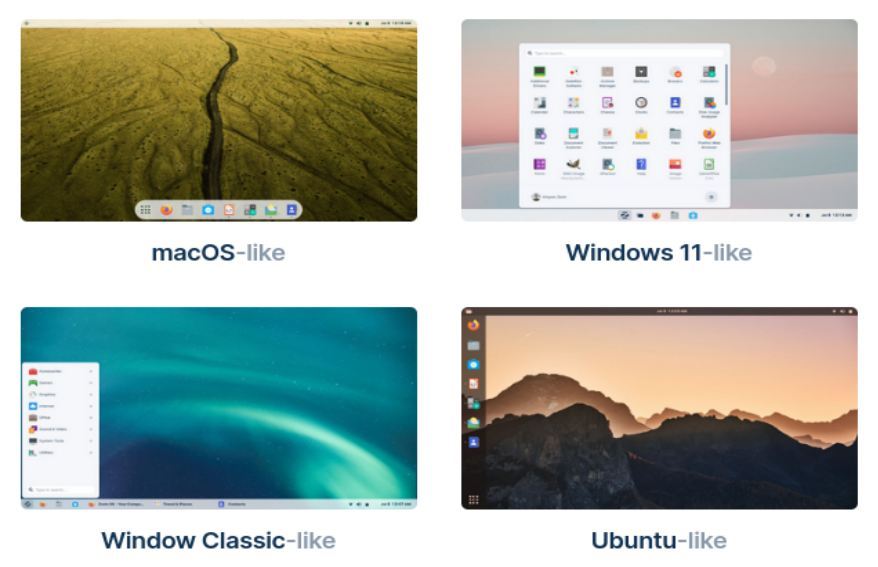
Zorin OS Professional offers eight desktop experiences out of the box. In addition to the layouts already mentioned with Zorin OS Core, the extra layouts, macOS-like, Windows 11-like, Windows Classic-like, and Ubuntu-like, are also offered here.
10 easy steps to switch from Windows 10 to Zorin OS
I completely switched to Linux years ago, and this has been to my complete satisfaction. I have also successfully guided others to make this switch from Windows to Linux, both with people in my direct environment, but also worldwide via my website, and book. Below, I have compressed all that information into 10 simple migration steps to help you get started quickly.
- Step 1 – Download Zorin OS
- Step 2 – Create a Zorin OS bootable Live USB Drive
- Step 3 – Try and test Zorin OS within the Live Environment
- Step 4 – Prepare for the installation of Zorin OS
- Step 5 – Install Zorin OS
- Step 6 – Familiarize Yourself with Zorin OS
- Step 7 – Set up the essentials in Zorin OS
- Step 8 – Select and install essential applications
- Step 9 – Stay informed about new features and backgrounds via Linux resources
- Step 10 – Start using your new operating system
Step 1 – Download Zorin OS
Downloading Zorin OS is incredibly easy. You can download Zorin OS 17.3 from the Zorin OS website. There you can find all available editions, like Core, Pro, and Education.
Zorin OS 17.3 Pro
If you are interested in buying the Zorin OS Pro edition, please consider using the affiliate button below. At no additional cost to you, this website will earn a small commission if you choose to click through and make a purchase via the linked website. For more information, see the Affiliate Disclaimer.
Go to the Zorin OS 17.3 Pro information and download page
(Affiliate link)
Zorin OS 17.3 Core and Education
If you are interested in downloading the free Zorin OS Core or Education editions, you can use the link below:
Go to the Zorin OS information and Download page
Step 2 – Create a Zorin OS bootable Live USB Drive
One of the many powerful features of Linux is the ability to start a distribution directly from a USB stick, without affecting your hard drive and the operating system on it. It is therefore not necessary to perform a complete installation to be able to use or try out Linux. But even if you have made the decision to install Linux individually, or next to your current Windows or OSX installation, a bootable Linux USB stick is the most practical and quick solution.
What do we need
What do we need to create a Zorin OS bootable USB storage device in Windows?
1) USB stick: FAT32 formatted, at least 4GB for Core and Education, and at least 8GB for Professional.
2) Etcher: To write the downloaded Zorin OS ISO file to the USB stick, we use a free and open-source application called balena Etcher.
3) Zorin OS iso file: Besides Etcher, we also need the Zorin OS ISO file to put on the USB stick. We already got this file in the previous step.
Steps to create a Zorin OS bootable USB in Windows
When you have finished the previous step, you have the Zorin OS ISO file in your Downloads folder. Now it is time for the next steps.
Download balena Etcher
1) Go to https://www.balena.io/etcher/
2) Choose Etcher for Windows. The balenaEtcher-x.x.xx.exe file can then be found in your Downloads folder after the download is finished.
Prepare Zorin OS USB stick for generic PC’s from Windows
1) Open your Windows File Manager, for example via keyboard combination Windows button + E.
2) Look up your USB drive and right-click it.
3) Select option Format…
4) Choose the options File system = Fat32, Volume label = ZorinOS and Format options = Quick Format.
5) Click on Start and OK.
Windows will perform the formatting of your USB drive.
Install Etcher in Windows
After you have downloaded Etcher, go to your Downloads folder and double-click the .exe file to install the application in Windows.
Create your Zorin OS USB drive with Etcher
Etcher configures and writes to your USB stick in three steps, each of which must be selected sequentially.
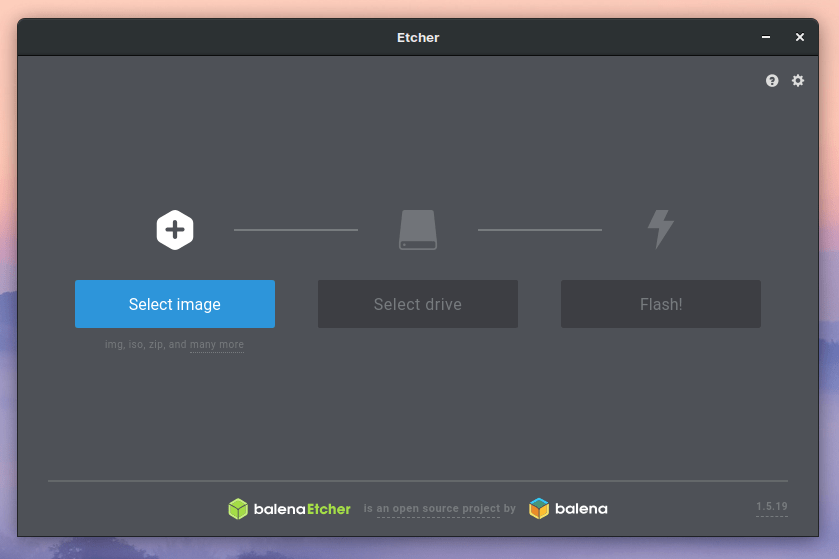
1) Select Image >> Search the previously retrieved Zorin OS iso file in your Downloads folder.
2) Select Drive >> Select the name of the USB stick here.
3) Flash! >> Activated when both the image and the drive are selected.
Etcher needs low-level access and will request your password after selection. The Zorin OS USB Live stick will now be created.
Step 3 – Try and test Zorin OS within the Live Environment
As already explained, one of the many incredible features of most Linux distributions is the ability to boot and use a distribution directly from the USB stick you created, without the need to install Linux and affect your hard drive and the current operating system on it. It is not necessary to perform a complete installation to first use and try out Linux to see if it is something for you.
1) If you have not already done so, first shut down your computer.
2) Then put the Zorin OS USB stick into a free USB slot.
3) Start your computer.
If all goes well, in the first couple of seconds, right after seeing the logo of your motherboard supplier, you will see an option to go to Setup or to go to the Boot menu.
Note: How to start up your boot menu depends on things like the brand, type, and age of your computer. But for example, if you have an ASUS computer, it can be Esc or F8; if you have a Dell computer, it probably is F12; for most HP computers, it is Esc, and for a Lenovo computer, it is probably F8 or F12. You can find more information on hotkeys for the boot menu and BIOS settings at the following resource:
www.wikigain.com/boot-menu-option-keys-for-all-laptops-desktops/
4) So hit the correct option on your keyboard (sometimes it is required to hit this option repeatedly each second till the boot selection screen appears) to go to your boot menu.
If everything went well, you see a screen now with the option to boot from your hard drive or USB.
5) Choose the generic USB option, or if applicable, choose the correct USB drive.
6) After a little while, a menu will be presented. Choose the option “Try or install Zorin OS”.
7) After a while, you will get a glimpse of the Zorin OS desktop environment. Here, a window will be presented that shows a selection screen that looks something like the screenshot below.
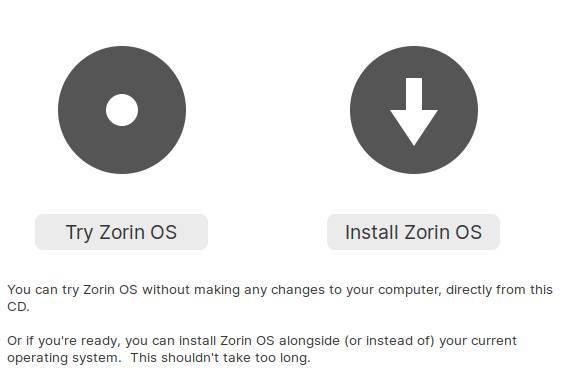
8) Select Try Zorin OS to start up and use the live environment.
Now that Zorin OS has been booted into a live session, the real fun can begin. In this environment, you can use most of the options Zorin OS has to offer to see if you like it and to check if all your hardware components work properly.
Step 4 – Prepare for the installation of Zorin OS
Now that you’ve had the time to try out and test Zorin OS in a Live environment, you’ve probably decided to use Linux for the long term and want to install it on your hardware. I’m assuming you want to remove Windows 10 from your system, since it’s going to be end of life soon anyway. But be warned. Many people have their personal data on the same drive as the Windows operating system. Since we’re going to completely erase the internal drive during the installation of Linux, you should first secure your personal files, such as your documents, video files, and music files, by making one or more backups of them on a separate backup device, such as an external hard drive, usb memory stick, or an external SSD. You can use special copy or cloning software for Windows to do this, but you can of course also easily make a copy of your files to the external device manually via your Windows file manager.
Step 5 – Install Zorin OS
It is, of course, possible to install Zorin OS on an empty hard disk, but it is also possible to install Zorin OS next to an existing operating system that is already available on your internal drive, such as Windows or even another Linux distribution. In this step, I assume that we will perform an installation on an empty hard disk or, if there is already an operating system on the hard disk, we will perform an installation where we will overwrite all existing data. So, I will not explain here how to install Zorin OS next to your existing operating system. As mentioned in step 4, keep in mind that we are going to completely empty your hard drive or SSD. When there is still user data, such as documents, music files, photos, and presentations, on your hard disk, make sure that all your data is first saved on a separate disk, USB stick, or in the cloud, before proceeding with the following process.
Based on the previous steps, you should now know how to create a bootable USB drive with Zorin OS and how to start and use the Zorin OS Live environment. With that knowledge, it should be relatively easy to start the actual installation process and successfully install Zorin OS on your computer.
1) I assume you are not in the Linux Live environment anymore, because you were busy making a copy of your personal files in step 4 in Windows. So, first boot again in the Zorin OS Live Environment, as explained in step 3, but now select the option Install Zorin OS.
Let’s go through the installation and setup steps.
Welcome
The “Welcome” screen will be presented to you.
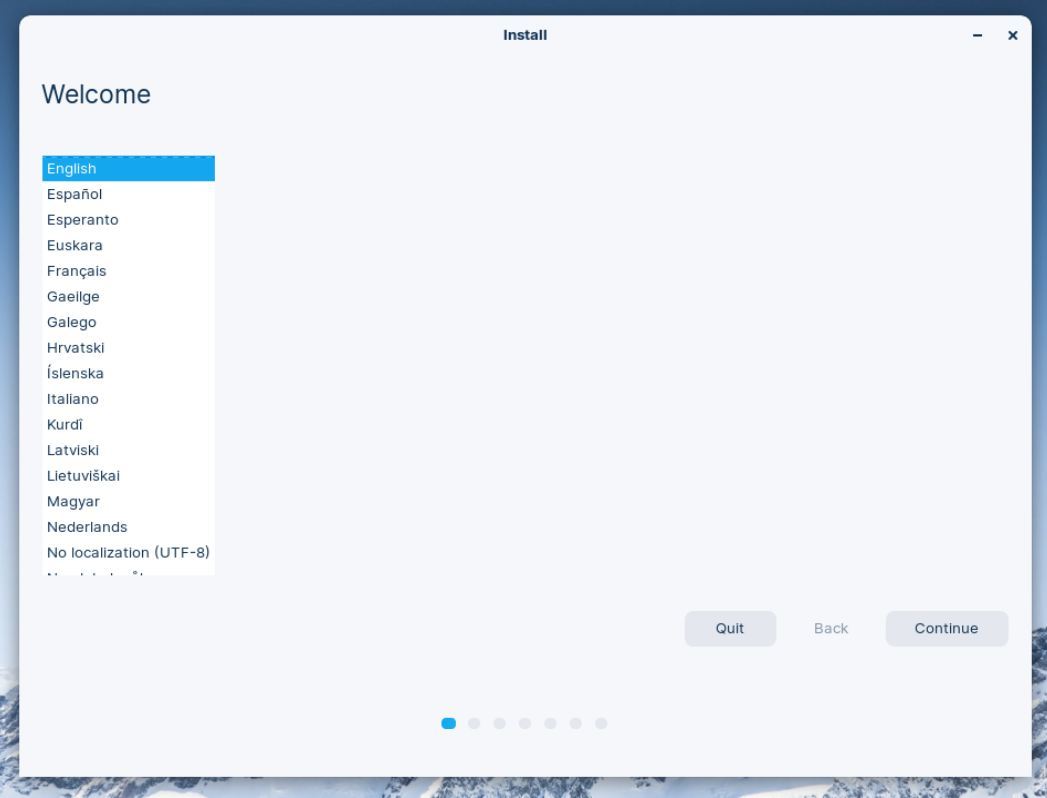
2) Select your preferred language and click Continue.
Keyboard layout selection
The “Keyboard layout” screen will be presented to you.
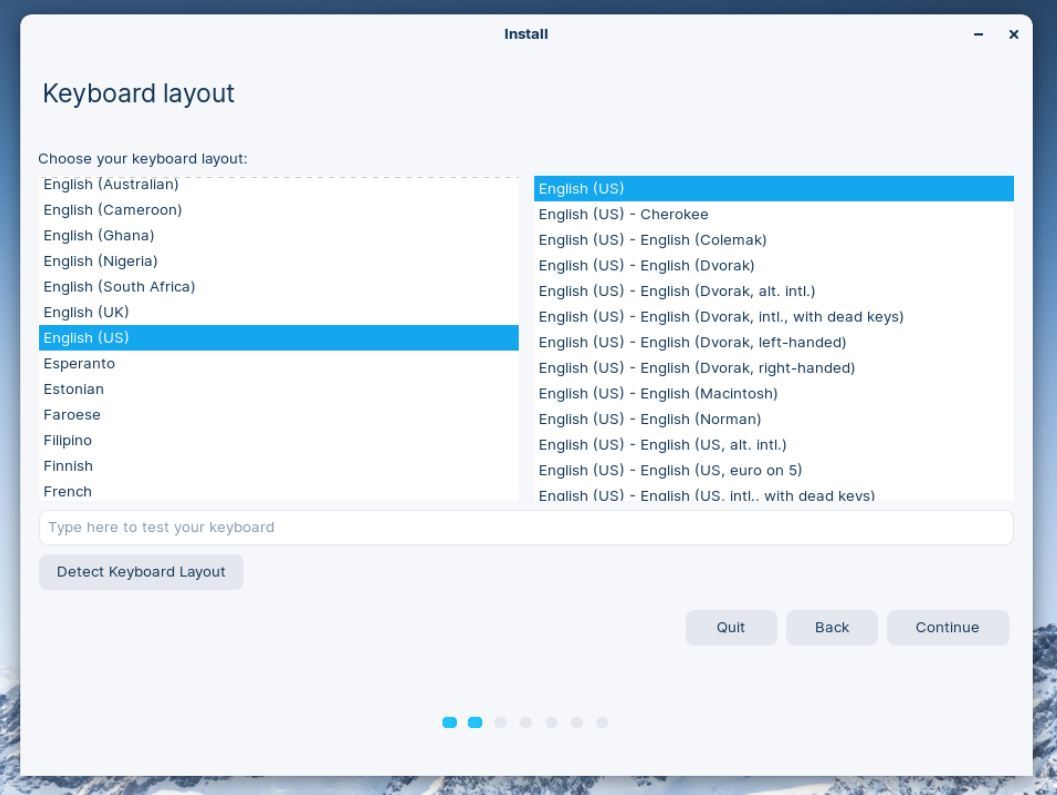
3) Select your keyboard layout. Most of the time, the installer already recognizes the correct keyboard and layout. Click on Continue.
Updates and other software
The “Updates and other software” screen will appear.

On this screen, you can select if you want to download updates while you are installing Zorin OS. I normally choose to do that. Next, you can choose if you want to install third-party software for graphics, Wi-Fi hardware, and additional media formats like MP3 support, which isn’t installed out of the box. The third option is to participate, or not, in the census. Here you decide if you want the Zorin team to help count the number of users of their distribution. This is based on depersonalized counts.
4) Make your preferred selections and click on Continue.
Installation type
The “Installation type” screen will be presented to you.
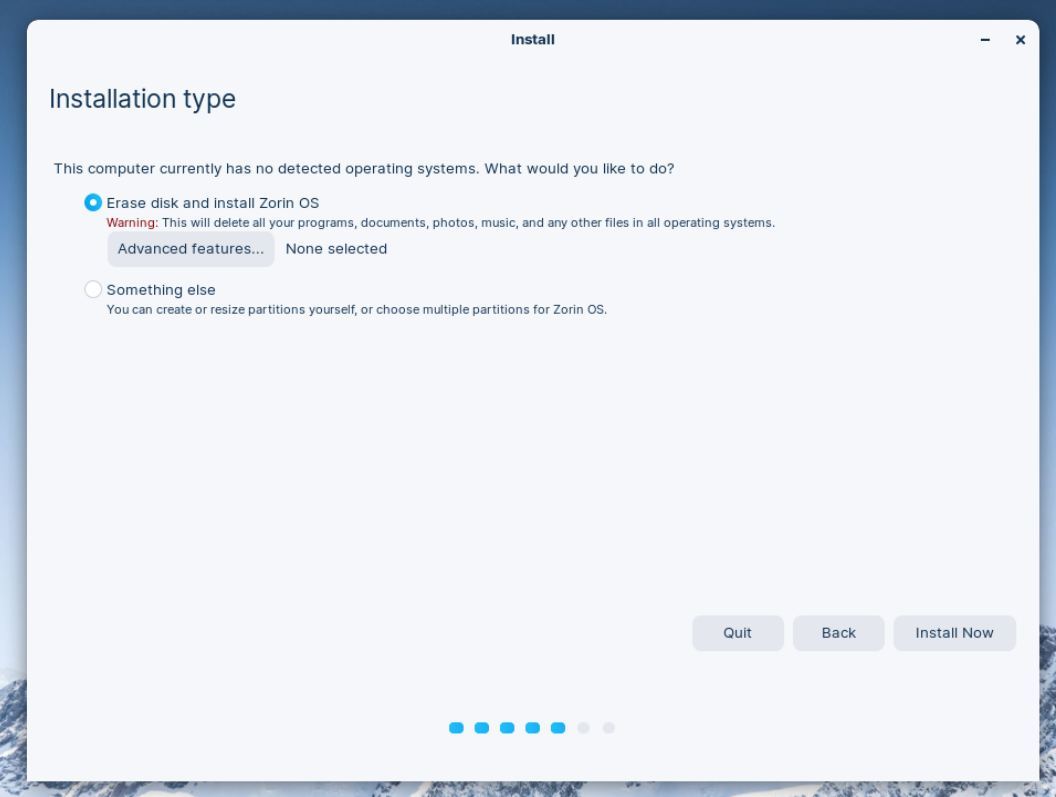
In this example, the internal drive we install Zorin OS on is empty and has no other operating system. Here you have the option to erase the disk and install Zorin OS like you see in the above screenshot. In case there is another operating system, like I expect in your situation, the installer will give you the option to install Zorin OS next to the existing operating system so you can dual-boot.
Here you also have the option to choose “Something else”, which gives you the option to create or resize partitions yourself, or choose multiple partitions. In this example, we will keep things simple, so do the following:
5) Select “Erase disk and install Zorin OS” (again…please make sure that you have nothing personal on this drive that is not backed up yet) and click on Install Now.
Now you will see the following pop-up:
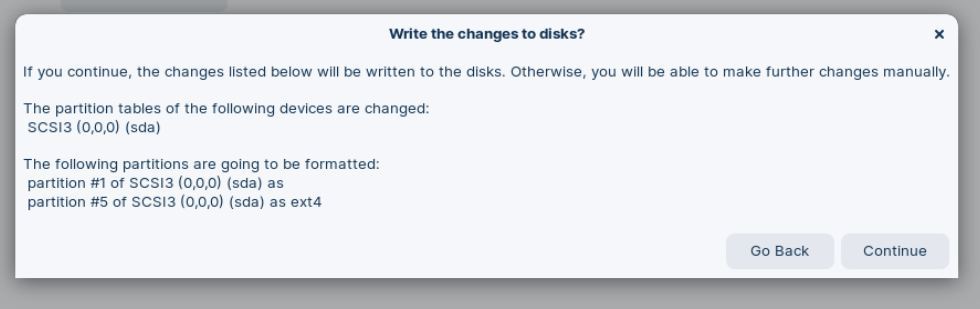
This confirmation screen explains what is technically going to happen with your disk.
6) Click on Continue.
Where are you?
A screen with a map of the world will be presented to you.

7) Select your region or hometown by typing the name or clicking on the map. In my case, it found the nearest capital city. Click on Continue.
Who are you?
The next screen will ask you for some personal details and credentials.
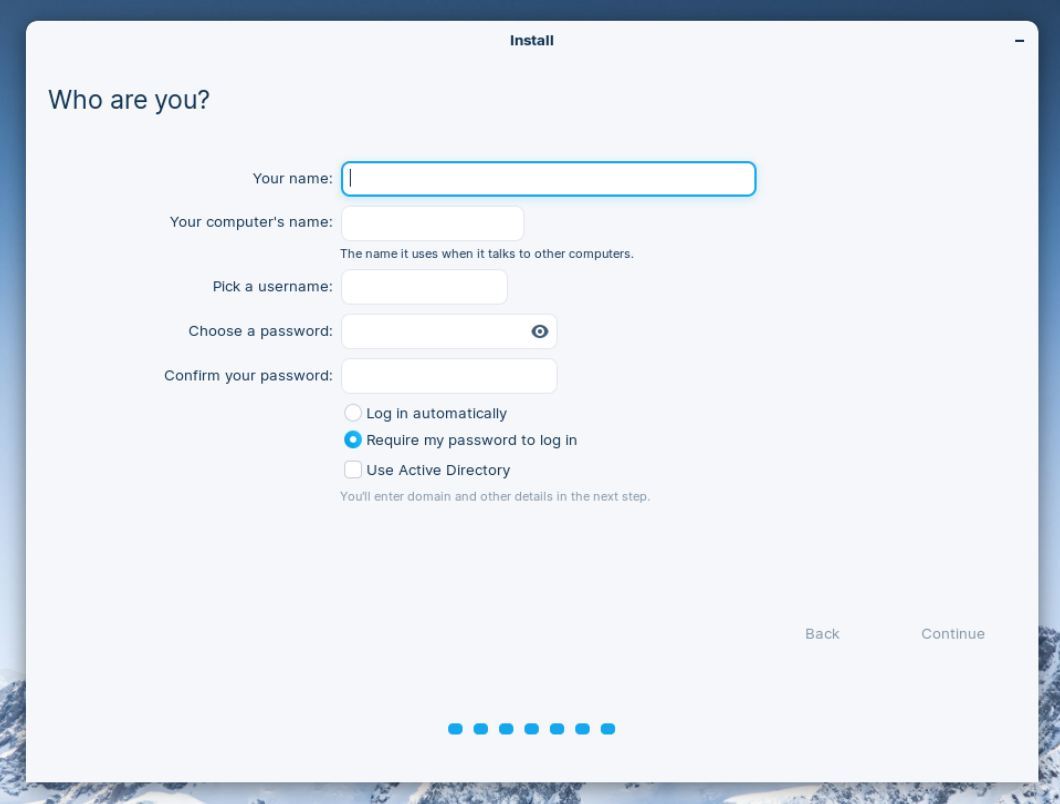
8) Type your name
9) If you wish, change the proposed computer name
10) Type the username that you want to use.
11) Type and confirm your password.
You have the option to log in automatically. I am all for security, so I want to advise you to opt for a password-based login instead of the automatic login.
12) Select Require my password to log in.
13) For this tutorial, we don’t select to use Active Directory.
14) Click on Continue.
The installation
Now the actual installation will start.

This part of the installation process can take somewhere between 5 and 30 minutes, but even on my old Core 2 Duo 2008 machine, it only takes 10 minutes to finish the installation.
Installation complete
After a while, the Installation Complete indication will pop up.
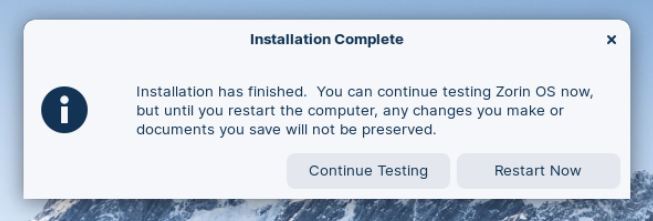
Now you can continue trying out Zorin OS in the live environment, but of course, you want to use the real thing.
15) Click on Restart Now.
Now, a message will be shown to inform you that you need to remove the USB installation medium.
16) Remove the Zorin OS USB drive and press Enter.
The computer will reboot, and if everything went well and the installation was done correctly, you will be presented with some logo animations and a nice login screen.
17) Now, click on the user name.

18) Fill in the password that you provided during the installation process and hit Enter.
Now the Zorin OS desktop will be visible, and the first time, a Welcome to Zorin OS Tour screen will be presented to you. Your Zorin OS installation is ready to be used.
Step 6 – Familiarize Yourself with Zorin OS
Before we dive into setting up Zorin OS, it’s a good idea to familiarize yourself with the operating system and the desktop environment. You’ll want to know how the desktop environment works, what the different components can do for you, where to find your applications, where to find and adjust your settings, etc. Give yourself some time to click around and see what is there.

Step 7 – Set up the essentials in Zorin OS
The first time I started Zorin OS myself, it really blew me away, from a positive point of view. And even now, after using it as one of my daily drivers for years, I am still impressed with the looks, configurability, speed, stability, integration, and all the nice things that a lot of other Linux distributions don’t offer all in the same package. Zorin OS offers a complete package of usability and reliability and is a great option for both beginners and experienced users. But although Zorin OS is from my set of requirements close to perfect, there are always things that need to be done or can be done to optimize your system and improve your user experience and pleasure even more. So let’s dive into some of these essentials:
- Change to the nearby update servers
- Update your operating system
- Check and install drivers
- Set up Timeshift for backup and recovery of your system files
- Set up a backup strategy for your personal files
- Improve battery life
- Install Stacer for system optimization and monitoring
- Set up Zorin Connect
- Set up AppImageLauncher
- Set up Night Light
- Install basic software
Change to the nearby update servers
In the standard installation of Zorin OS, the Main and Base mirrors, which are the starting point for retrieving your software updates, are probably not the closest to your location and not the fastest option for your specific situation. To change to a more nearby update server to improve the update performance, you can do the following:
1) Click on the Zorin icon on the left of your panel in the lower part of your desktop to open the applications menu or applications grid (depending on your theming).

2) Search for “Updates” and click on the icon with the name “Software & Updates”.
3) Select the tab “Zorin Software”.
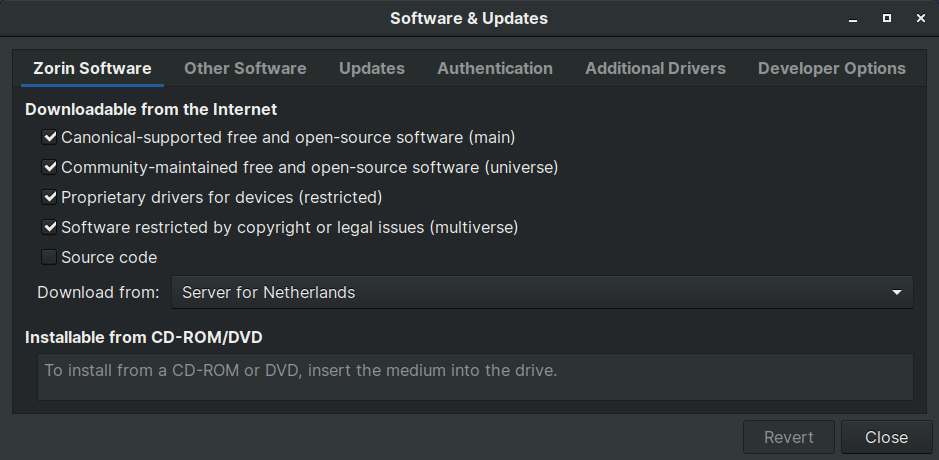
4) Click on the drop-down next to “Download from”.
5) Select the option “Other…”.
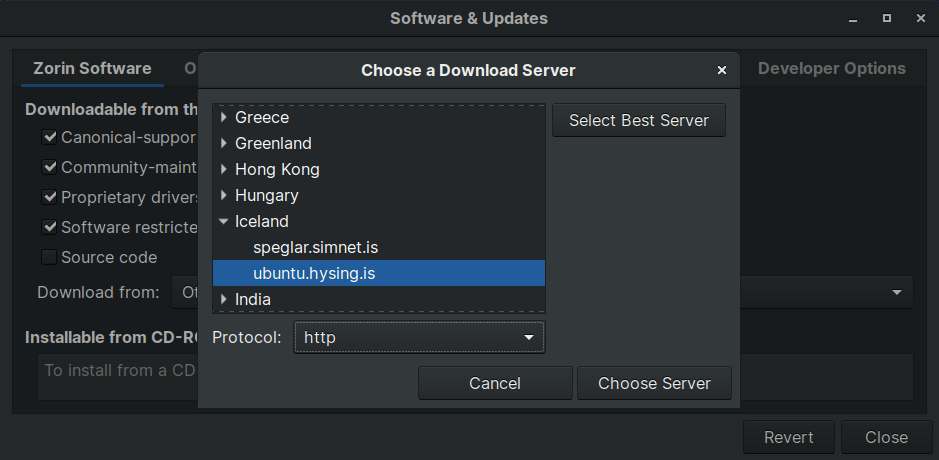
6) In the “Choose a Download Server” screen, first choose your (nearest) country, and within that option, choose a server.
7) Now, click on “Choose Server” and enter your password when asked for.
8) You can now close the “Software & Updates” screen.
The following message will be presented to you.
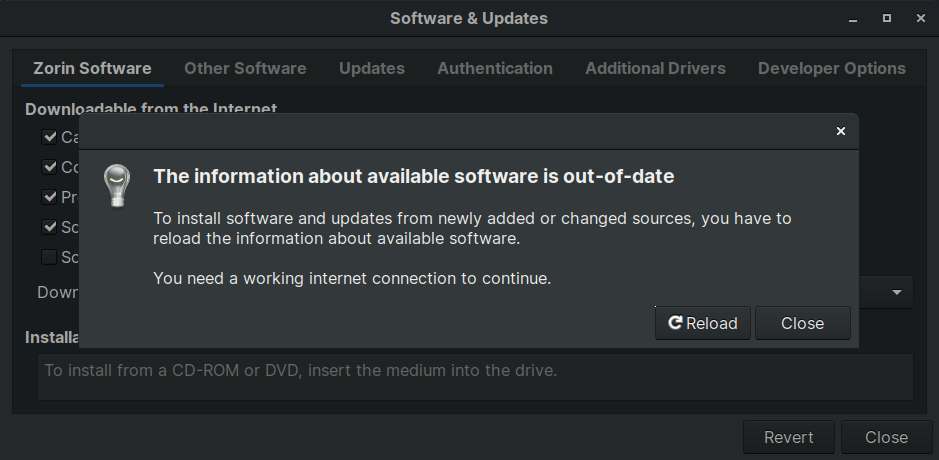
As you change to another server, you have to reload the information about available software.
9) Click on “Reload”.
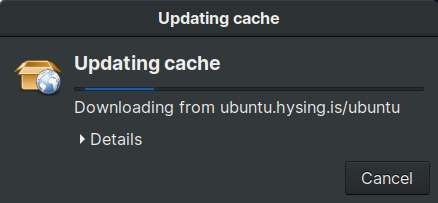
The cache will be updated. After the update process, this screen will close automatically. Based on your changes, you will probably notice an improvement in the update performance of your system, as you get your data from a source closer to your location.
Update your operating system
After we change to a nearby server, which optimizes your download speed, the next step is to update the package index files and upgrade to install the newest versions of all packages so that we start with the most up-to-date foundation, and we are sure we will install the most recent software. Remember, an update should always be performed before an upgrade.
1) Open a terminal session with keyboard combination Ctrl + Alt + T.
2) Type the following command and hit Enter:
sudo apt-get updateAn Update is now required to resynchronize the package index files.
3) Type the following command and give Enter:
sudo apt-get upgradeAn upgrade is required to install the latest versions of all packages currently installed on the system.
You will get the message “Do you want to continue? [Y/n]”.
4) Type “Y” and give enter (or just hit enter directly, because the capital Y means that this value is already preselected).
Your system is now updated and upgraded.
Check and install drivers
Modern Linux distributions have out-of-the-box terrific support for most of the available hardware components, like graphics cards, printers, and WiFi adapters. But it is always possible that the setup procedure doesn’t come up directly with the correct or most optimized drivers. So it is advisable that you check and adapt your drivers for devices and hardware components, like your Wifi adapter, graphics card, and Printer.
1) Click on the Zorin menu icon to open the applications menu or applications grid.
2) Search for “Updates” and click on the icon with the name “Software & Updates”.
3) Select the tab “Additional Drivers”.

After it searches for available drivers, in my case, it finds drivers for my old NVIDIA GTX 750 Ti. In your case, probably something else will show up.
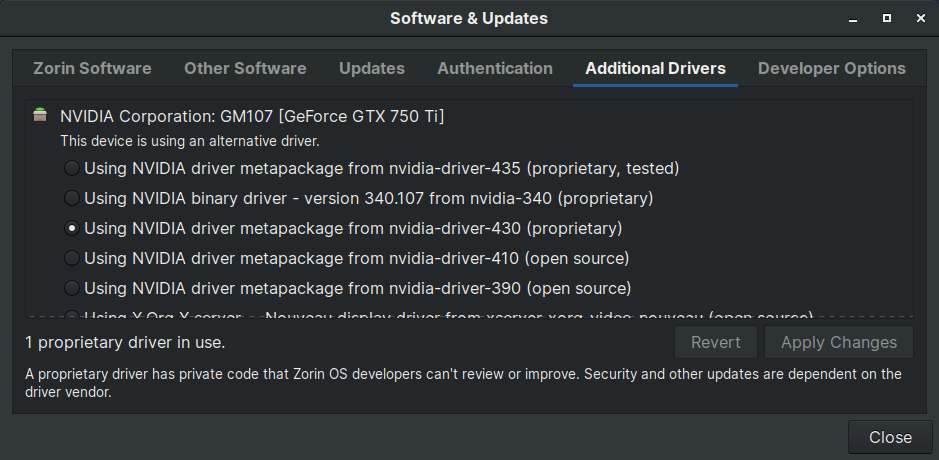
Here, another / newer driver can be selected.
4) Select the desired driver and click on “Apply Changes”.
Set up Timeshift for backup and recovery of your system files
Setting up a backup solution is essential. Although Zorin OS includes its own backup utility, in my opinion, the separate application Timeshift is much better for the backup and restore of your system files. Timeshift is not meant for every backup situation. To secure and restore your individual personal files, such as text documents, spreadsheets, photos, and films, which are maybe even stored on separate drives, it is advisable to use another backup application, such as Vorta, LuckyBackup, or Cronopete. But for securing your system implementation, including the option to go back to a specific moment in time, Timeshift is a perfect solution, as it enables you to recover your whole system when something really goes wrong.

Timeshift works on the basis of incremental backups. The first time, when there is nothing backed up yet, Timeshift will have to make a full initial backup, but from then on, Timeshift only looks at the modified files and then only makes a backup of those changes. The advantage is that these backups are much faster since the number of files that are in scope is much smaller. But also, the amount of storage needed is much smaller.
I have explained the procedure to install and set up Timeshift in my article “How to use Timeshift to backup and restore Linux Mint“. Although written for linux Mint, the procedure is the same for Zorin OS.
Set up a backup strategy for your personal files
In the previous item, I already focused on backup and recovery of your system files, but your personal files are probably far more important to you, so a good backup strategy here is very important as well.
For my backup needs for backing up personal files, I use Vorta. Vorta is based on a powerful and reliable foundation, called BorgBackup. BorgBackup, or in short Borg, offers what they often call deduplicating technology. This means that this technique can analyze your files and only store changes to these files, which makes it very suitable for high-frequency (hourly, daily, etc.) backups. So it doesn’t create full backups each time, which makes this technology faster and uses less storage space on your backup device. Unlike other backup solutions. Vorta has quite a few settings and is able to write to different sources to different targets.
If you are interested in a simpler backup solution, but based on the same powerful and reliable BorgBackup foundation, have a look at Pika Backup. Pika Backup has relatively few settings, but enough to reliably back up your personal files and restore them in case of an emergency. You can read more on Pika Backup in my article “How to easily create backups in Linux with Pika Backup“.
Improve battery life
A Linux operating system like Zorin OS is really great since it is stable, robust, modern, and user-friendly, and therefore it can easily compete with the established operating systems and even surpass them in some points. But Linux is not equally strong at all points. One of the areas that deserves more attention is battery life when running on a laptop. Most Linux distributions are out-of-the-box, not really optimized to get the most out of your laptop battery. On a desktop machine, you don’t need to improve battery life, of course, but on your laptop, you should give some attention to optimizing your power consumption, so you can use your machine as long as possible during the day. Up till this very moment, it has never been possible to squeeze as many hours out of a Linux-based laptop as compared to macOS and Windows-based machines. But things can be improved with an application like TLP. So let’s see how to improve battery life on your Zorin OS based laptop with TLP. It is command-line based, but it is really not scary.
1) Start a terminal session via the keyboard combination Ctrl + Alt + T.
2) Add the TLP Package Repository to your package sources with the following commands:
sudo add-apt-repository ppa:linrunner/tlpsudo apt-get update3) Install the packages tlp, tlp-rdw, tp-smapi-dkms, and acpi-call-dkms via the following command:
sudo apt-get install tlp tlp-rdw4) Open the Zorin OS Software Center and search for “tlpui”.
5) Click on the found result and click on Install in the next screen.

6) Now you can launch TLPUI.
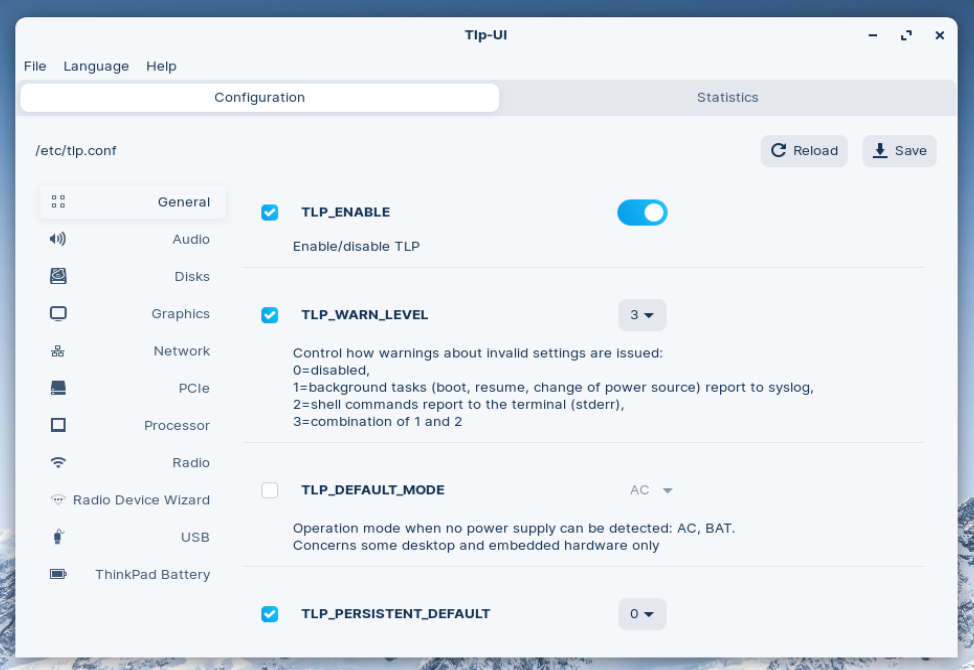
TLP gives you a generic out-of-the-box optimized configuration that should work great with your laptop. After installing TLP on my Dell Latitude 5520, I get on average 1.5 hours longer battery life than before the installation of TLP, which is, in my opinion, really good. But you can change the settings even further for a lot of components to adapt them to your personal situation and preferences.
Install Stacer for system optimization and monitoring
Making clutter is easier than cleaning up clutter. Making a mess happens naturally to many people, but cleaning up the mess requires a bit of discipline. This works better for one person than for another, so if there is some help out there that makes the job easier, that would be a great gift for a lot of us. One of the applications for Linux that people like you and me can support in this process is Stacer. In my opinion, Stacer is the best and most user-friendly free system optimization and monitoring tool for Linux.

Stacer is an application heavily based on a graphical user interface and offers an extensive set of both cleaning and system monitoring functionalities for the Linux user. By using an accessible and beautiful user interface, Stacer wants to make the process of cleaning and monitoring easier for the average Linux user. But also, the experienced user can easily make this tool part of his or her Linux-based workflow.
Read more about Stacer in my article “Stacer is the best system optimizing and monitoring tool for Linux“.
Set up Zorin Connect
Zorin OS is a beautiful, very accessible, and friendly operating system that offers a lot of functionality directly out of the box, which in other distributions often has to be installed or adjusted afterward. One of these built-in functionalities is the connection between your Zorin OS computer and your Android phone, which is supported in an impressive way through the Zorin Connect applications in Zorin OS and is available for your Android device.
Zorin Connect is a software solution that provides convenient and intelligent functionality to integrate your Android mobile phone and your Linux Zorin OS based pc or laptop. Zorin Connect is designed and created and in active development by the team behind the Zorin OS Linux distribution. Zorin Connect is a software solution that makes communication possible between your Zorin OS device and your Android mobile phone, as long as your computer is connected to your network and your Android phone is connected to the same network via WiFi. If this setup has been arranged and the software has been installed and configured on all devices involved, you will have a great integrated experience.
With Zorin Connect, it is possible to receive the notifications that normally appear on your phone and on your desktop as well. So when there are WhatsApp or Telegram messages coming in, a pop-up will also be visible on your desktop, so you can even react to or remove them without touching your phone. But you can also browse the photos on your phone, share both files and links between your devices, and get notifications for incoming phone calls and SMS messages on your computer. And you can even use your Android phone as a remote control to control some software on your computer. And that’s not all. You can see the battery status of your phone on your desktop, you can browse the file system remotely, launch the camera app to take and transfer images, find your Android Phone via your computer, send SMS messages from your desktop, use your Android device for changing slides in a presentation or the pages in your LibreOffice document, it provides a remote control function for your media player and you can use your phone as a touchpad or keyboard. That’s all pretty great.
Zorin Connect needs to be installed and configured on all devices involved. On your Android phone, go to Google Play, search for Zorin Connect, and install Zorin Connect on your phone. For your Zorin OS computer, you don’t have to download and install, because Zorin Connect has already been integrated into the Zorin OS operating system.
Set up Night Light to prevent negative effects of blue light emission
Lately, we have read and heard more and more about the dangers of looking too long at displays. Displays of computers and mobile devices emit significant amounts of blue light. Under certain circumstances and with long-term exposure, there are some concerns about possible long-term effects on the health of your eyes. Zorin OS uses a simple but effective application called Night Light to prevent such effects, as it reduces the emission of blue light and also schedules the most important moments of the day.
1) Click on the Zorin menu icon on the left of your panel to open the applications menu or applications grid.
2) Search for “Settings” and click on the Settings icon.
3) On the left of the settings screen, click on Displays.
4) On the right part of the Display’s screen, click on Night Light.
5) Here you can change settings for Temperature and Schedule, so it fits your needs.

Step 8 – Select and install essential applications
There is a huge number of applications available for Linux for a multitude of use cases, such as drawing, writing, office applications, photo management and editing, administration, video editing, 3d modeling and animation, chatting, and so on. Not every application that you used under Windows will also be available for Linux, but there are many Linux alternatives to be found for the Windows applications that you know. In addition, more and more applications are made available via the web browser, so it does not matter which operating system you use, as long as you use a modern web browser and have an internet connection.
There are several ways to install applications under Zorin OS, but when you start out, the Zorin OS Software Center is really great and, from a functionality point of view, comparable with what macOS and Windows have to offer.
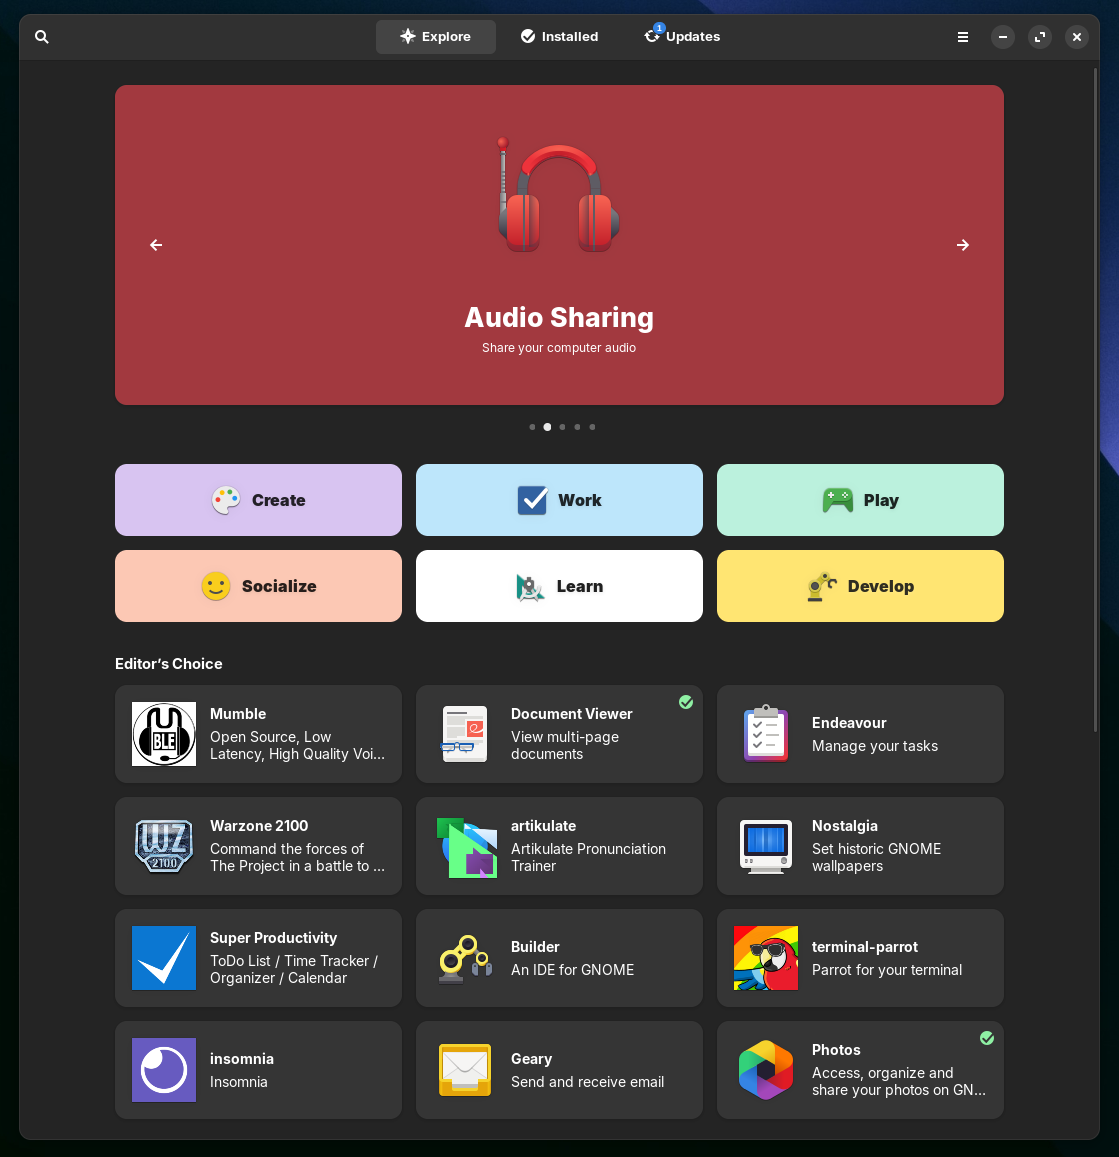
The Zorin OS Software Center is probably the most convenient software platform and offers the simplest way to search for, install, and remove software. If you are very visually oriented and you appreciate the way in which the Google Play Store or the Apple App Store works, you will also appreciate the software center. The software center shows you by means of different categories, such as Accessories, Games, Graphics, Office, Programming, and Sound and Video, which applications are available in the repository. It gives a short description and screenshots of each application, it shows how popular an application is, and gives user reviews if available.
There are also online App Stores available for Linux. The most popular one is Flathub. The Zorin OS Software Center is connected to Flathub, so you can find a lot of apps in both environments. But the Zorin OS Software Center also supports other app package formats, so it offers even more applications than Flathub.
For a great first overview of applications to consider and to try out, I want to point you to my yearly review articles. Have a look at the article below to see my personal selection of 53 favorite apps for Linux.
A yearly review – My 53 favorite apps for Linux
Here you can find a great selection of apps in categories like productivity, creativity, file management, system optimization, backup, internet and communication, tools, and software development.
Step 9 – Stay informed about new features and backgrounds via Linux resources
I recommend that you stay up to date with developments in the Linux world from now on. Follow some news websites focused on Linux, try to delve deeper into Linux-related developments and backgrounds, and read the monthly Zorin OS blog posts with the implemented and upcoming changes. It will help you to get and build a better understanding of Linux and give you a more confident feeling as a Linux user.
Here are some websites:
- RealLinuxUser.com (of course 😉)
- blog.linuxmint.com
- www.omgubuntu.co.uk
- https://itsfoss.com/
- https://askubuntu.com
- www.noobslab.com
- www.ubuntupit.com
Step 10 – Start using your new operating system
Perhaps an open door, but an important point nonetheless. Don’t get stuck playing with and trying out your new Zorin OS machine for too long, but focus on actually using your nice new Zorin OS system productively. I understand the need to just play and tinker with your new system, but the whole idea is to use our system for content creation and content consumption. So, start using your Linux system productively to create beautiful, important, or world-changing stuff, consume content, manage your administration, keep track of your mail, browse the web, you name it. Whatever you want to do, I guarantee Zorin OS will make it possible for you, and you will enjoy it.
Final words
And so we reached the end of my “Windows 10 is ending – How to switch from Windows 10 to Zorin OS in 10 easy steps” article. I hope this article gives you enough confidence to try out and even install Zorin OS on your soon-to-be-outdated Windows system, and bring your hardware back into the modern world. If you like to have a bigger body of background and helpful tutorials, then consider my 360-page book “Linux for the rest of us – A starter guide for people who just want to be productive with Linux”.
Linux and everything around it is a fantastic hobby for me, and I notice that others get excited when I talk with them about the possibilities of Linux. I really believe that Linux can be a productive, simple, beautiful, and user-friendly platform, and the old image of being too technical, too complex, and not user-friendly has long been gone. To end this article, I wish you fun trying out and using your new Linux system, and hopefully, you will keep an eye on my website.
Have a look at my latest book on Linux, in Paperback or Kindle format.
For more info on my book click here.
When you want to buy the book click on the image below.

If you appreciate what I do on this website…,