In this new article in my AppFlowy Basics tutorial series, I will explain how to build a complete book reading tracker in AppFlowy. There is a huge number of book reading enthousiasts among us and many like to track their reading progress and history. There are many out-of-the-box book trackers available, like StoryGraph, Goodreads, Bookmory and Hardcover, but if you don’t mind missing the social part of these apps, I think it is nice to build your own private personalized book tracking solution. So, in this article, I will explain how to create a full book reading tracker in AppFlowy, with an author database, a reading database, a two-way relation between them, and different views on the underlying data.
Content of the article
- Introduction
- Requirements for our book reading tracker
- Setting up the top level environment
- Creating the Author Database
- Creating the Reading Database
- Linking the Author Database and Book Database
- Creating the Reading Hub
- Enhancing the tracker with additional features
- Final words
Introduction
I really enjoy reading books, both fiction and non-fiction, for leisure and for professional purposes. Over the last couple of years I have tried different solutions to keep track of the reading status and reading history of my books, like StoryGraph, Goodreads, and most recently Hardcover. Although these apps are great, I also like to think about my own custom solutions. And here a tool like AppFlowy can bring a great platform for us as DIYers, as it offers a lot of building blocks to create your own productivity solutions. With AppFlowy you decide how your data is organized and how it can be used. In this article I will explain how to use some of these building blocks to create a nice book reading tracker from scratch. The idea is to end up with a simple, pleasant, and fully customizable system that grows with your reading habits.
Before we start building a book reading tracker in AppFlowy, for some of you it is good to have some background on what AppFlowy is and why it is such a nice platform to build this kind of productivity and tracking solutions. In one of my previous articles, “AppFlowy is a good Notion alternative for Open Source and data privacy enthusiasts” I already gave a detailed introduction to what AppFlowy is and what it can do, so you can start from there. For even more information, you can also read my other AppFlowy related articles:
- AppFlowy Basics – An explanation of all available block types
- AppFlowy Basics – The importance of Normalization for your AppFlowy databases
- AppFlowy Basics – How to migrate a simple Notion structure to AppFlowy
- AppFlowy Basics – How to create a simple To Do list in AppFlowy
- AppFlowy Basics – How to Include Standard Operating Procedures in Your Task Management
So, let’s begin.
We will create two simple core databases: one for authors and one for your reading list. These will be linked so you can reuse the same author data when adding one or mutiple books by the same author. In the author database you can automatically see all the books you read for that specific author. Then we will create different views that give information on unread books, books in progress, and completed reads.
The end result will look something like this:
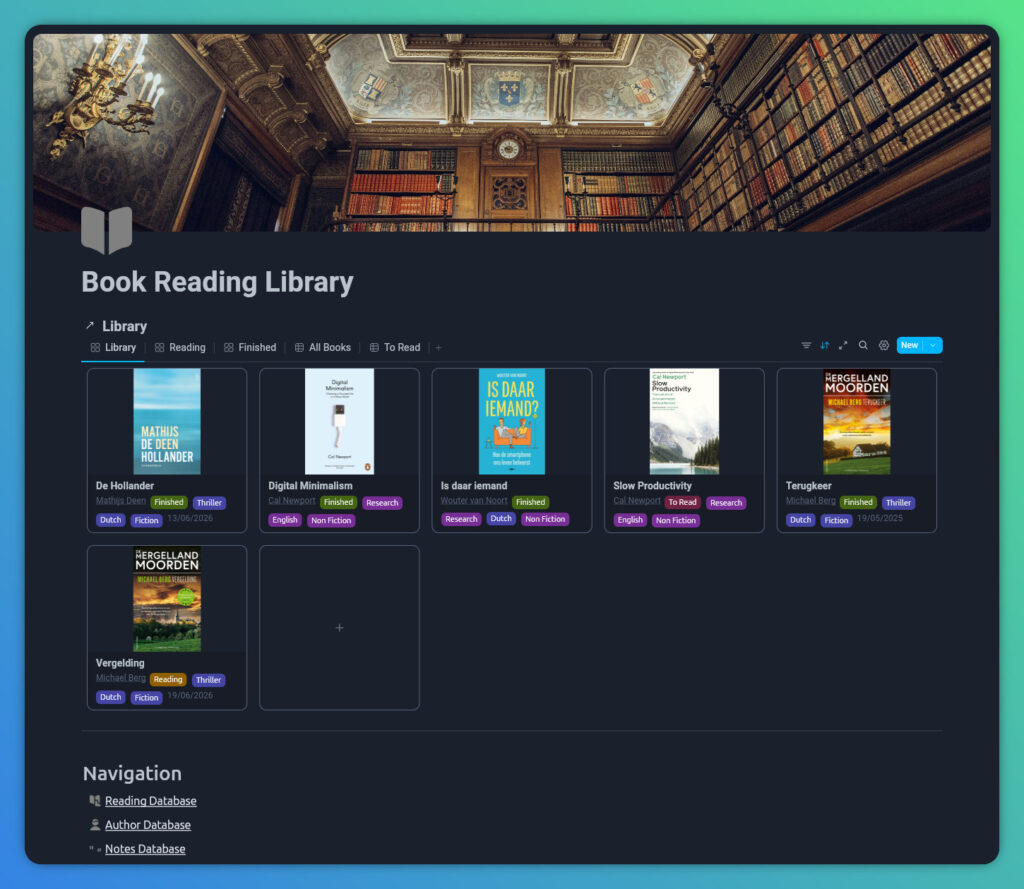
This is a practical walkthrough, not a theoretical explanation. We will start by defining our requirements, then build the Author and Reading databases, connect them, and create the views that make the system useful. Just follow the steps, implement them in your own AppFlowy installation, and afterwards you can tweak the whole thing to match your personal workflow.
Requirements for our book reading tracker
When you start building something in AppFlowy, it really pays off to think ahead. Before touching a single block or database, I like to map out exactly what the system needs to do. That is the IT Solution Designer in me: define the functional and technical requirements first, and construction becomes much more transferable and predictable.
At its core, a reading tracker should answer a few simple but essential questions: Which books do I want to read? What am I reading right now? What have I already finished? And just as important: who wrote these books? To achieve this, we will set up two main databases, one for authors and one for books, so we don’t have to retype the same author names over and over. And additionally, by linking these databases, AppFlowy can automatically show all books by a specific writer or help us filter our reading list in different ways. On top of that, I like to add a small notes database to store things like quotes and thoughts connected to each book.
We will also create a few filtered views so we can quickly switch between our To Read, Reading, and Finished lists. All of these views will simply be different filters on the same underlying data.
Below is the full breakdown of what our tracker needs.
The foundation
- A top level environment that holds all our components and functions as a landing page.
- A dedicated Author database to store writer information.
- A Reading database to track books and their status.
- A Quotes database to track quotes from the books.
- A relation between the Author database and the Reading database, so we can connect each book to its author.
- A relation between the Quote database and the Reading database, so we can connect each quote to its book.
- A relation between the Quote database and the Author database, so we can connect each quote to its author.
- Three filtered views: To Read, Reading, and Finished.
The attributes
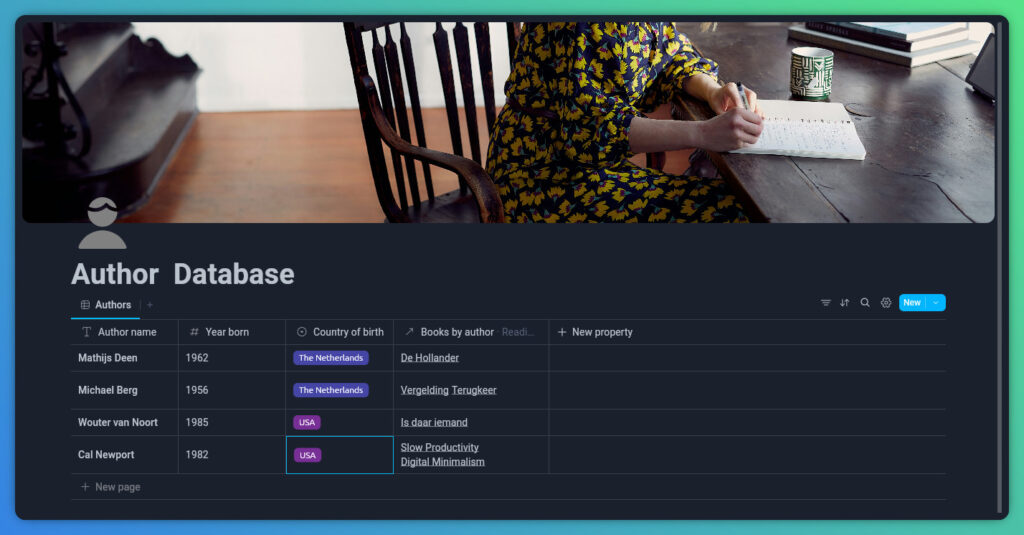
Author database
- Author name
- Books by author (relation with reading database)
- Year born
- Country of birth (select property that can hold different reusable values)
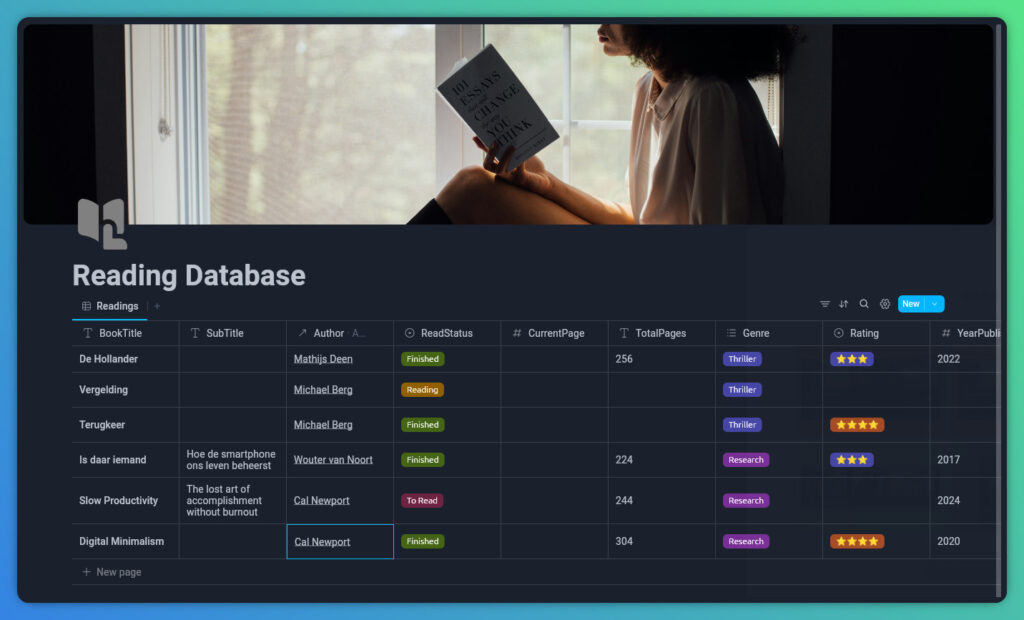
Reading database
- Book title
- Sub title
- Author (relation with author database)
- ReadStatus (select property that can hold different reusable values for To Read, Reading and Finished)
- CurrentPage
- TotalPages
- Genre (select property that can hold different reusable values)
- Rating (select property that can hold different reusable star ratings: 1, 2, 3, 4 and 5 stars)
- YearPublished
- DateLastread
- Language (select property that can hold different reusable values)
- Publisher
- Reference (for example ISBN number)
- Series
- Type (multi select property that can hold multiple different reusable values)
- Keywords (multi select property that can hold multiple different reusable values)
- BookCover (files and media property that can hold actual images or links to online images)
The User Interface
A Book Reading Library landing page, offering us:
- a visual gallery overview showing book covers and some basic information.
- navigation to swithch between the different views.
- quick navigation to the different databases.
Setting up the top level environment
Before we start building databases and views, it’s smart to create a clean top level environment that will hold everything our Book Reading Library needs. This page will also become the main landing area for the entire setup, your central reading hub.
Step 1: Create the main page
In the left navigation panel of AppFlowy, click New page. You can also click the plus icon at the top level and choose Document.
This gives us a blank canvas to build on.
Step 2: Give the page a proper name and icon
Hover over the new page in the left navigation area and click the three dots. Now:
- Choose Rename and set the title to Book Reading Library.
- Select Change icon → choose Icons → search for Book. Pick the book icon and select a color that fits your theme.
Step 3: Add a cover image
Now click your Book Reading Library page to open it.
Between the icon and the page title, hover your mouse until you see Add cover. Click it, then choose Change cover → Unsplash. Now search for a nice library image.
This gives your landing page a bit of personality. It should look something like this:

Now it is time to create our databases.
Creating the Author Database
In my opinion, a solid database structure always starts with separating information that you willl reuse often (read my article AppFlowy Basics – The importance of Normalization for your AppFlowy databases for more background). Authors are a perfect example: most of us read multiple books by the same writer, so storing author details in their own database keeps everything clean and prevents duplicate entries.
Technically, you could skip a dedicated database and use a simple select field for author names, but you should do that only if you want to store the author name and no other author related details. But I prefer a more flexible setup. A proper author database lets you store extra details, like birth year or country, and it also enables a two‑way relation so you can instantly see which books you have read from each writer. It keeps your system tidy and makes filtering and exploring your reading habits much easier.
Once this database exists, we will link it to the Reading database so every book can be connected to the correct author with a single click.
Let’s build it.
Step 1: Create the Database
- In the left navigation panel, hover over Book Reading Library.
- Click the plus icon and choose Grid to create a new database.
This gives us a clean starting point.
Step 2: Name and Style the Database
Open the new database and do the following:
- Rename New Database to Author Database
- Rename Grid to Authors
- Add a cover image by hovering above the page title. Choose Add cover, then Change cover, and select Unsplash. Now search for an author‑themed image
- Now add an icon. Hover again. Choose Add icon, select Icons, search for Person and pick a color you like
Step 3: Create the Required Attributes
Now we will set up the fields that are part of this database.
Start by removing the default Type and Done columns. Keep the Name column.
Then create the following properties:
- Author Name: rename the existing Name column.
- Year born: create a Number property (Note: AppFlowy’s date picker currently doesn’t support years before 1971, so a number field works best for now).
- Country of birth: create a Select property with reusable values.
Now we have something like this:
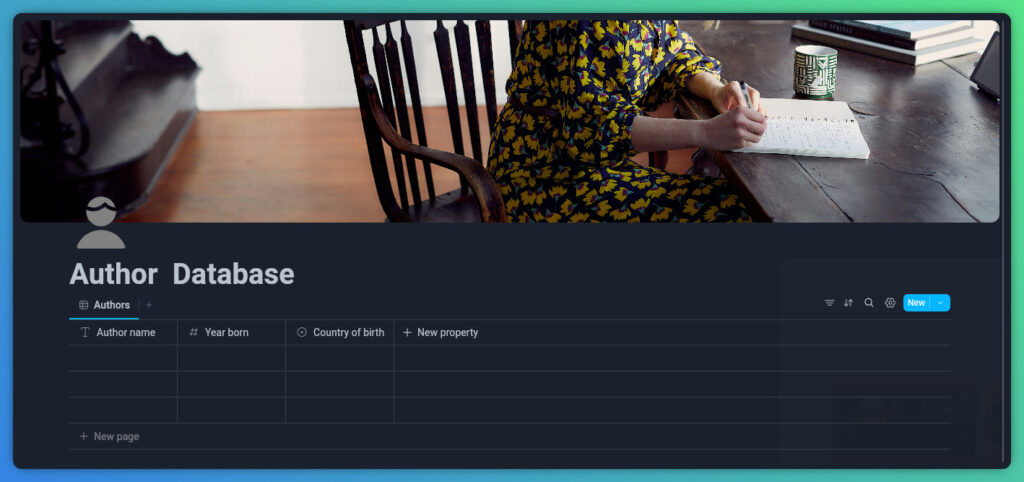
We will not fill in any author data yet. First, we willl build the Reading database so we can link both systems together.
Creating the Reading Database
With the Author Database in place and the experience of creating it, the next steps become much easier. In this section, we will create the Reading Database. We will not connect the Reading database and the Author Database yet. That will be done in the next session.
Step 1: Create the Database
- In the left navigation panel, hover over Book Reading Library.
- Click the plus icon and choose Grid to create a new database.
This gives us a clean starting point.
Step 2: Name and Style the Database
Open the new database and do the following:
- Rename New Database to Reading Database
- Rename Grid to Readings
- Add a cover image by hovering above the page title. Choose Add cover, then Change cover, and select Unsplash. Now search for an author‑themed image
- Now add an icon. Hover again. Choose Add icon, select Icons, search for Person and pick a color you like
Step 3: Create the Required Attributes
Now we willl set up the fields that are part of this database.
Start by removing the default Type and Done columns. Keep the Name column.
Then create the following properties:
- BookTitle: rename the existing Name column.
- SubTitle: create a Text property.
- ReadStatus: create a select property that can hold different reusable values for To Read, Reading and Finished).
- CurrentPage: create a Numbers property.
- TotalPages: create a Numbers property.
- Genre: create a Multiselect property that can hold different reusable values.
- Rating: create a select property that can hold different reusable star ratings: 1, 2, 3, 4 and 5 stars. Use the ⭐ symbol to create the different star ratings.
- YearPublished: create a Numbers property.
- DateLastread: create a Date property and choose your preferred date format.
- Language: create a select property that can hold different reusable values.
- Publisher: create a Text property.
- Reference: create a Text property.
- Series: create a Text property.
- Type: create a Multiselect property that can hold multiple different reusable values.
- Keywords: create a Multiselect property that can hold multiple different reusable values.
- BookCover: create a Files & media property that can hold actual images or links to online images.
We will not fill in any reading data yet. First, we willl build the relation between the Reading Database and the Author Database.
Linking the Author Database and Book Database
Relations in AppFlowy work in a simple one‑to‑many layout, in which one author can be linked to multiple books, while each book usually points back to a single main author. When you pick an author inside the Reading database, AppFlowy automatically creates the reverse link to the Author Database. Open an author entry, and you will immediately see every book connected to them.
This automatic back‑linking is one of AppFlowy’s most powerful strengths. Your data stays connected without any manual syncing or extra maintenance. Whether you are browsing or managing your authors or your books, the relationship stays consistent and up to date.
Now that the Author Database and Reading Database are set up, it is time to link them. Once the relation is in place, every new book you add can be assigned to the correct author instantly. Even better: if the author does not exist yet, you can create them on the fly just by typing their name directly in the Reading Database.
Step 1: Create the Relation
Go to the Reading Database. In the Reading Database create a new property based on the following settings:
- Type: Relation
- Name: Author
- Related to: Author Database
- Limit: No limit
- Two-way relation: True
- Property name in related database: Books by author (this will be the property name automatically created based on the relation in the Author Database)
Now move the new Author property next to SubTitle for a better structure. Also check your Author database to see that there also a new Books by author property has been added.
Once this is set, adding a book becomes much easier. You can select an existing author from a dropdown instead of typing names manually. And if the author is not in the system yet, just type the name and AppFlowy will automatically create the new author entry in the Author Database.
Now add some books to the Reading Database. Here some tips:
- ReadStatus: create values for To Read, Reading and Finished.
- Genre: create values like Thriller, Research, etc.
- Rating: create 5 different star ratings for 1, 2, 3, 4 and 5 stars by using the ⭐ symbol.
- Type: create values like Fiction and Non Fiction.
- BookCover: search on the internet the cover of your book, copy the link and add it to the BookCover property via Embed link.
After adding some books, my Reading Database looks like this:
And my Author Database looks like this:
Creating the Reading Hub
Now that we have our main databases, it is time to continue with our central reading hub for which we have already created an empty main page in the “Setting up the top level environment” section with the name ” Book Reading Libray”. This page will hold different views on top of our reading data and some quick navigation to our databases.
Building the core library view
First we will create the Library view, which will show a nice gallery of all our books with the cover of each book, the title, the author, the status, etc.
Step 1: Create the Library gallery
- In the Book Reading Library page type ‘/’ and then choose ‘Linked view of Gallery’.
- Choose your Reading Database.
- Rename the link View of Reading Database into Library. The gallery name View of Reading Database automatically changes in Library as well.
Now your Library page should look like this:
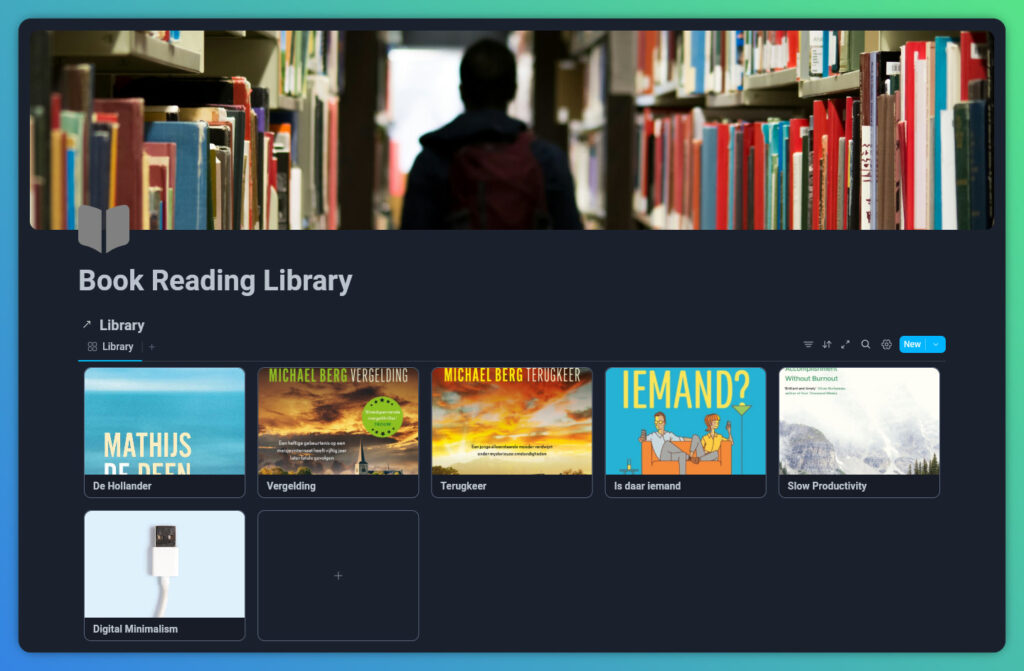
Step 2: Improve the Library gallery
It is nice to add some attributes to each gallery tile, to show things like the title, author, etc.
- Click on the gear icon at the left side of the New button and select Properties.
- Based on your preferences activate the Show icon (eye) for the properties you like to see in each tile.
- Based on your preferences, reorder the properties in the same list.
In my situation I selected and reordered like below:
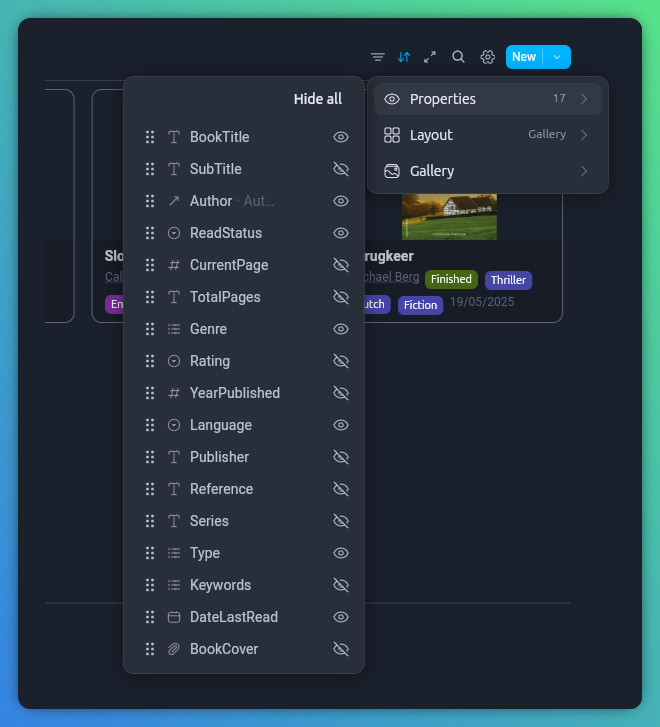
Let’s also show the complete cover instead of only a part of it.
- Click on the gear icon at the left side of the New button and select Gallery.
- Now set the Fit image switch to true.
Now the tiles in my gallery view look like this:
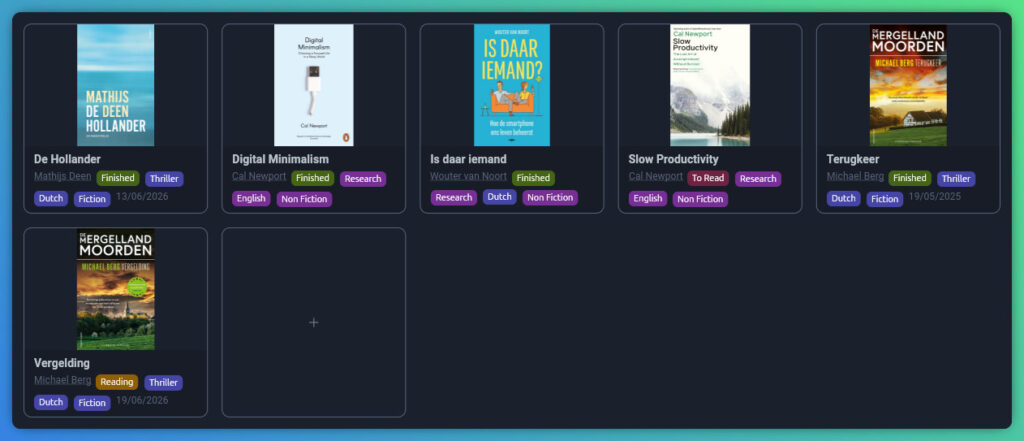
Building the status views
Now that both databases are set up and connected, you have a solid structure to work with. From here, you can create different views that help you focus on exactly the books you want to track, without touching the underlying data.
In the following parts, we willl build three essential views: To Read, In Progress, and Finished. Each one is simply a filtered slice of your Reading database.
Step 1: Create the To Read view
- In our Library view, which already is a linked view on the Reading Database, click on the plus symbol to add a new view on the same data.
- You can choose whichever layout feels most natural. A Grid view works well if you like structure, but a list or gallery view can make the results feel more visual. Let’s choose New Grid.
- Now rename Grid into To Read.
- Click on the Filter icon (the 3 lined icon in the set of icons next to the blue New button) and select ReadStatus. It turns blue now.
- Now you see above the BookTitle column ReadStatus is. Click on it and select To Read.
Now you have a filtered view with only your books with To Read status.
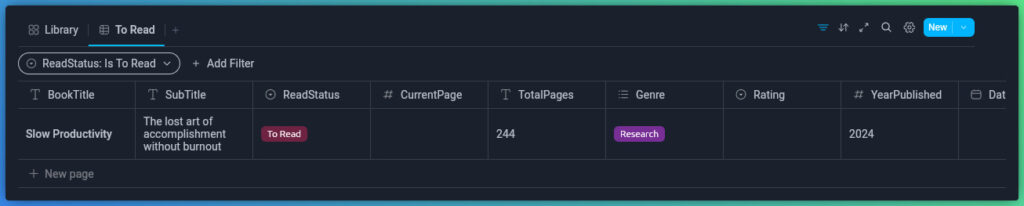
Step 2: Create the In Progress, and Finished views
Here, I will not go through the same steps again. Just follow the same steps from the previous section, in which we created the To Read view, to create the In Progress and Finished views. You can decide here to use another layout, like List or Gallery.
Step 3: Add quick links to your databases
When you have set up your Book Reading Library, it is nice to have quick access to your underlying databases right from the main screen. You can always use the navigation panel on the left to do the same, but adding a few shortcuts on our main screen makes the whole setup feel more polished and efficient.
- Under your gallery type ‘/’ and select Divider.
- Below type ‘/’ and select Heading 1. Change the name in Navigation.
- Below type ‘/’ and select Link to Page.
- Select Reading Database.
- Do the same for Auhor Database.
With these quick links and the four views you created earlier, your Book Reading Library becomes a helpful reading companion. Instead of scrolling through one long list, you can jump straight to the view that shows exactly the status that you are interested in. And because everything is based on the same underlying data, your setup stays consistent, and easy to maintain.
Enhancing the tracker with additional features
Now that the core of your book reading tracker is in place, you have the flexibility to gradually extend your application with extra functionality and enhancements that make the tracker even more your own. Think of new options like a Genre counter view based on the Rollup function that counts the number of books you read for each type of Genre. Or what about an extra linked database to keep notes and favorite quotes. And of course you can add functionality to write per finished book your review. It is up to you what to do with the basic set up we created together in this article.
Final words
A reading tracker in AppFlowy offers the best of both worlds, because it enables you to create the structure you need to stay organized and gives the flexibility to shape the system exactly the way you want. You stay organized, but you also keep full control over how your system evolves. Because AppFlowy is open‑source and privacy‑friendly, your reading life, or any other workflow you build, stays completely yours. And with simple building blocks like databases, relations, and views, you can shape your setup exactly the way you want, now and in the future.
The foundation we built together is yours to extend. Just add new views, refine your databases, or expand the whole thing into a broader personal knowledge system. If you have ideas for other AppFlowy‑based solutions you like to see me work out in the same style, just reach out and share your ideas. I am always happy to explore and work out new concepts.
Have a look at my latest book on Linux, in Paperback or Kindle format.
For more info on my book click here.
When you want to buy the book click on the image below.
If you appreciate what I do on this website…,